*this post is brought to you in partnership with PaintCare.
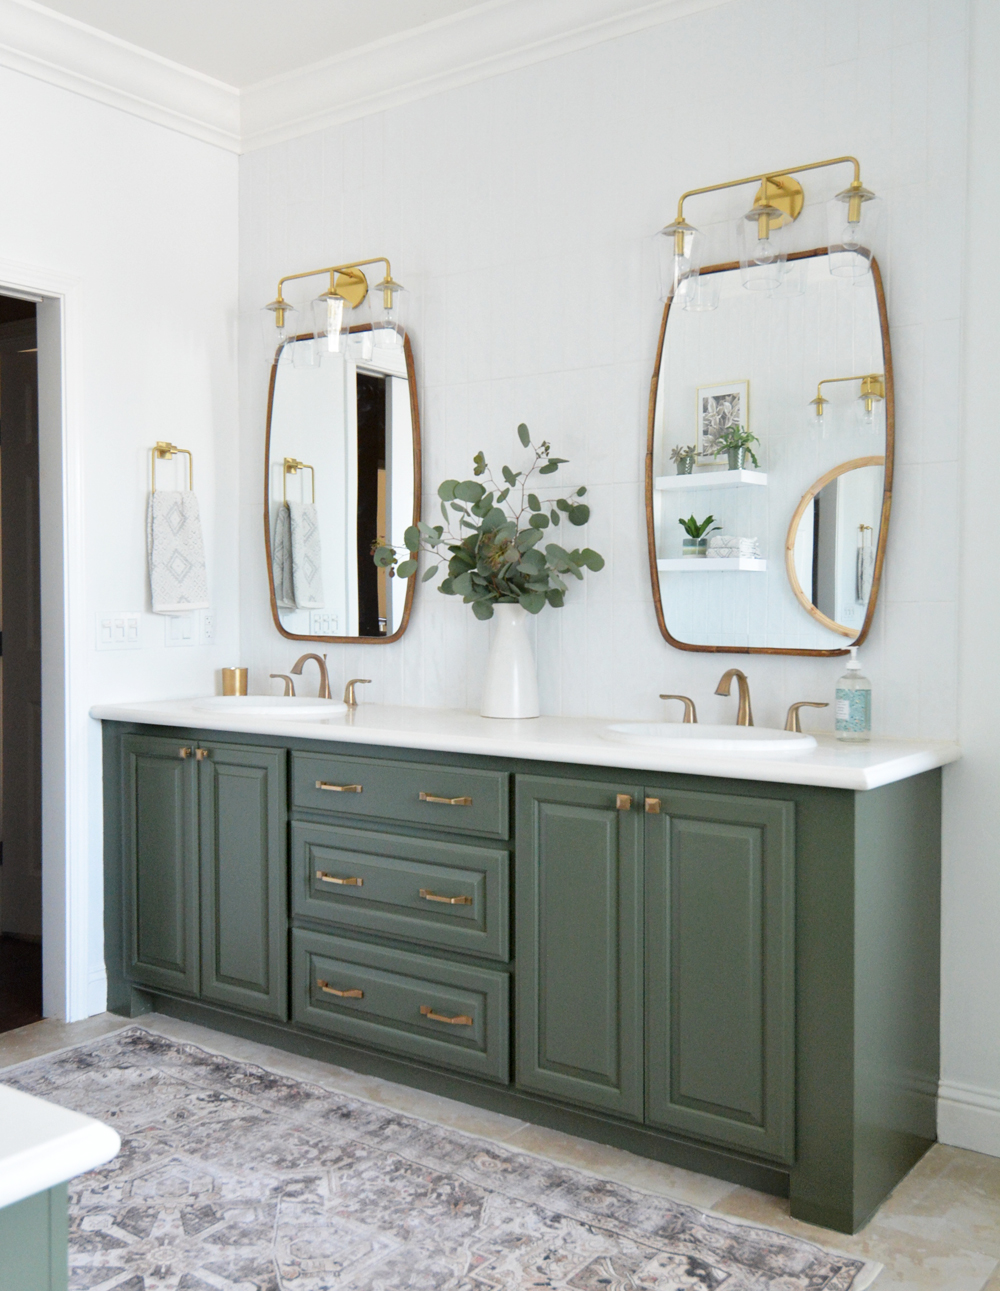
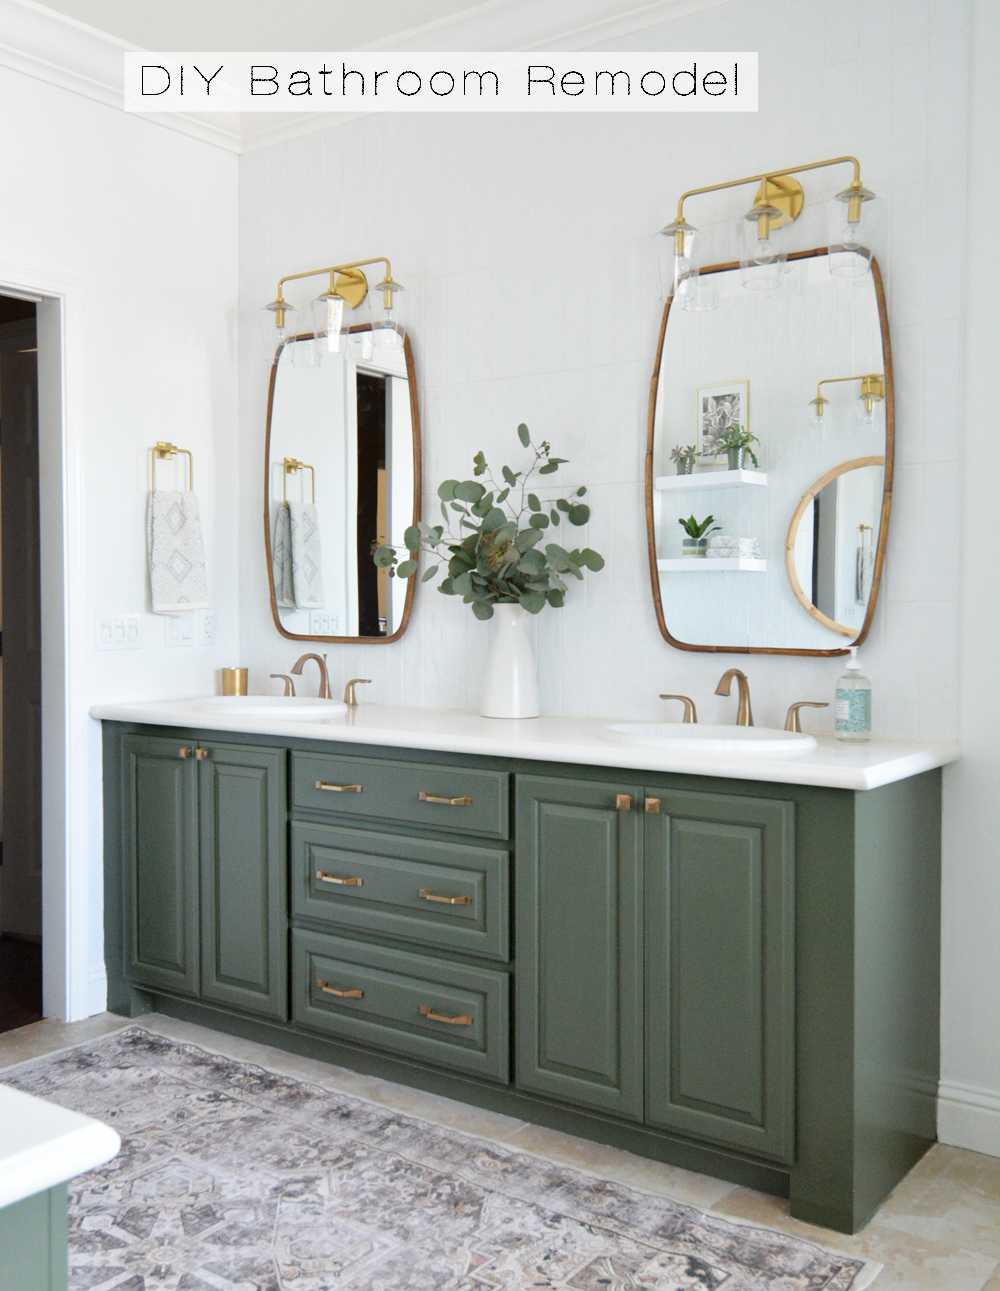
It’s been a few years that I’ve wanted to give this bathroom a refresh but finally got around to completing phase one! I started with a design plan two weeks ago, ordered all the materials and fixtures, then installed them all last week. I decided to break up this remodel into three phases, first tackling the vanities, then the flooring and bathtub, and finally the walk in shower. It was too expensive and inconvenient to lose use of the bathroom, so I’ll be redoing the rest of this space later this year.
I’ve linked to all the sources below including the paint color I used on the cabinets. Take a look at the dramatic difference made in just a week!
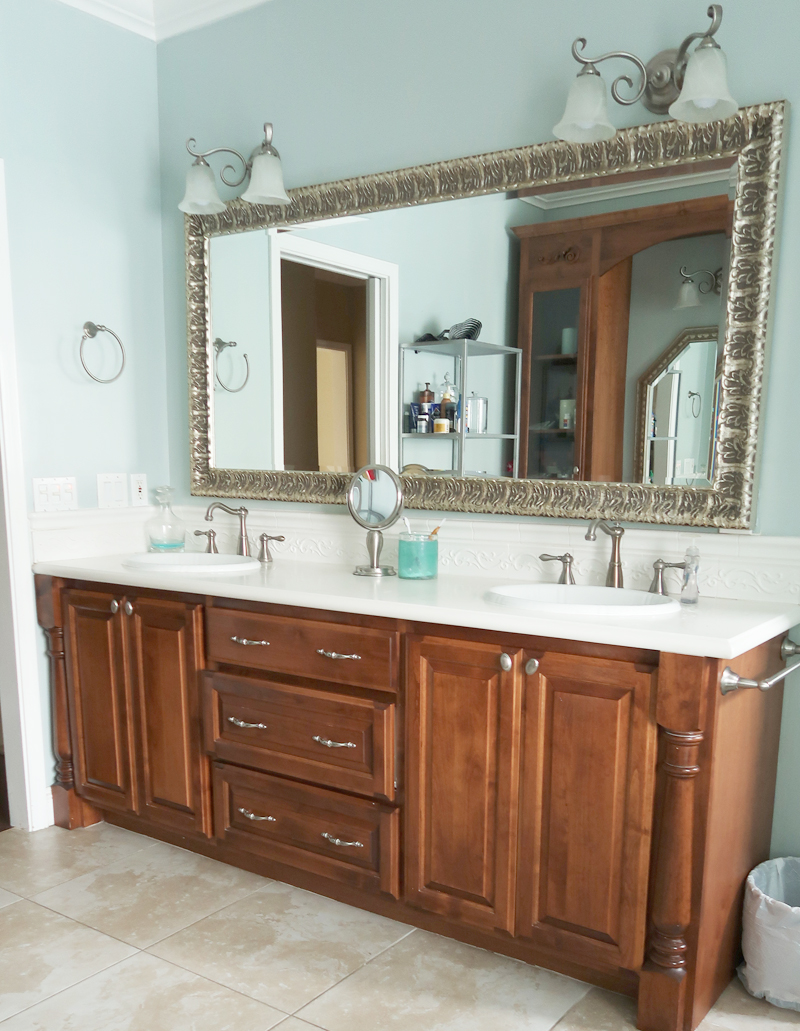
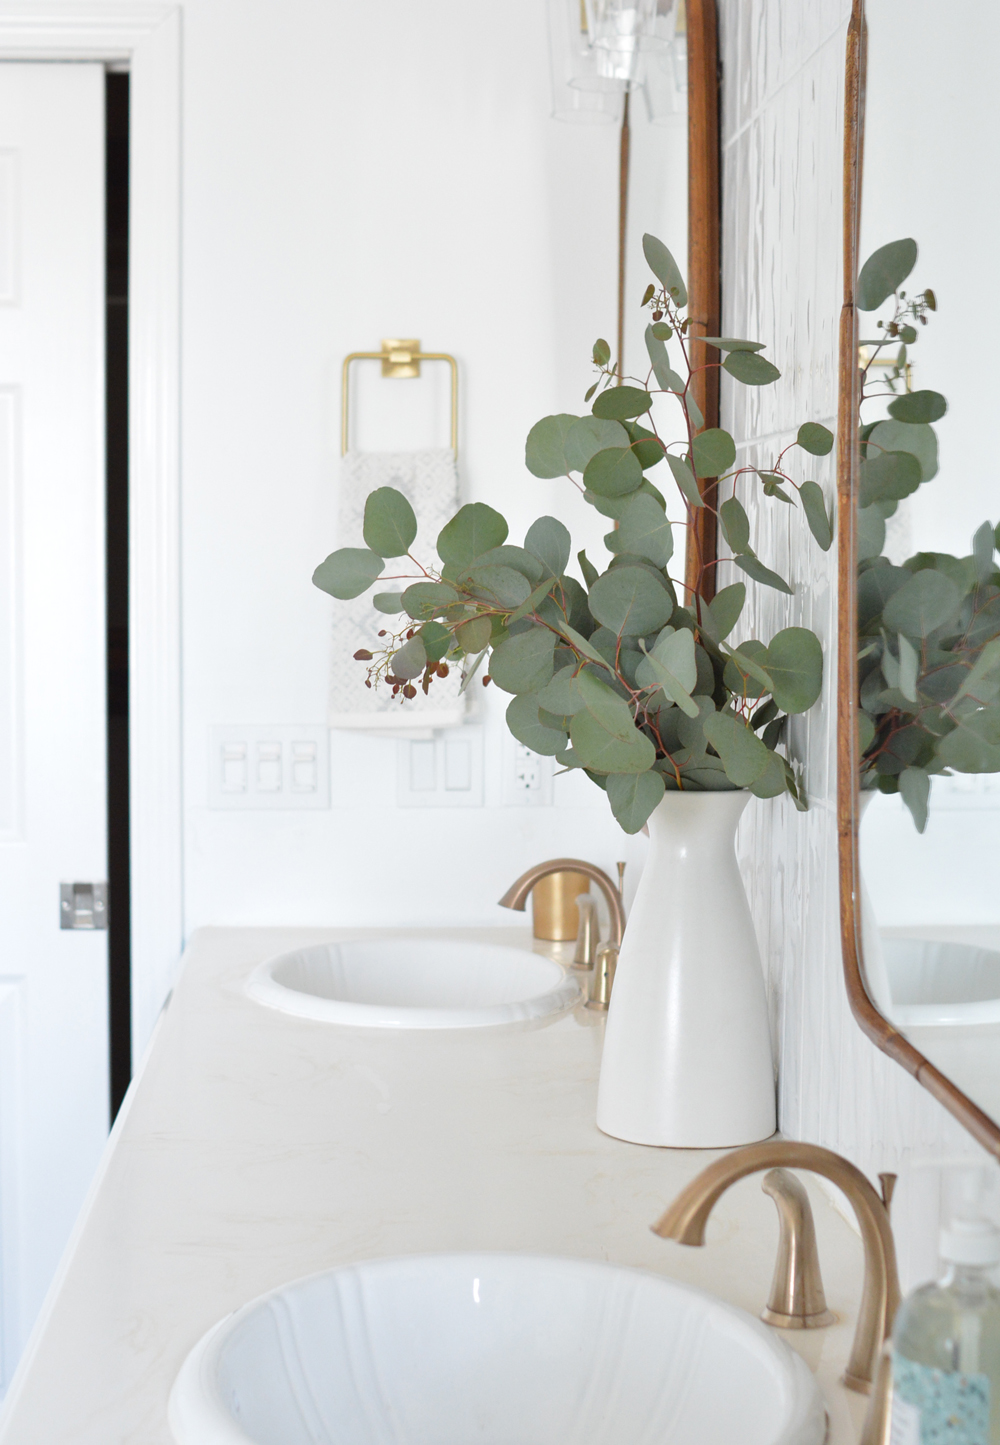
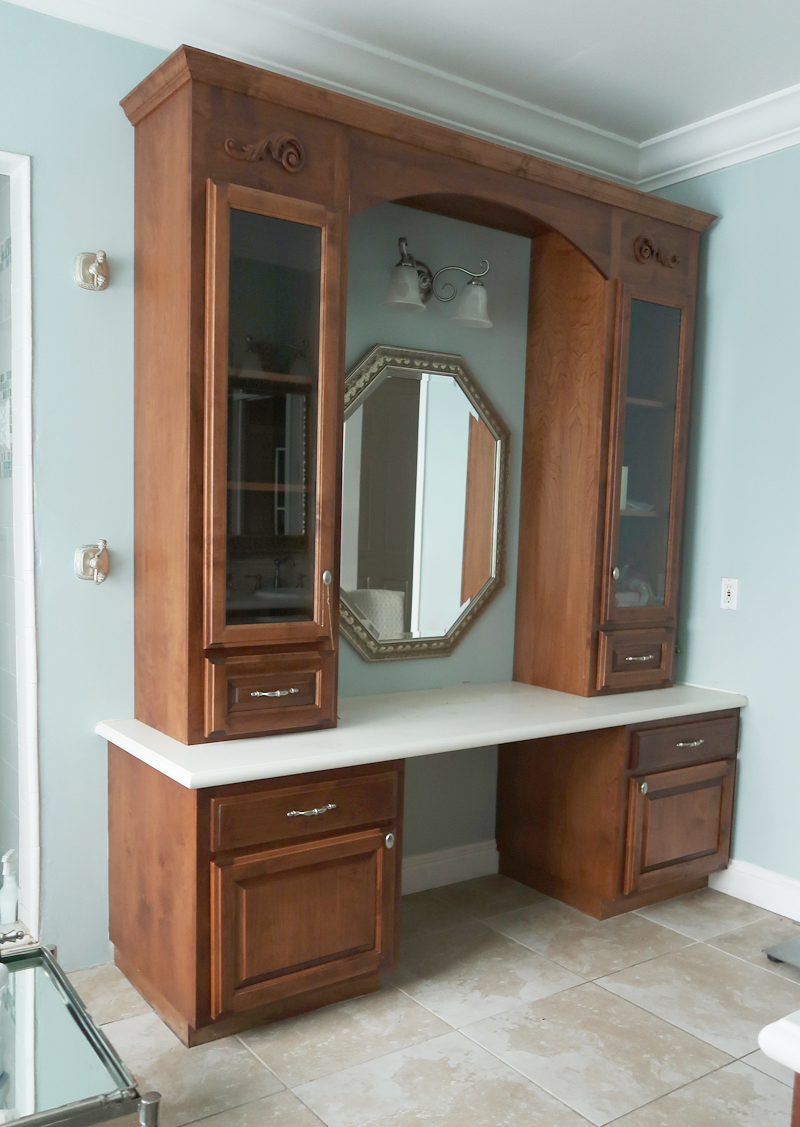
Here’s a peek at what the right side sink vanities looked like before the changes. Swapping out the faucets, light fixtures, mirrors, and cabinet hardware made a huge difference!.
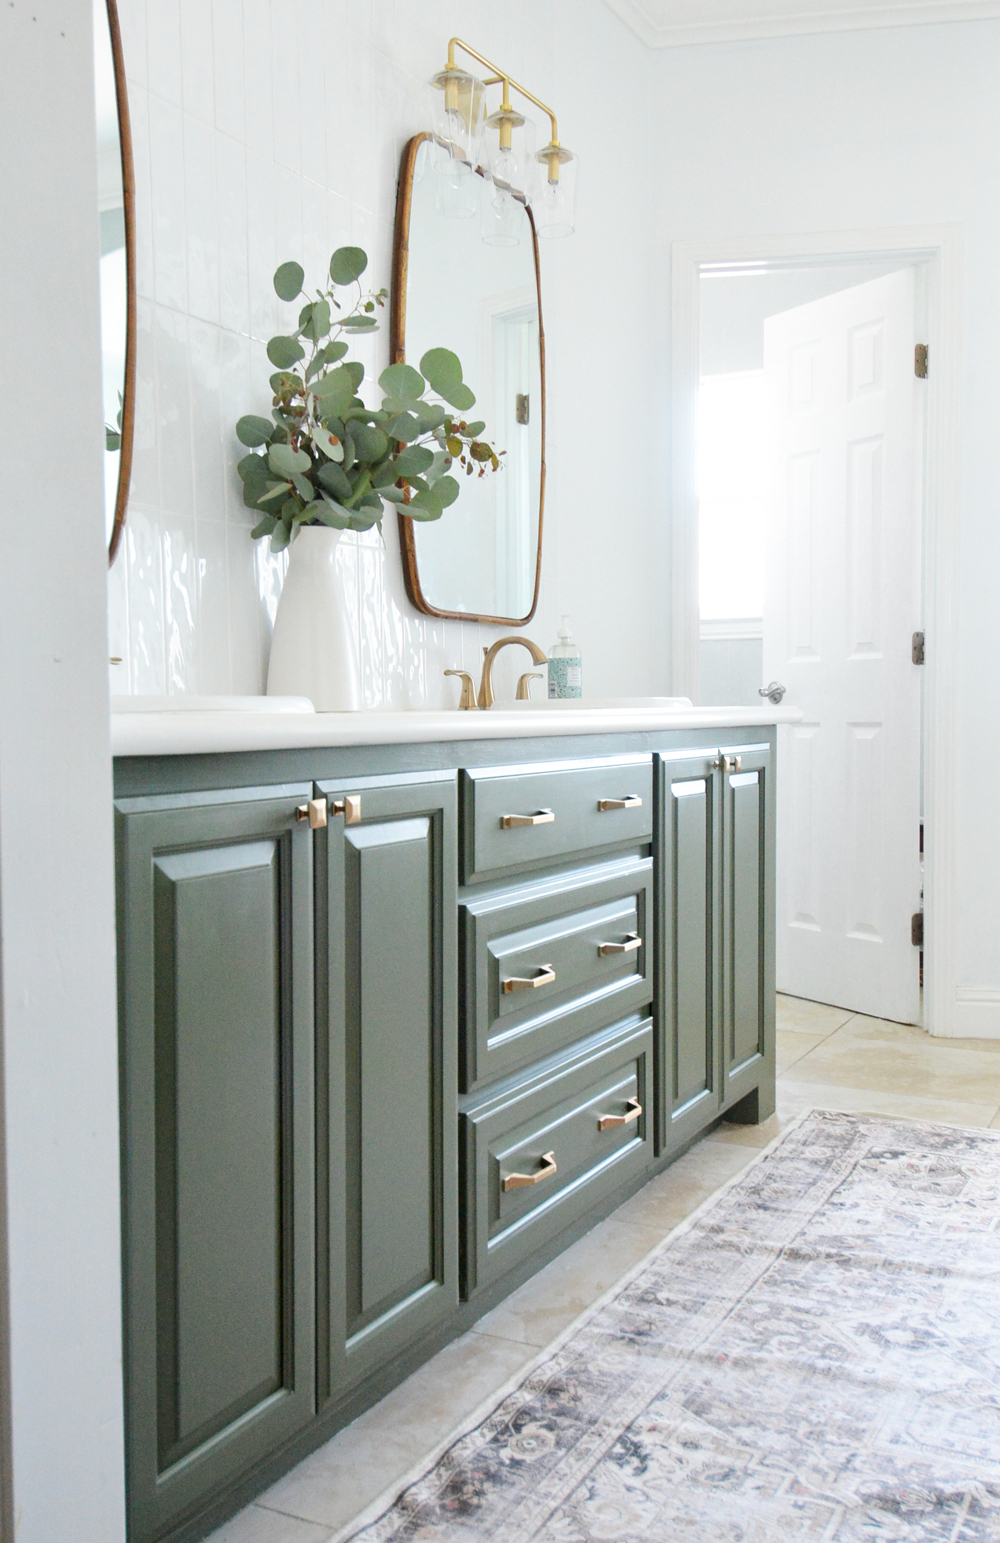
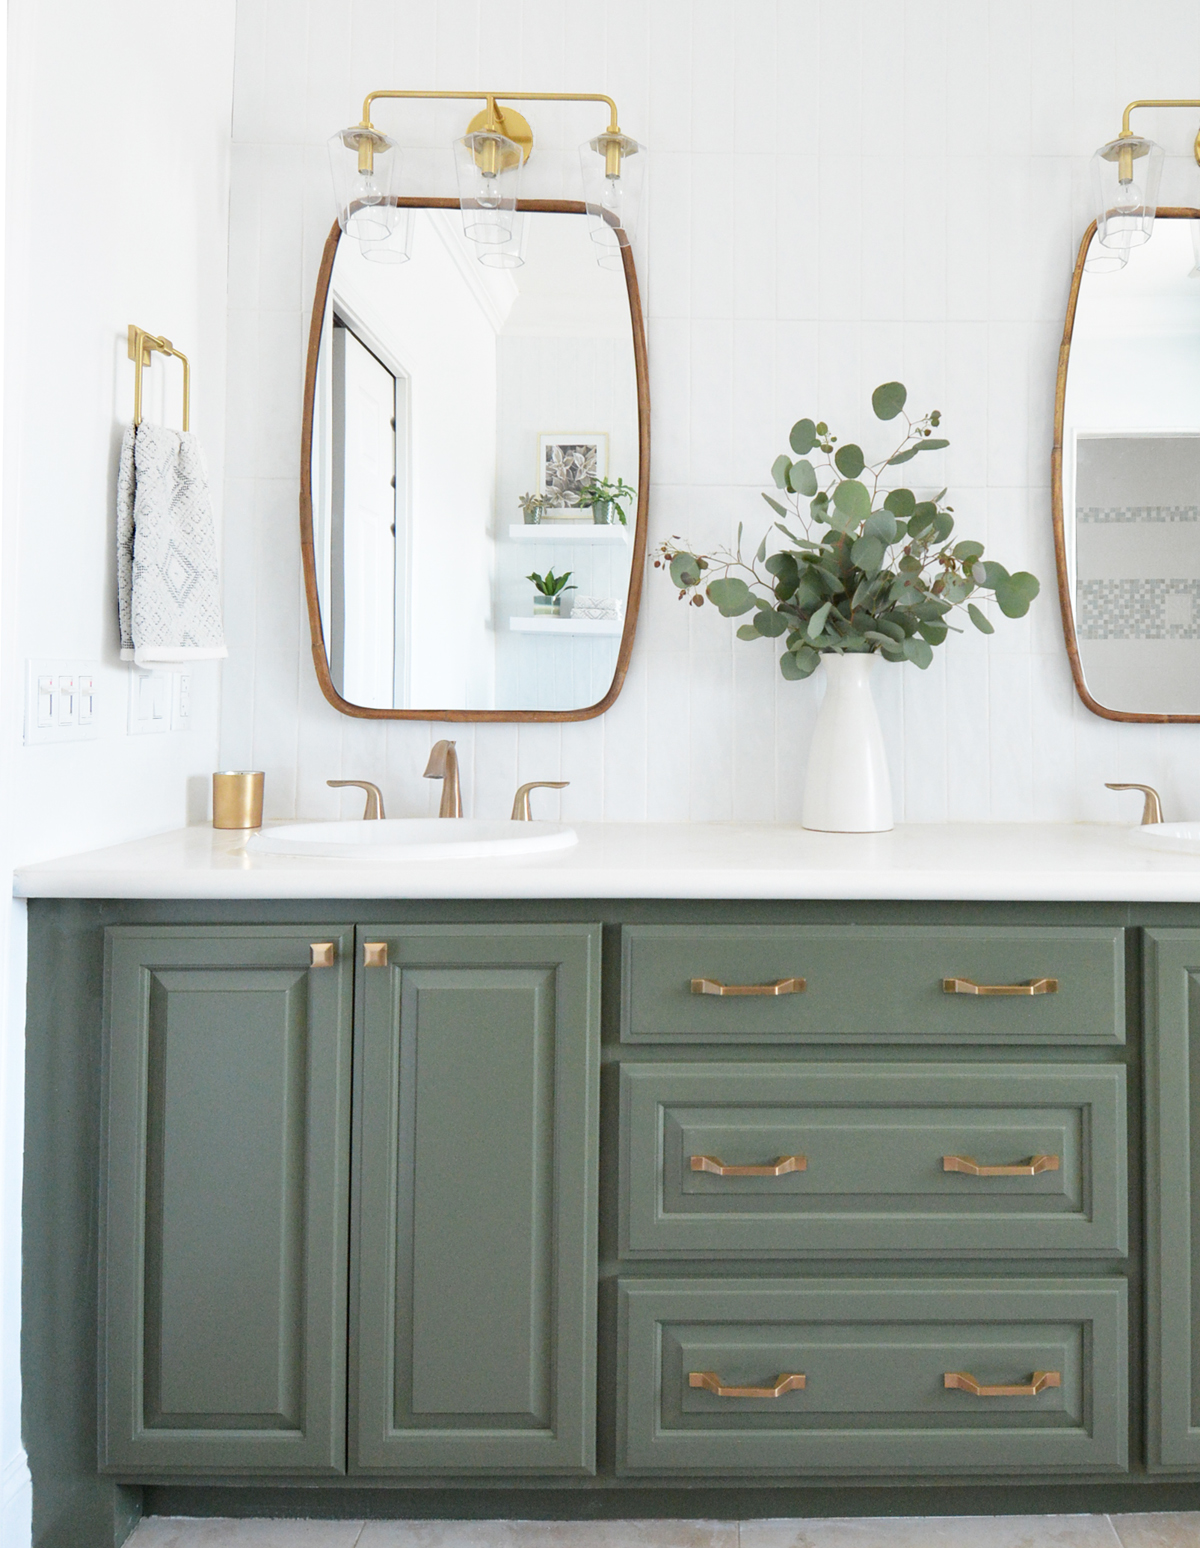
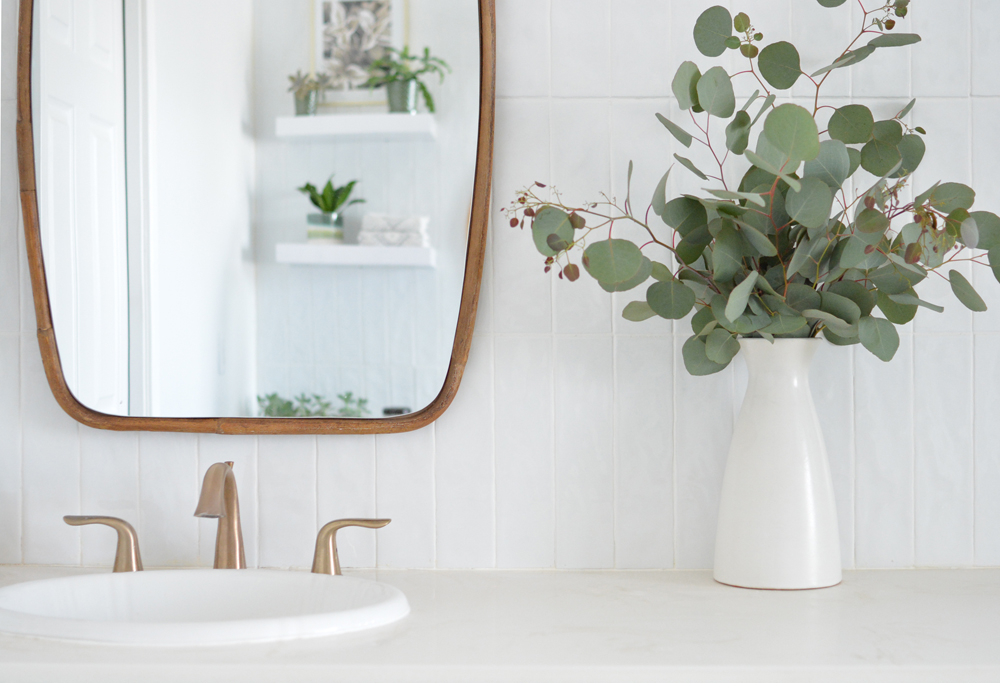
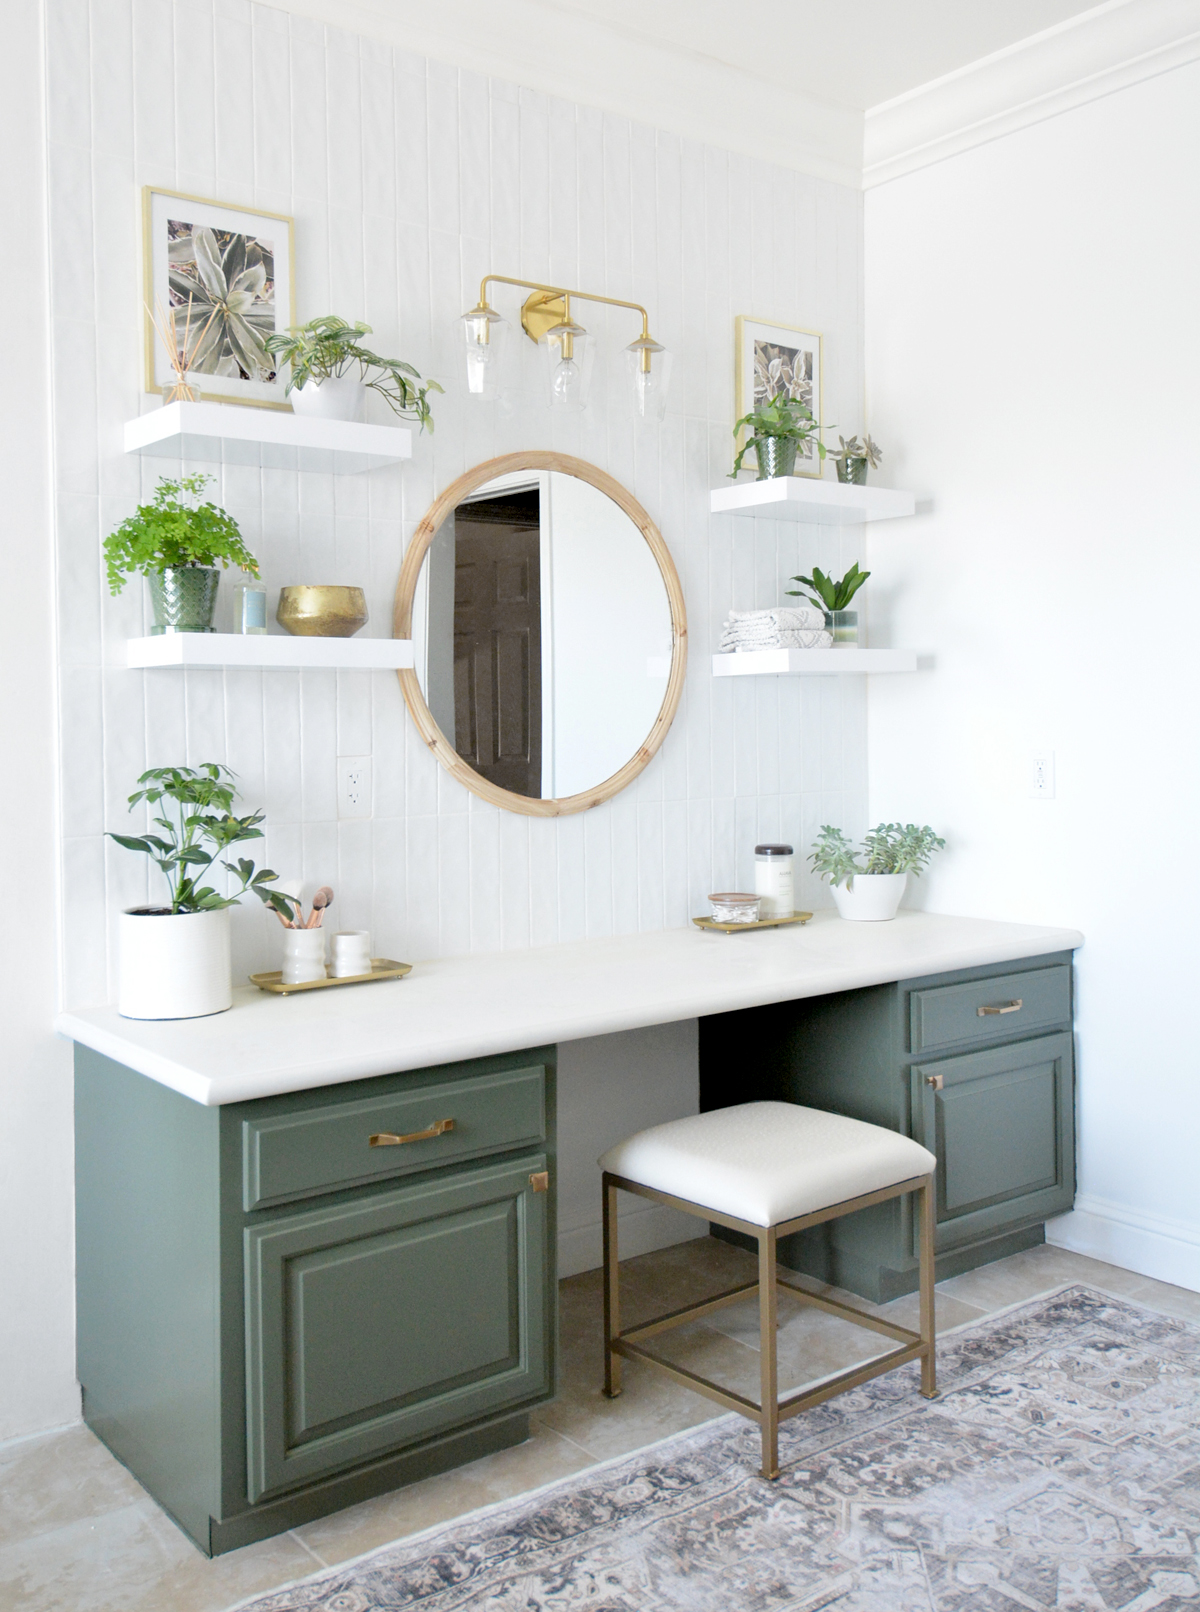
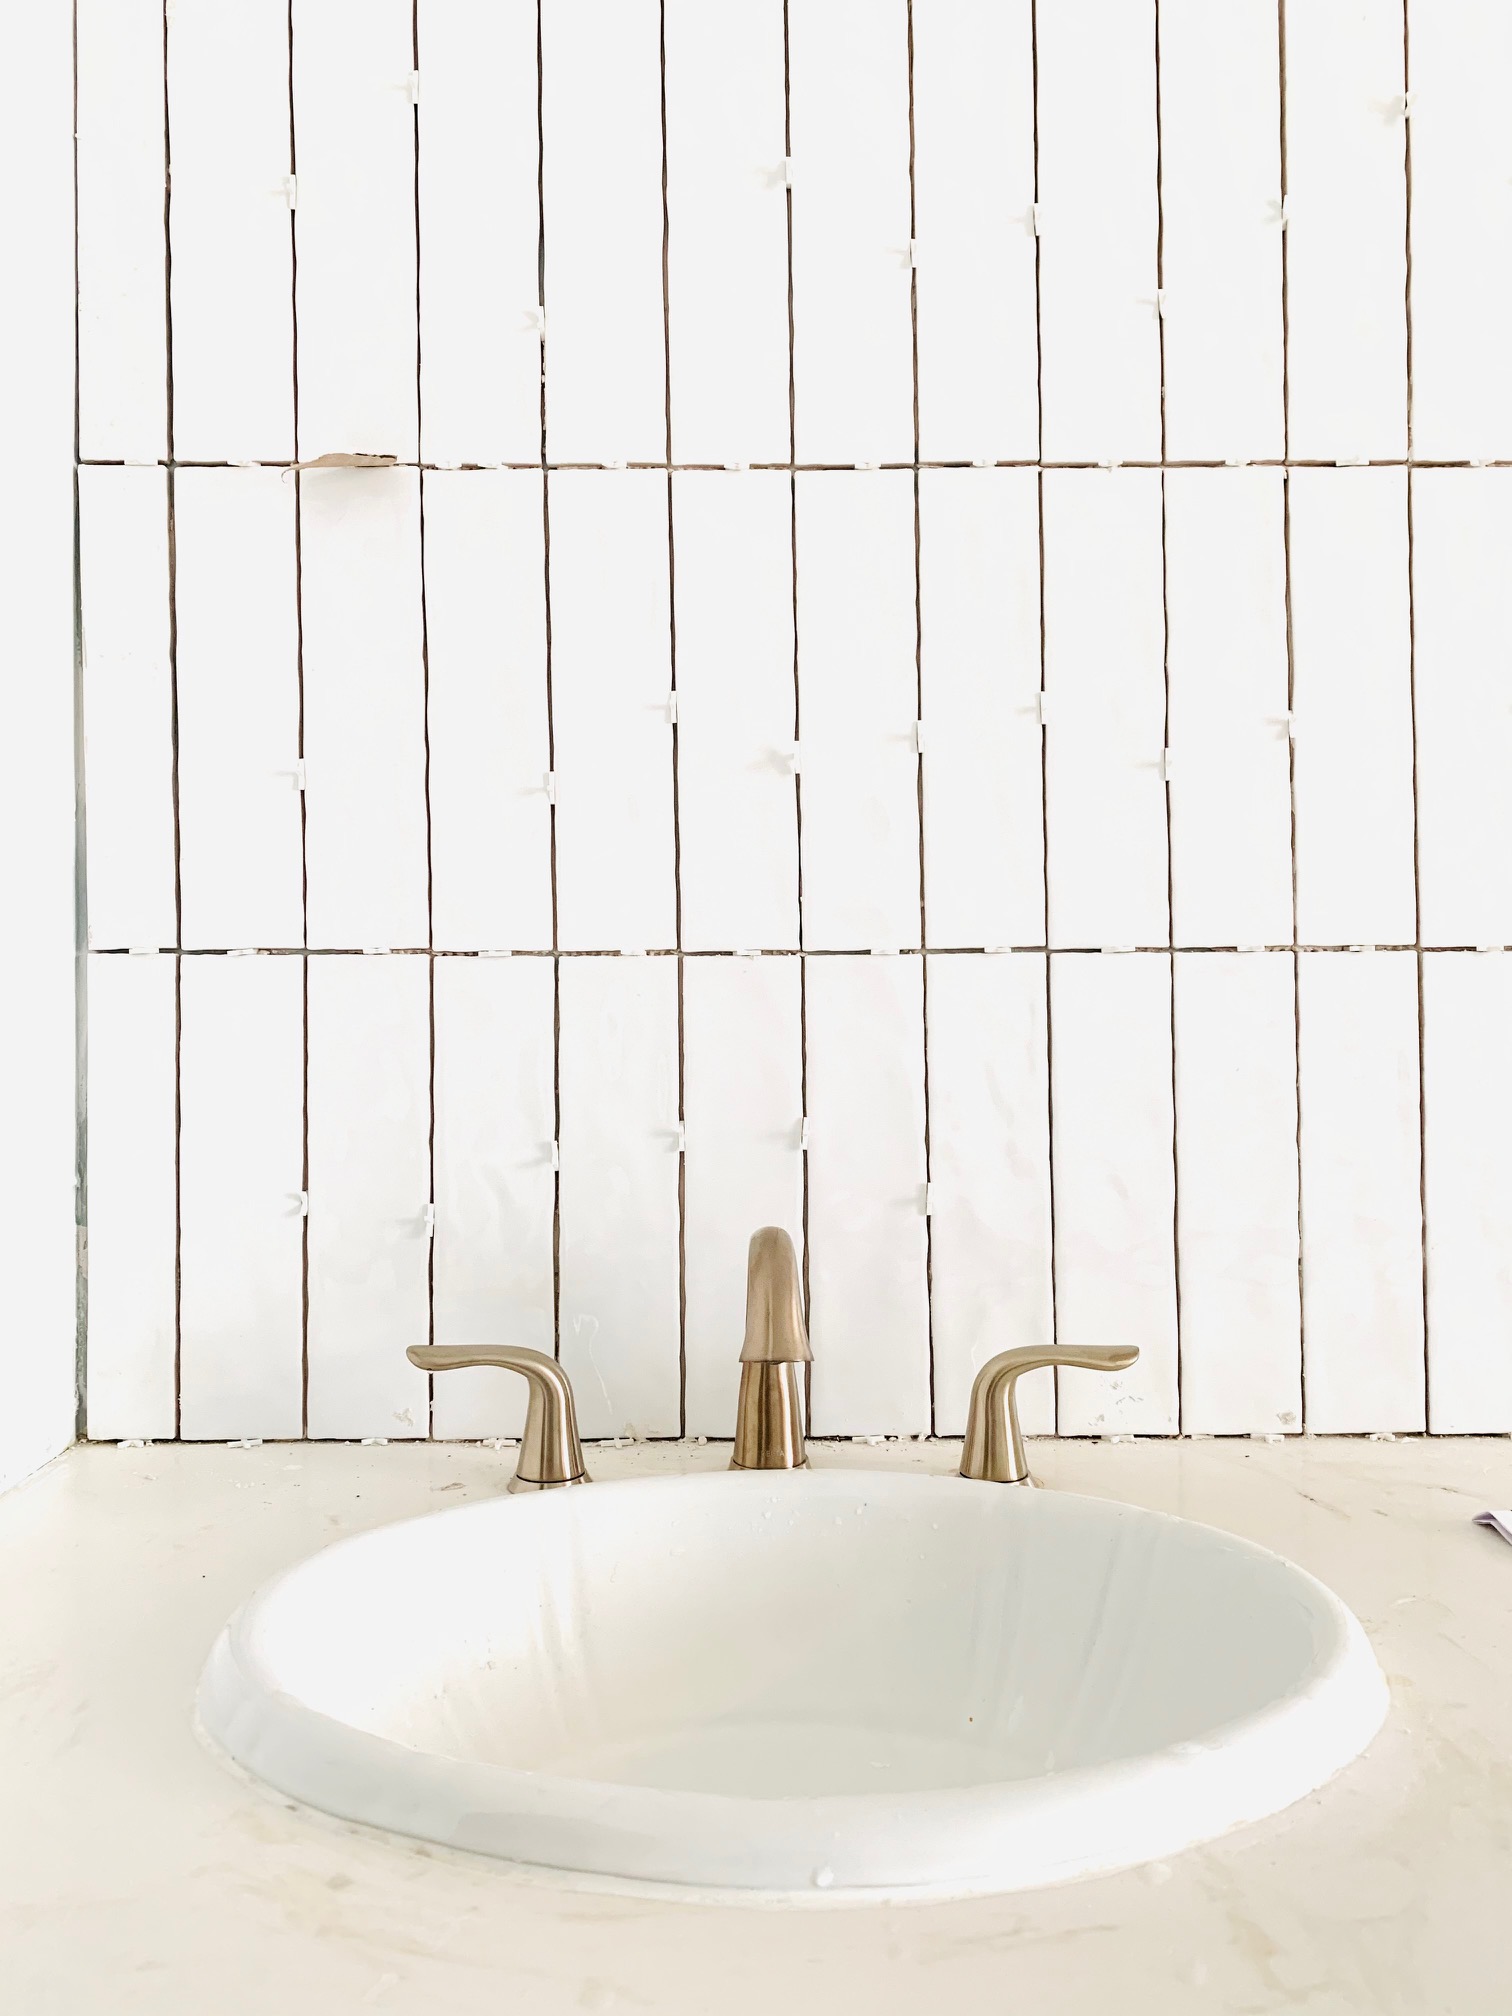
The old backsplash was replaced by a new vertical stack bond white tile from counter to ceiling which freshens the space. I also removed the decorative half legs on the vanity cabinet before priming and painting them deep green.
I went back and forth on replacing the vanity cabinets because they’re really good quality. I considered replacing the doors with a Shaker style, but then decided to simply paint them a beautiful shade of deep green and replace the old hardware. The home’s style is traditional so the raised routed panel design of the drawers and doors fits this home, and the new pulls help update the look.
Painting the walls and the cabinets required two kinds and colors of paint. The walls are painted with interior white and the cabinets with a waterborne alkyd paint, which is designed for trim and cabinets. Calculating how much paint you need can be challenging, thankfully there’s a comprehensive list of paint calculators by brand you can use to get the amount right. Thanks so much to PaintCare for creating a very helpful list!
I proudly partnered with PaintCare to bring this project to life! PaintCare is a non-profit that plans and operates industry-led paint recycling programs in states that pass paint stewardship laws. Their environmentally friendly program helps renovators, consumers, and businesses with paint management when their projects are final and complete.
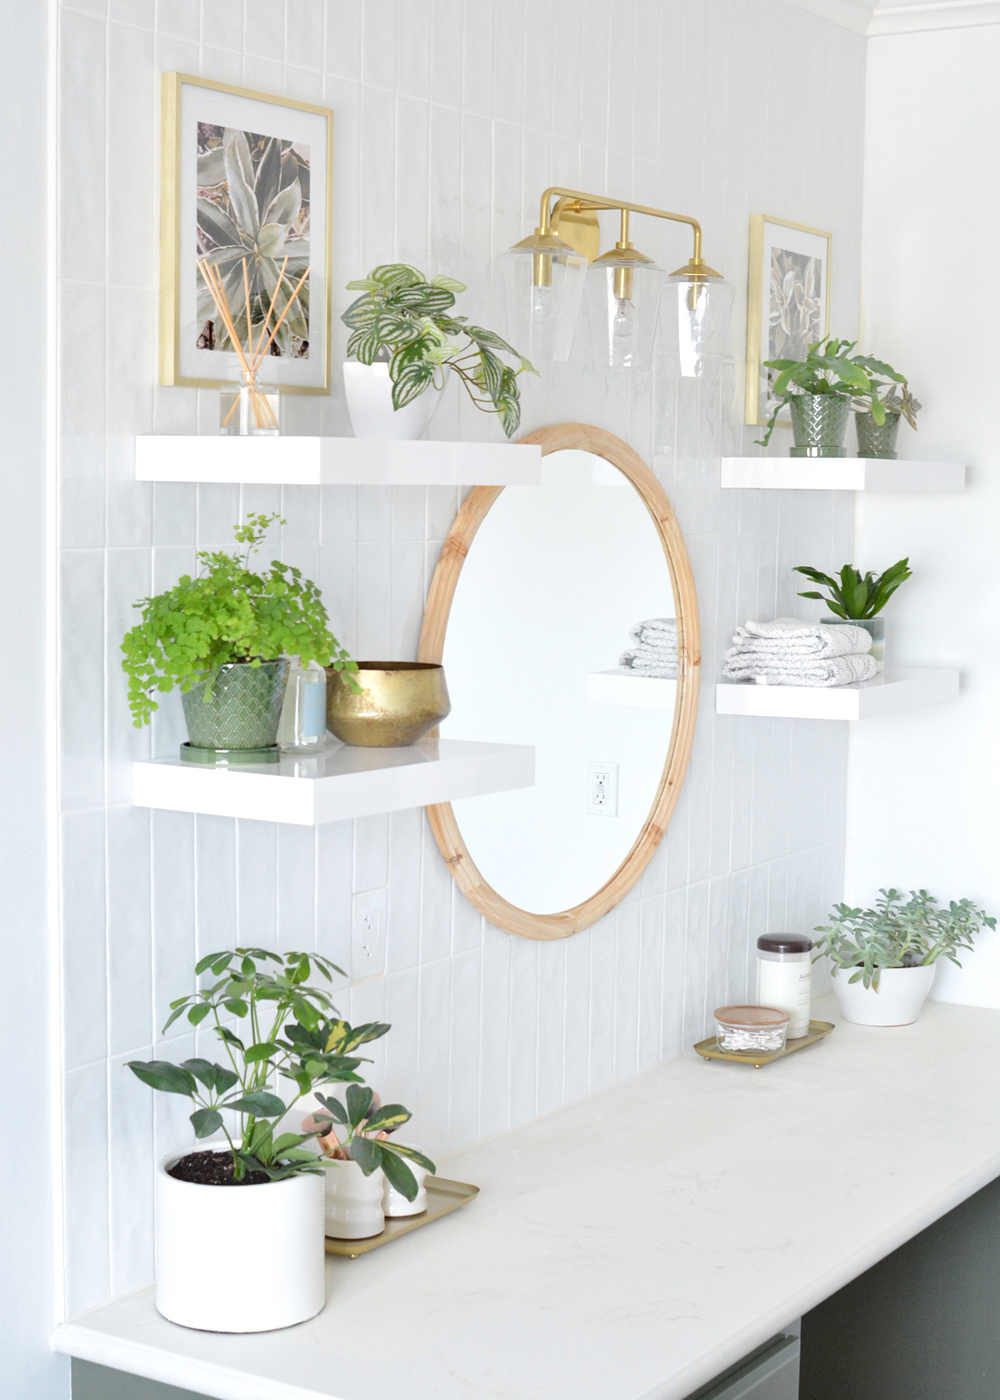
Below is an image of what the left side looked like before I made all the changes. Those tall glass cabinets provided storage but they were so bulky and old fashioned and they blocked light to the mirror so I swapped them out for the floating shelves. I also have plans to add a modern wall cabinet like this one to the side wall to replace the storage I lost.
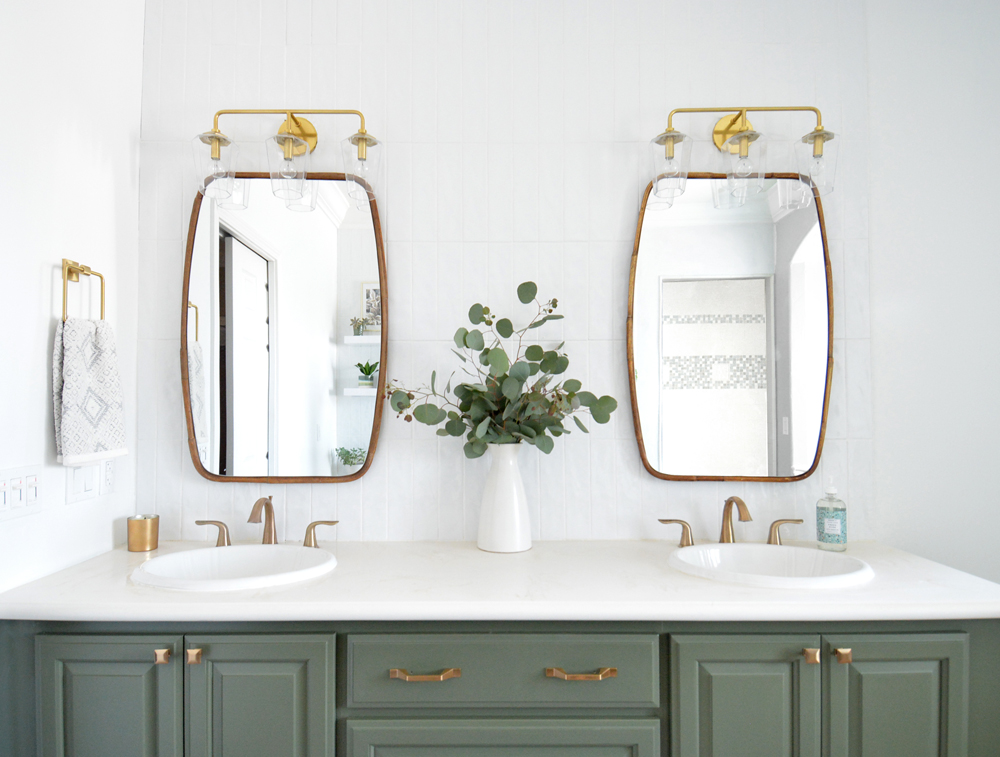
I chose a deep green and bright white palette because I wanted the bathroom to feel fresh and modern but also zen too! The tile, shelves, and plants give it a far lighter and more airy feel. I covered the blah tile (that I plan to replace) with a new washable rug.
The glossy white open shelves pair nicely with the glossy white tile. These shelves have sturdy brackets that were anchored with sheetrock screws to give them the greatest stability, then we cut the tile to go around the brackets.
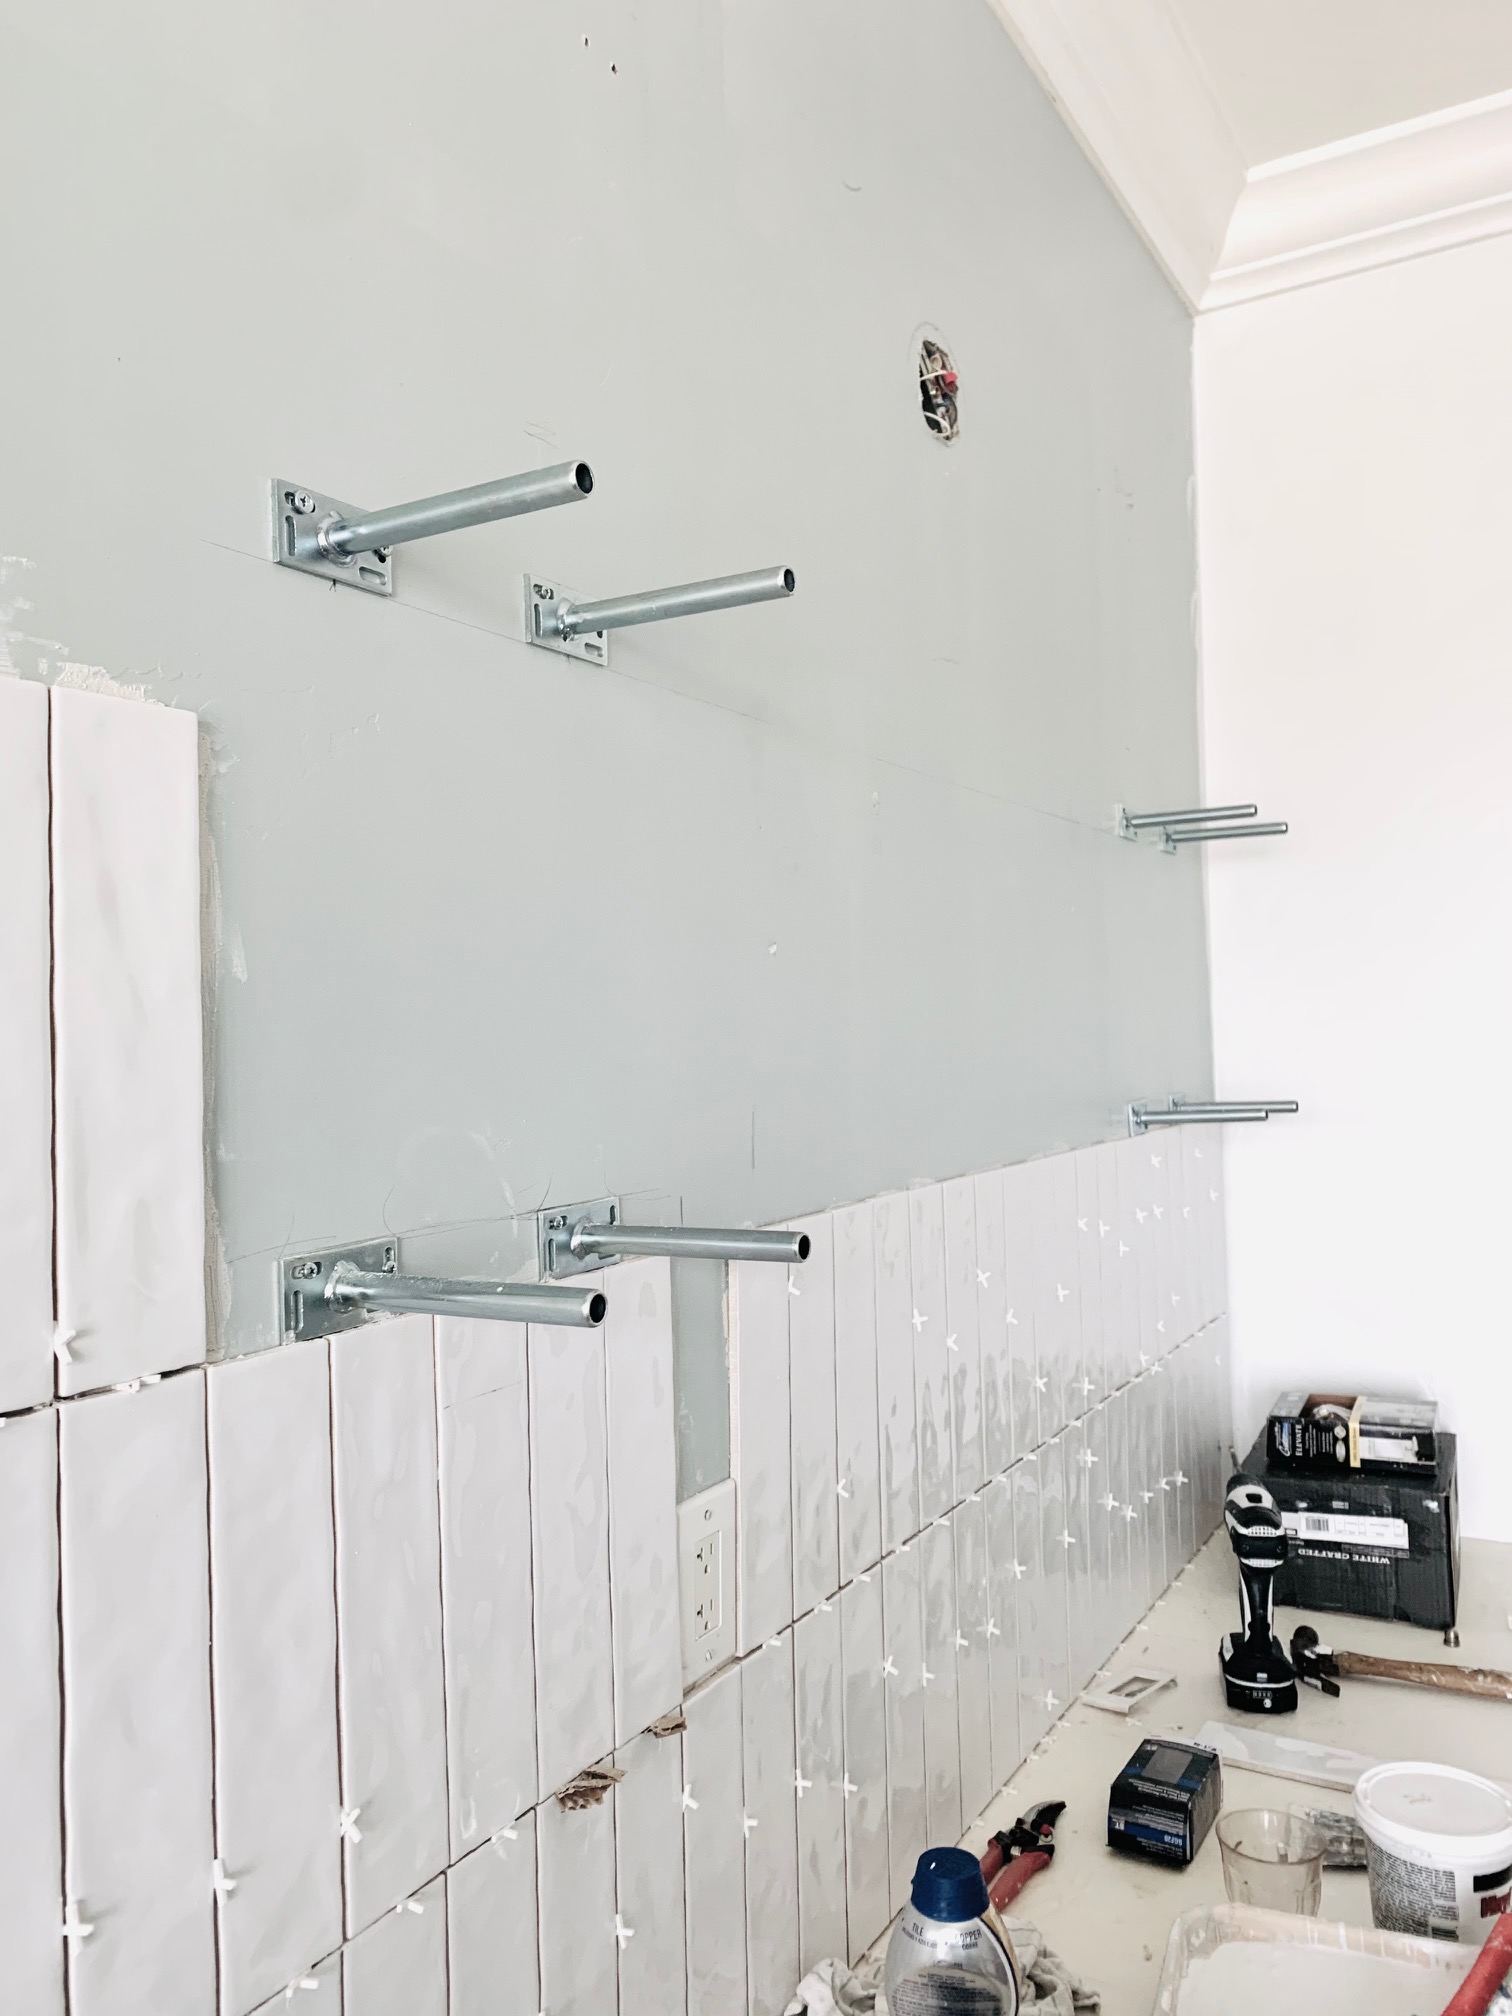
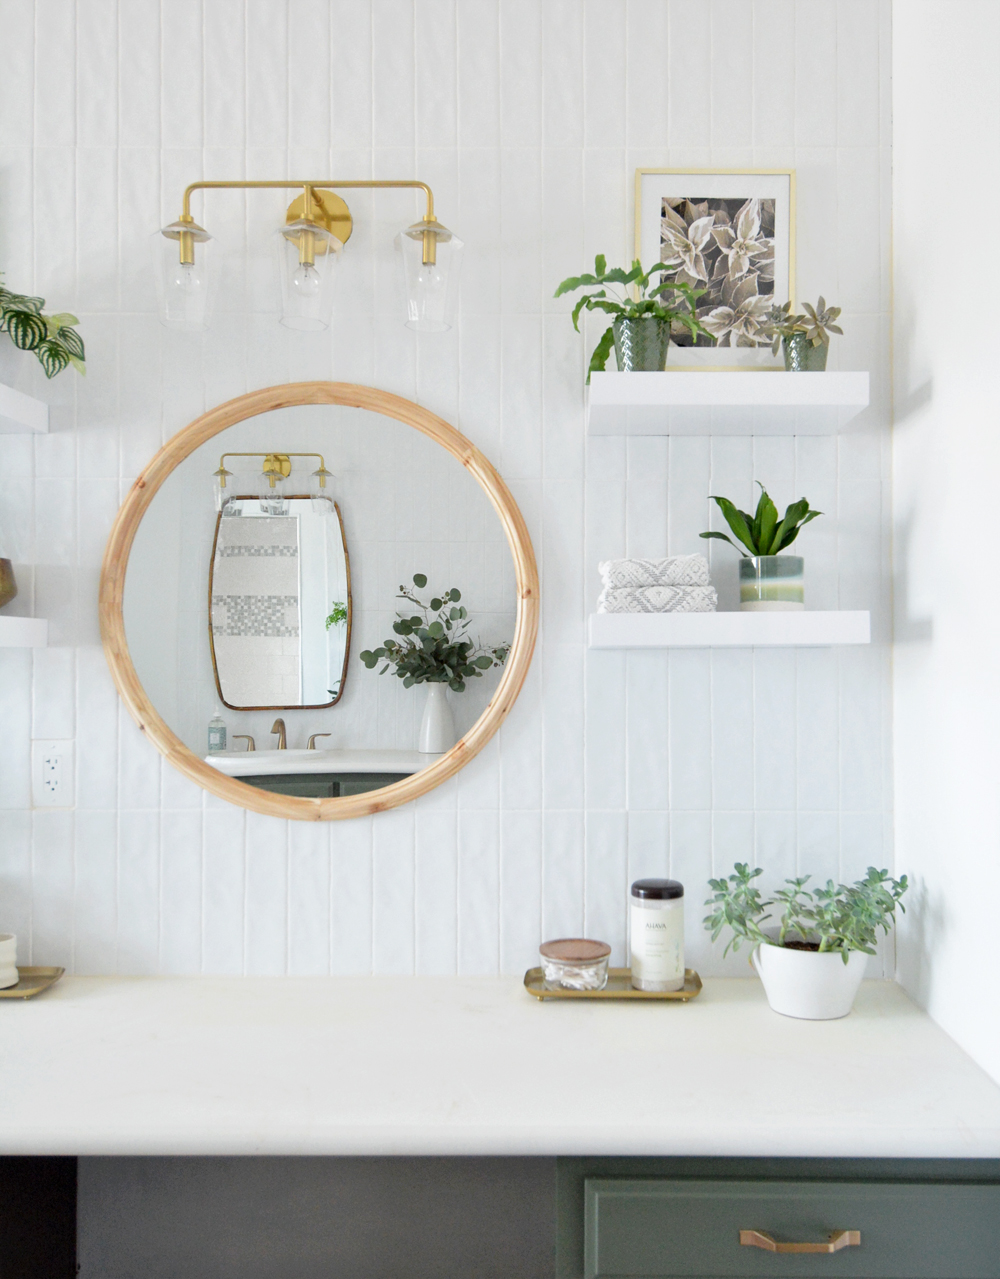
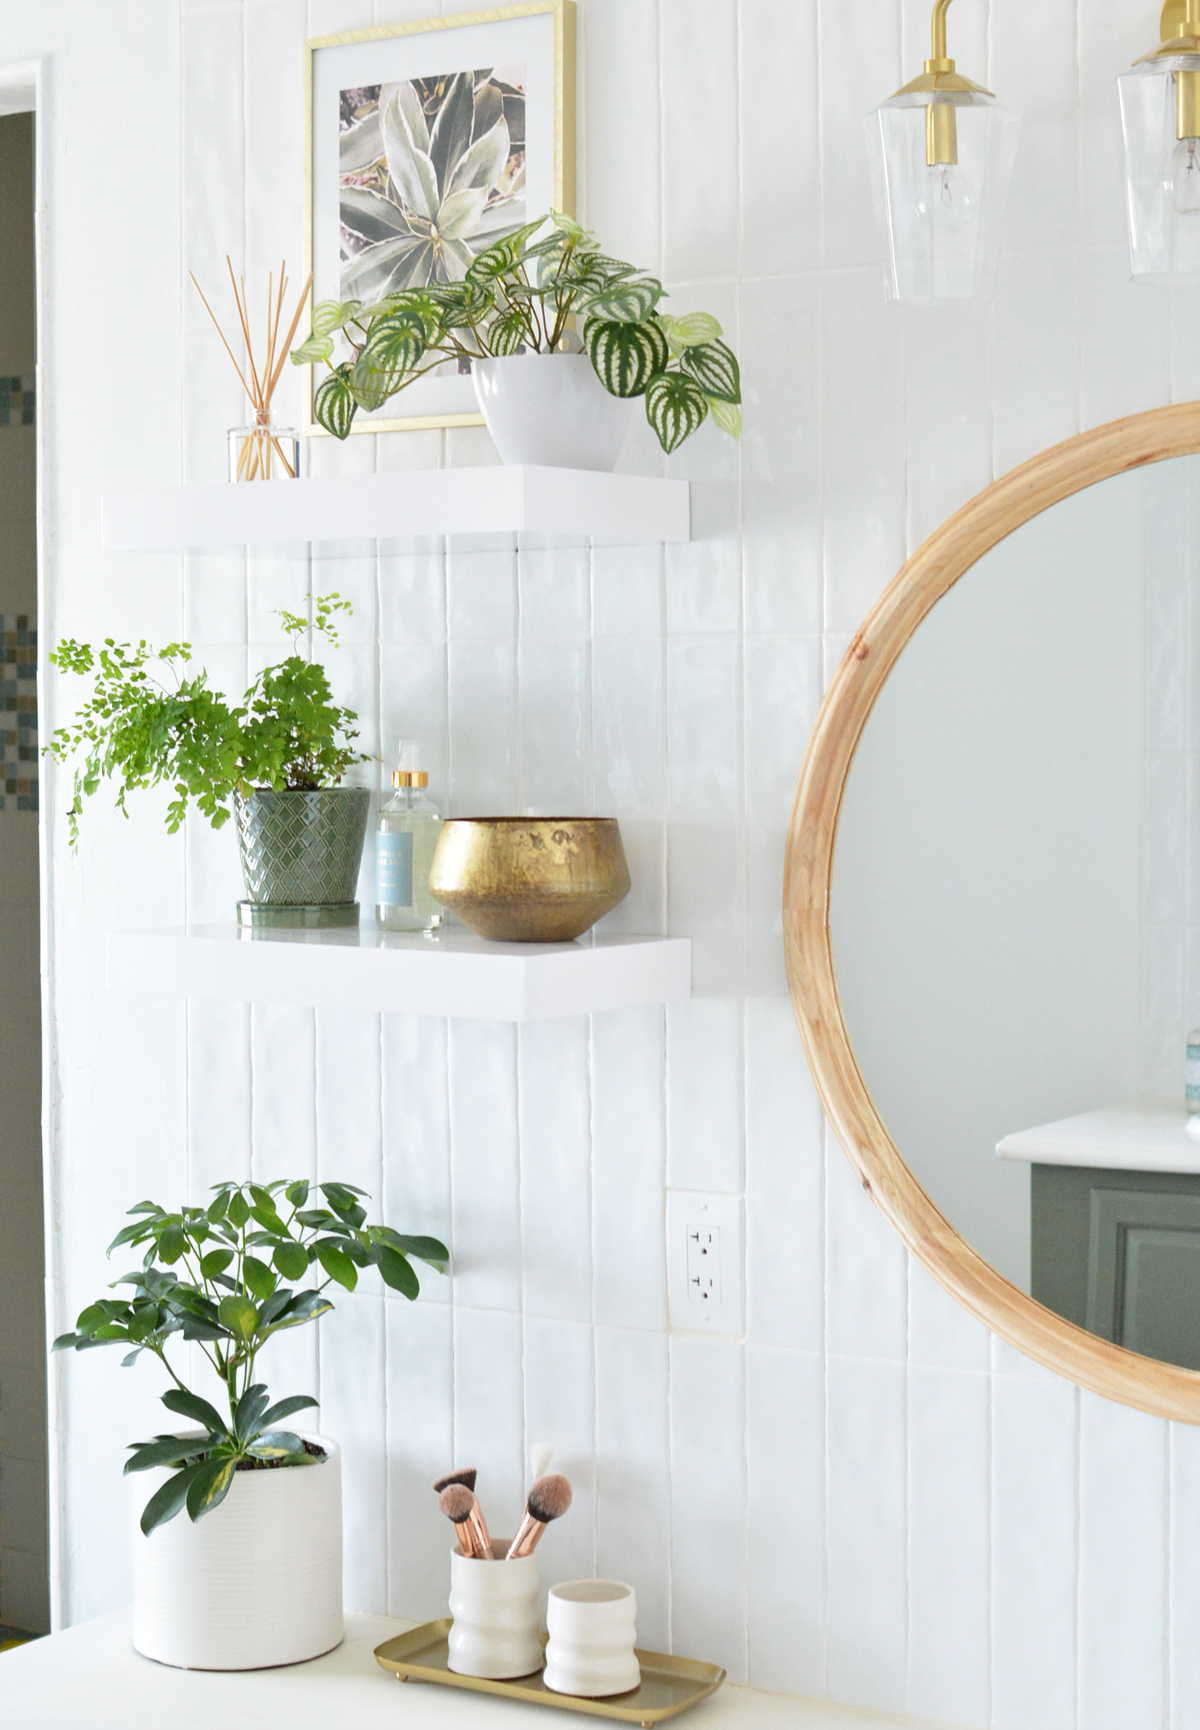
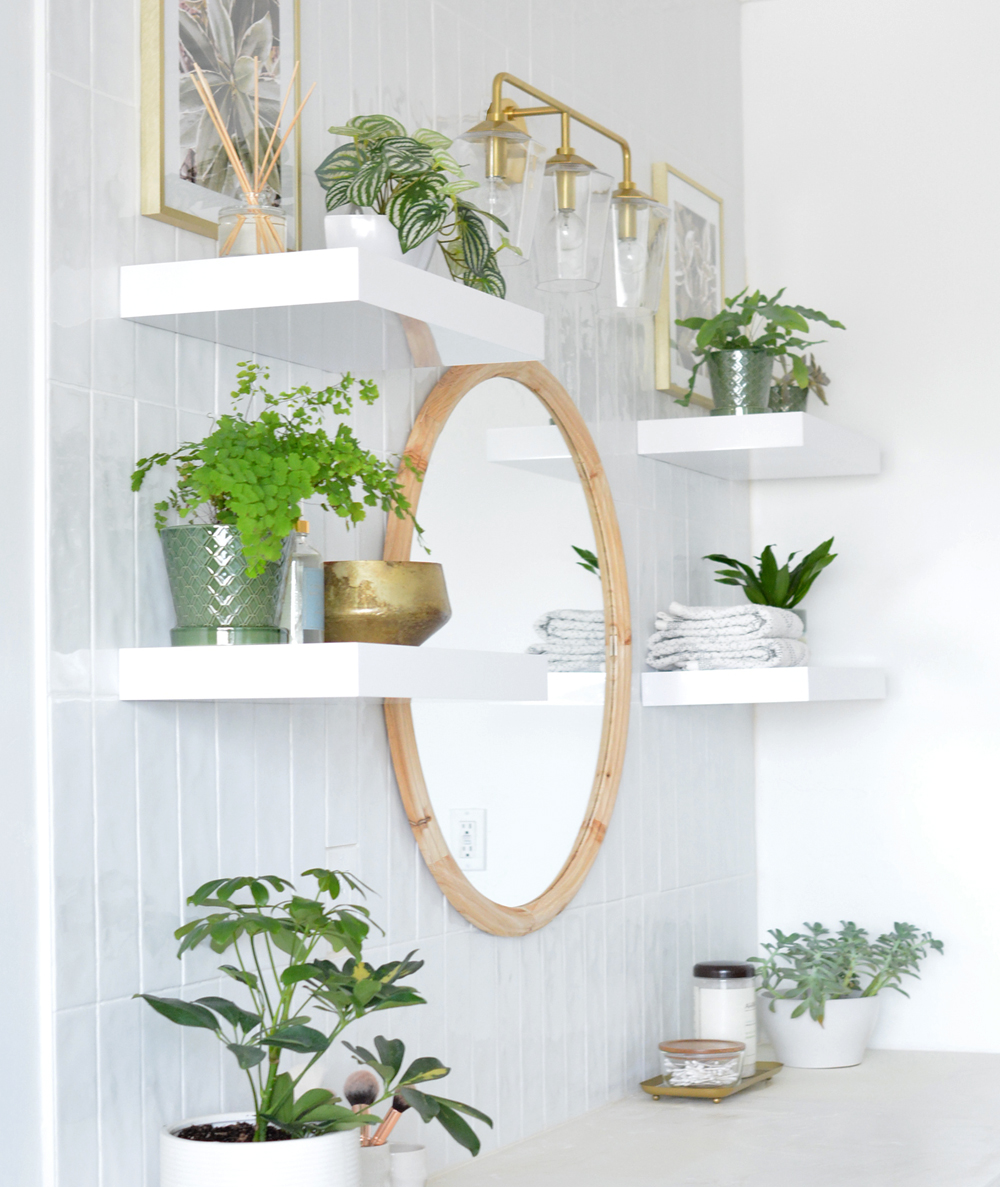
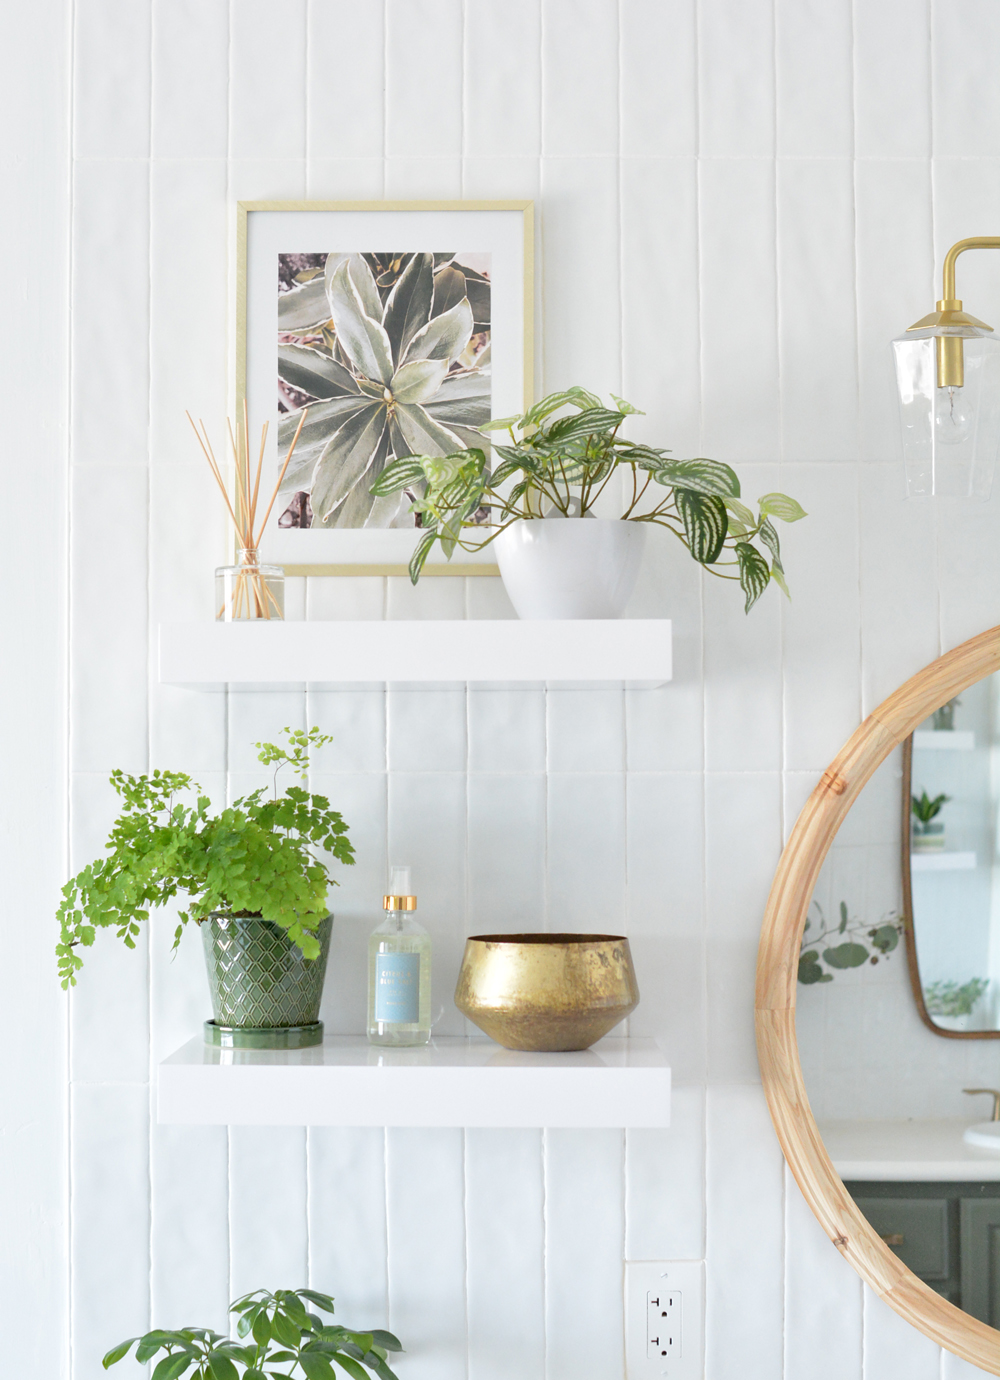
I’ve always liked white tile in bathrooms, and you really can’t go wrong with any pattern of installation. I chose a simple vertical stack bond to elongate the space and I’ll repeat this pattern in the bathtub alcove. I followed the same steps I did a few years ago installing this backsplash using tile adhesive, 1/8” spacers, and grout.
I’ve written about the process for painting bathroom cabinets before so that you get the smoothest finish possible. The steps are the same! I use a deglosser to remove any dirt and grime, this product also acts as a sander too. Next, I spray paint the doors and drawer fronts with spray primer.
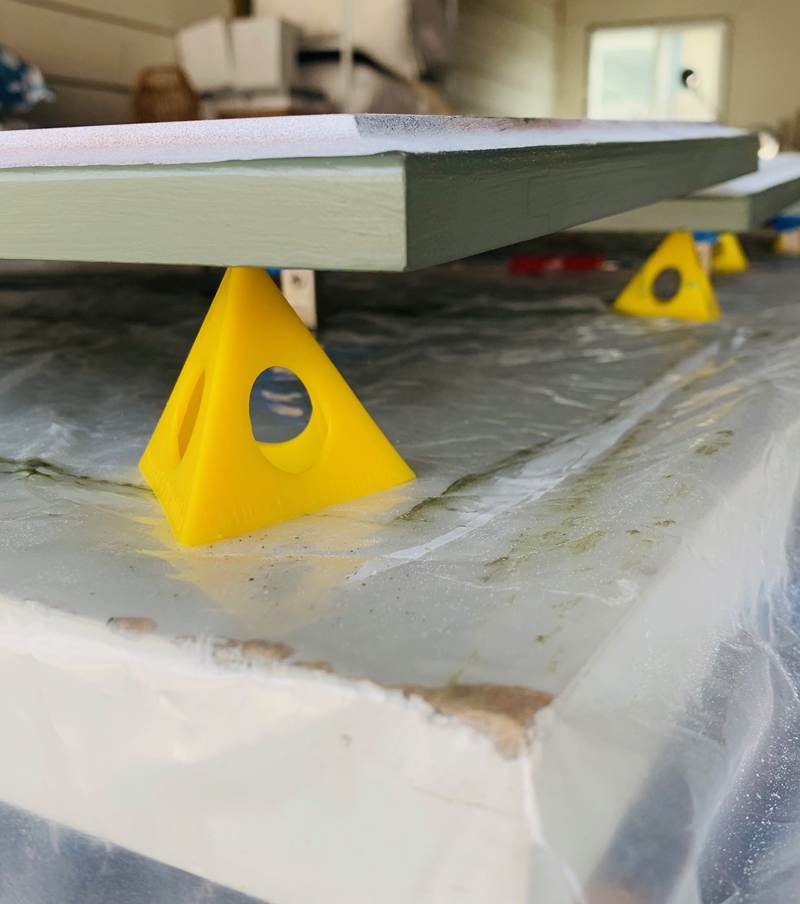
I brush prime the cabinet frames with a high quality brush, then add three super thin coats of paint to the surface. The thin coats are the key to ensuring a smooth coat on drawers and doors! Also these painting pyramids are essential, they prop up the doors so you can avoid drips along the sides of the cabinet doors.
Painting these bathroom cabinets and walls was a fun and fulfilling project, but cleaning up can be a chore. PaintCare makes it easy and convenient to recycle leftover paint! Visit PaintCare.org to find the nearest drop-off site to recycle your leftover paint from your home improvement projects.
Sources for this bathroom refresh:
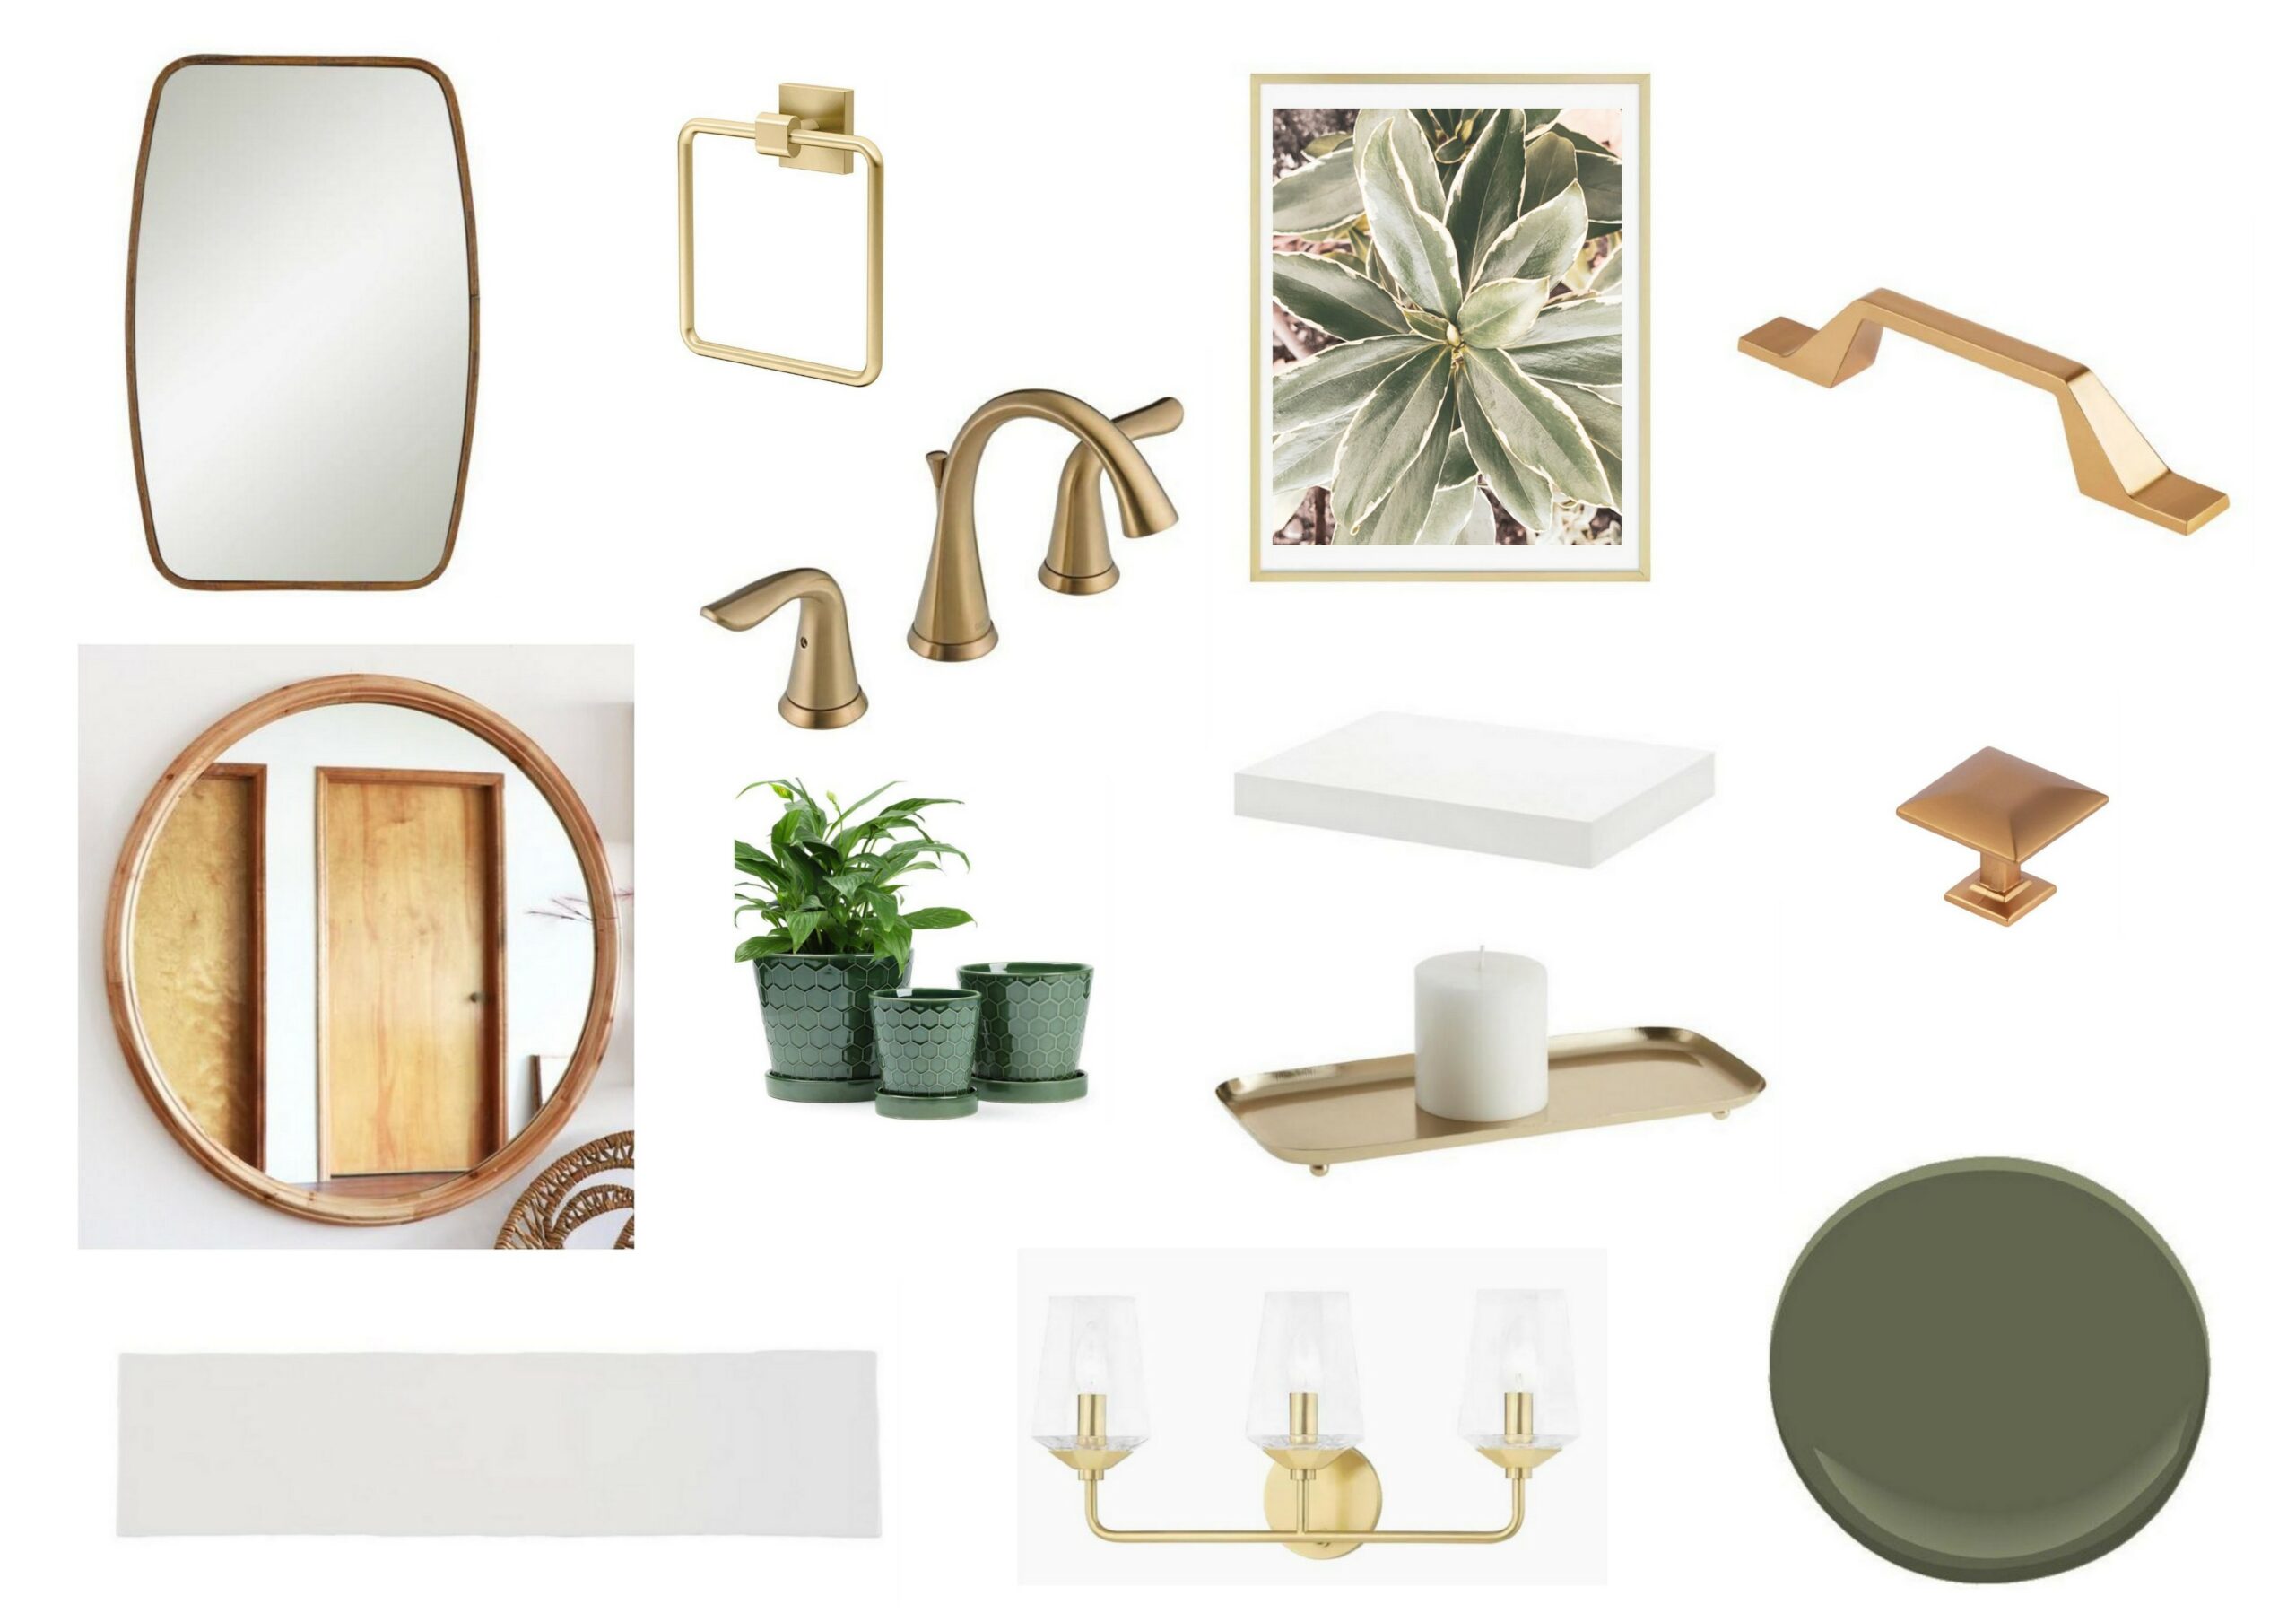
rounded rectangle mirrors / brass towel ring / widespread faucet
drawer pulls / round vanity mirror / green planters / floating shelves
door knobs / gold picture frames / leaves art / 3×12” backsplash tile
gold trays / washable rug / brass vanity lights / cabinet paint color
Stay tuned for the next phase of this bathroom remodel (floors and bathtub alcove) coming later this summer. :)


Wow, Kate! It looks amazing! I was confused that you didn’t link your “new” vanity… it looks totally different without the half legs, and that green paint is perfect. Well done! Enjoy your gorgeous new bathroom 😍
Removing the legs made it look so different, right? I love that paint color too! I tried out a few and in this space, that one was the clear winner. Not too dark, not too light, not too saturated, not too gray. Just RIGHT! Especially with the pretty pulls and knobs. :)
So amazing! Not a generally a fan of green but, wow, that green is stunning.
Kate – I love this! Can you give more detail on the process of removing the old backsplash and installing the new? I have a bathroom that needs to be updated and while painting the oak cabinets, changing faucets and lights seems doable, the tile work seems scary. I’ve read your older posts on tiling but the first step – removal and cleaning up the backer board – wasn’t covered. Thanks!
Hi Michelle. It all depends on how much mortar was used with the previous tiles and how strong the drywall is behind it. I’ve had drywall deteriorate when the tile is removed because the mortar pulls it off and needed to patch the drywall first making sure it’s smooth and even before starting on a new backsplash. This space was not the case, the tiles popped off relatively easily working carefully with a flat head screwdriver, chisel and hammer. You never know until you get started what you’re up against but be prepared for the worst (replacing/patching drywall) and delighted if your wall stays intact, then you can simply sand it down and install new tile.
The green is perfect! We just redid our bathroom- so not changing that but am painting our bathroom vanity that green! Thinking about painting my front door that as well
Isn’t it the best shade of green! I love it so much, I want to reuse it again too.
Wow – what a difference! It is just beautiful. We are in the process of renovating the master bathroom of a house we have bought. We will be changing the floor. It is a very narrow but long room and the previous floor was 6 x 24 tiles that had been laid vertically – making it look even more narrow, like a bowling alley. :( What would be your suggestions for the new floor. The cabinetry is a khaki color and the walls will be white. What do you think would help it visually widen this narrow bathroom? I trust your opinion as you have incredible taste!
Oh how kind Karen. Well like you said, however rectangle tiles are installed, the eye follows. Perhaps wood look tile or luxury vinyl plank are options for you and perhaps install in a herringbone pattern to draw the eye in the opposite direction to give the space a wider feel.
Thank you so much for the suggestions. I had thought about herringbone and you just helped me confirm that! Also, I’ve been following you since you were Censational girl! Congratulations on your continued success. :)
So beautiful, Kate! We are currently doing the same thing in our master bath. I couldn’t bear to get rid of our solid wood vanity, and I had the same thought that it looks great in our traditional home. I painted it a different shade of green, but I think I like yours better! I’m looking forward to accessorizing. Struggling a bit with the large wall space between our new mirrors, but I’m sure I’ll come up with something. Thanks for sharing your fresh and inviting bathroom!
How fabulous! I was puzzled by the fact that you didn’t link your new vanity…
That shades of green paint are perfect with those half legs removed. Nice work!
Thanks! Removing the legs made a big difference, it created cleaner lines. :)
What a fantastic makeover! I love the green cabinet colour and the fresh new look you created in this bathroom.
Thank you so much Nancy. :)
Another stunner! You really knocked it out of the park. It looks so great and updated. Thanks for sharing all of the links. Can’t wait to see more of what you are planning.
Absolutely GORGEOUS!! you have given me plenty of ideas! did you use special primer/paint to ensure adhesion? we are about to paint our bathroom cabinets, which have a satin wood veneer on them, and I am terrified the paint won’t stick? Denver Arborist
Make sure you use a primer that clings to that surface, I’ve had a lot of success with the Zinsser brand. I’ve even painted laminate with it.
Beautiful job! Love the green… makes me feel like it’s a trend I can implement in my home (without too much commitment)!
Absolutely GORGEOUS!! you have given me plenty of ideas! did you use special primer/paint to ensure adhesion? we are about to paint our bathroom cabinets, which have a satin wood veneer on them, and I am terrified the paint won’t stick?(Tree Removal Schaumburg)
Do you have an updated link for those rounded rectangle mirrors? Thanks!
Yes! Here you go.
https://bit.ly/3u7ZAvt
What color of green was this ?:)
What’s the name of the green paint and finish you used?
Jade Romanesque by Benjamin Moore, linked at the very bottom. :)