I’m constantly experimenting with photo styling as I continue on this blog journey, and I absorb inspiration from all sorts of places, from magazines, food stylists, prop stylists, Pinterest too. One of the things I’m always looking to improve is my photography. I’ve come a long way since the beginning of this blog in 2009 but I think I still have a way to go, I aim high!
When I look at the portfolios of professional stylists, I’m always so impressed and inspired, and when I’ve had the opportunity to work or converse with them, I try to learn a thing or two from their many talents. Here are five tips I’ve learned in the past year when it comes to styling and photographing a project, scene, recipe, or room.
Shoot from Above. Taking a picture of a scene from a bird’s eye view is one additional angle to consider when taking pictures of your latest tablescape, project, or recipe. This can be complicated for larger scenes because you need a lens that can capture all of the subject matter and the advantage of height above it, and it doesn’t work with everything, but it’s a great trick to keep in the back of your mind when you’re taking pictures from the side, think about snapping a picture from a high above angle too.


Halloween tablescape for Dabble Magazine

Bring the Bokeh. I learned from stylist Matthew Mead that a 50 mm lens with a low aperture setting is a really great tool for achieving bokeh, that desirable blur (technically referred to as shallow depth of field) when the main object is in focus and the background or foreground is not.

image by Matthew Mead

You can purchase a 1.8 50mm lens for both Nikon and Canon for under $150 and it is a worthy investment for beautiful closeups! Simply set your aperture to 2.0 or below and watch the magic happen.
Keep it Simple. We all love Paul Lowe of Sweet Paul! He said some words in our spotlight interview that stay with me to this day. “Keep it simple, don’t overthink things, and go with your gut feeling. Think a simple background and few props. Remember what’s important in the shot.”


Allowing the project, craft, recipe, or group of objects to shine in a simple setting is a no fail approach to great styling. Less is more!
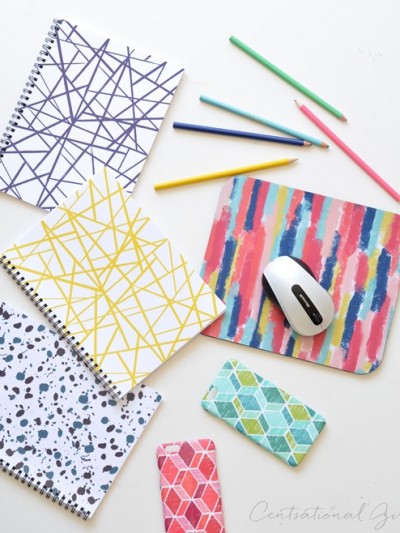
Practice the Rule of Thirds. You’ve heard that old photography Rule of Thirds trick time and again but the technique rings true. Imagine a tic-tac-toe grid on your image, either when you’re shooting or when you’re cropping. Place the main object on one of the four intersecting points or along one of the four lines that dissect, and you’ll end up with a more dynamic shot. Off center looks best!


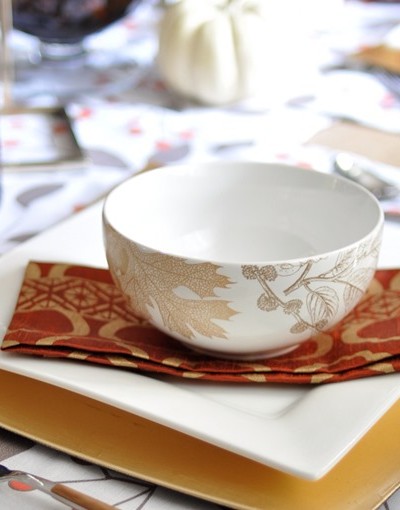
Include Something Living. I’ve been practicing the ‘include something living’ ever since I picked up this tip from last year’s Better Homes & Gardens shoot. Often it’s something as simple as a vase of flowers on a table or a bowl of fruit, sometimes my kids become part of the scene and who can resist a cute dog?
Kids and pets and botanical objects from nature make the image or scene come alive. It shouldn’t be forced, but instead a natural part of the narrative. Ever notice how all shelter magazines have fresh flowers or plants in just about every room shot? Copy that!


Those are my latest observations and tips for better styling and photography for bloggers and nonbloggers too. Do you have any tips to share you’ve learned along the way, or stylists or photographers that inspire you?
.


These are great tips Kate. My dream is to be a photo stylist. That is my favorite part of blogging.
Great post! Each tip had me thinking, “yes, of course that’s better” but I sure needed to hear them!
I love that you share these wonderful tips-
This is good stuff. I like the “include something living” idea.
One I would add is to know the natural light in and around your home. I have a (good, but still) point and click camera, which means I have to just work with what I’m given a lot of times. Knowing the best time for light in and around my apartment has made a big difference in the quality of shots I get. For me, mid-afternoon (say four pm or so) is the best time to take pictures. Here’s a good example: http://www.thebookofjimmy.com/odds-and-ends/
A little overcast weather outside helps too.
Agreed Jimmy, natural light is always the starting point right? So true that when the natural light is at its best in a particular spot, that’s the time to click away!
Kate
I have always wanted to acheive “Bring The Bokeh” but never was able to. Can’t wait to try! Thanks for the tip!
Awesome tips, Kate! I’ve always admired your photography skills. :) I’ve learned how important lighting can be…it really does make such a difference. And, thanks to you, I have a love affair going on with PicMonkey (from Picnik) and Picassa. :)
Great tips! I got a DSLR about a year ago and these are some of my “constant reminders” to make my pictures better. Still a (major) work in progress and there is always room to improve! But it’s so fun :)
Thanks, Kate ~ I love styling, but have a long way to go learning about photography. I use a tip from Martha Stewart I read a long time ago, use a solid piece of poster board behind your subject for a clean background. The photo of the cake is a great example.
Get low! I’ve taken better pictures of kids and pets etc when I get down on the ground with them. I can also be found outside taking pictures lying down in the grass! Love these tips! Now to just get a better camera!
I totally agree Laura, I love those pictures of scenes taken from down low on the ground!
Kate
Wonderful Post ! I too am learning, (aren’t we all ? ) and photography is probably the most
important thing on a blog to me. Of course we love a good story, and a well written post, but
if the photos are not interesting or blurry, we will just move on..
Thanks so much for all the informational tips- great Blog !
Diana
Those are great tips! I am hoping (hint hint – husband) Santa brings me a new camera for Christmas, then this post will be revisited!
-Sarah {tuckerup.blogspot.com}
Thank you so much, Kate! I appreciate the simple tips. I’d love to have time for a class in photography, but that’s just not going to happen. So quick, easy-to-implement tips are a real blessing to me.
Fantastic post – really great yet simple tips to bring photos to the next level. Thank you so much!
Kate these are all great tips. I need to start to implement more of them in my photography. I have a long way to go, but it is something I do love. Keep up the great tips. :)
thank you kate for all these wonderful tips! I always avoid auto-focus when i take my pics, I think most ot the time, the FLASH is not my fr iend. I still have a lot of ways to go and I’m thankful for all your tips. Havve a wonderful day!
Great ideas! Now you just need to get the dog to sit still long enough for the shoot! Ha ha!
I would love to be able to achieve the Bokeh. Oh, the joys of someday owning something better than a simple point and shoot. Thanks for all the tips though. Some of them I knew but tend to forget when actually shooting for a blog post.
I think your pictures always turn out beautiful. You have a real talent with the camera.
Great tips. All advice I can use. I need a new camera any recommendations? Kate what do you use when photographing?
love this post. Your pictures are amazing. The next step for me will be to get a camera and begin learning…do you have one you recommend ?
Thank you for this post! As a new blogger, I find it extremely useful. I got a 50mm lens last year for Christmas and I love it! Makes my photography look a lot cleaner. Now, if I could remember to actually pull out my camera more often rather than just Instagram!
Great tips! I am just getting into blogging and see how much I need to improve with my photography! Love the rule of thirds. Also, love any excuse to photograph my dogs, so I will let them creep into pics more.
Great tips, Kate! I need to use the lens more as a styling tool – and these tips are easy enough to remember and implement. Super helpful – Thanks!
Emily
Great post. I like Laura’s tip to get low – works great with pets and kids especially. I learned that in a photography class 35 years ago (pre digital, of course). A professional photographer who took photos of my kids 20 years ago was known for her trademark “light in the eye” – you know, that little square of light in the eye that you see in some close up photos. It really made my kids photos come alive and gave them a special je ne sais quoi.
Thanks for the tips! I was just given a new camera and I’m having a blast using it! Now, I just need to take some time to really learn it. I didn’t know the one about putting a living object in my photos. Thanks :)
I’m still working with my little P&S, and your tips are even helpful for me. I’ve been working on the rule of thirds recently, but I find things look lopsided for me. Any tips on how to keep it balanced, while still getting the visual interest that comes from shooting off centre?
Great tips. Thank you for sharing. I have an F2.8 macro I’m learning to use.
Thank you so much for sharing these great tips!
While the formal definition of “bokeh” may include photos where the background is blurry, the common definition usually includes blurry background lights. If you Google Image search “bokeh” you’ll see what I mean. Otherwise, I might just describe your bokeh photos as “shallow depth of field.”
And for people with point-and-shoots, you can sometimes achieve this “bring the bokeh” effectby using the ‘macro’ setting on your camera. It should force your point-and-shoot’s aperture wider (i.e., high aperture number, more light gets in, more shallow depth of field, etc.)
Oh my! Thank you so much for sharing this. I am VERY new to blogging, and I just got my first DSLR camera with lenses about two weeks ago. So far, I’m in love with both (blogging and camera), but am still learning how to style and use the camera. Thank you for this post, it has been really helpful, and you are talking in terms that do not require me to get out the dictionary.
Awesome post, Kate! I’m a long way away from where I want to be with this, but I loved the tip that Layla shared at Haven to sort of mess up one thing when you’re photographing a room. Add slippers to the floor, adjust the top book on a stack so it’s not perfectly aligned, etc.
Oh great tip Kelly, “mess up one thing” = more realistic!
Kate
Kate, your photos are always gorgeous. I can’t imagine them improving much! They are always perfectly exposed and composed. In fact, I bet I could pick out one of your photos from a group of 100 other blogger/photographers. They’re distinctive.
If I were going to offer one tip that’s helped me get better images, it’s “Take lots of shots.” I might take 25 or more pictures when I want just one. I’ll change the angle, or move a few things around, or adjust the settings. I’ll edit the ones I like best and keep eliminating by comparison until I end up with the best.
I agree Barbara, taking a lot of pictures from different angles is key!
Kate
This and your other archived posts with photography tips are SO helpful!! Thanks much for sharing the wealth of knowledge through your own practice. I’m a beginner blogger and photographer {hoping for the canon rebel T3i for Christmas! *fingers crossed and wish-list updated!}, so this is incredibly useful.
Thanks Kerri, and everyone!
Hi Kate, love reading your blog…lots of great styling tips and information but the one thing I really look forward to are your DIY projects, why have you stopped doing them?
I’ll never stop with the DIY projects Kay but I can’t feature one every day so I try to add variety with other kinds of posts.
Stay tuned for more DIY in the near future!
Kate
Such an awesome post. Thank you so much or always being so willing to share your knowledge. I can’t wait to try these tips out when I get my new dslr.
Wonderful tips, Kate. I love the one messed up tip as well as something living. I think as bloggers we can all relate to, “Oh, the light is amazing right now! Click click click!” I still have so much to learn so this was great.
I owe most of my photog knowledge to you – I think I’ve read and re-read just about every one of your posts on the subject! I’m learning and having so much fun playing with my camera – and that 50mm lens literally changed my life!
Thank you for sharing all of these tips Kate. As someone just starting out with photography and an “almost there” website, these tips are extremely helpful. I have lots to learn and look forward to having fun with photography. Your photos are always gorgeous.
I love this post!! SO helpful. The rule of thirds is really something I try to keep in mind. So much to learn!
WOW! Simple but great tips. Thank’s a lot. I love photographing and while I am only self-teaching I appreciate all good advice. And this is all about improving, isn’t it? Hugz!
This was really helpful. Thanks!
Yes, thank you so much for posting these tips! I’ve been following your blog (the first blog I ever started following and still my fav!) for awhile, inspired by you and your great shots I splurged in the summer time for a new DSLR and took the online course from shootflyshoot.com! Tip from the Nate Burkus show: for better shots of people & especially kids… get them to do their craziest laugh, at the point where they start smiling naturally start shooting!
Hey! Thanks for the great tips! I think that when you are in the weirdest positions, you get the best pictures. Example – tip toeing, crouching down, laying down, etc. I also think that when you are photographing people or animals, get down on their level. An eye level shot of your dog is probably going to look better than one of you standing over your dog while they’re craning their neck to look up – same with babies. Get on eye level with them and you’ll get some really great photos! =]
Great tips Kate!! I learned alot and I learned I need to play with the camera more. Thanks so much!
Cynthia
I have a Canon Rebel that’s been in the cabinet more than in my hands. I need a course! It just simply intimidates me! Need to get over it! These shots are certainly inspiring!
Really helpful tips. I am going to pass this along to the girls at the shop. ~angela
Great tips kate! I especially like the “keep it simple”. I feel like I struggle with that. For instance, that keep it simple picture as a wire basket, 3 forks and some glasses and it looks great! The art of placement. That probably would have taken me forever to come up with and it’s like 6 objects! ha.
I think my photography is one of the things about my blog that needs the most work. It’s improved greatly since I started, but still needs a lot of work.
Thanks so much for the tips! I know my photography needs a lot of work, and when the budget allows I’m going to take a class from Shoot Fly Shoot. For now though, gotta work with free tips so thank you for sharing!
Thanks! These were great tips. I am going to try to incorporate something living in my next few shots. Stay tuned…
Great tips! My favourites were using a 50mm lens and the rule of thirds. Thanks so much for writing this post.
great tips! I find good photography to be very important in blogging and I do my best to get it!
great photography tips! These principles apply across a lot of different areas of design. I’m a graphic designer, and I use a lot of these concepts throughout a lot of my work! Thanks for sharing!!
Great advice. Thanks! :)
Great tips! I’m off to try some out! Thanks Kate! Xx
Since my blogging journey, I too have realized how important a good photograph is. I’ve come a long way since I began blogging but I have so far to go. I have a great admiration for photographers now! I’ve never heard the rule of thirds so I have to remember that. My husband bought me my first DSLR this Christmas and I just signed up for the ShootflyShoot course. I’m sooo excited. Thanks for the tips!