Hello all, thanks for the kind comments on this morning’s post on better home photography! I have a great guest today, one I’ve had the pleasure to work with and observe create magic in front of and behind the lens.
Please welcome back Matthew Mead, the incredible stylist, writer, author, and photographer behind Holiday Magazine. I invited him to share a few of his best tips for improving your photography, especially those detailed close ups he’s so brilliant at, and that desirable bokeh backdrop created with twinkle lights that we all love so much during the holidays.
* * *
”When it comes to taking beautiful images with your camera it truly is a “practice makes perfect” proposition. But there certainly are some tricks of the trade that I have found repeatedly useful in photographing food and still life imagery.
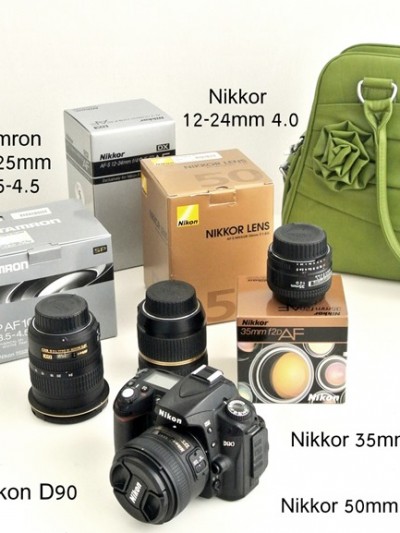
I own a Canon Rebel XTI camera which is truly my right arm when it comes to my work. I have several different lens which I use for things like room shots and up close imagery like miniature items or tight details but the magic for me resides in the 50 mm 1.4 lens. This lens allows me to select a sharp focal point with everything else in the frame falling off softly in a very palatable “out of focus” style. I use multiple F-stops between 1.4 and 3.0 in order to achieve the desired degree of focus depending on the subject.
To begin, set your camera to manual. This will give you the most control over the image and allow you to manipulate the light to the best possible outcome. I am a huge fan of auto focus and find it most helpful when shooting food to allow me to work quickly and select multiple focal points in just a few minutes. The benefit of a manual shot also allows you to shoot RAW files which are the largest format file that you can create and will allow you the ability to manipulate your image in many different types of photo programs.
I shoot all daylight imagery so make sure you set yourself up in a situation that allows for plenty of light. A shear curtain or “scrim” is useful in cutting the light if it’s too bright or harsh. Remember that subjects that are light or white are best on the opposite side of the light source as they will become over lit or “blow out” in too much light.

For under lit spots in your image, I use fill cards, reflectors, even a wall mirror to fill in those spots from the front of the image and add a bit more sparkle.
A mix of professional and novice items are included in my arsenal… including reflectors, a wall mirror and foam core covered with aluminum foil ~ all of them offer different degrees of fill light.
SELECTIVE FOCUS AND CLOSE UPS
For me, selective focus truly allows me to pinpoint and showcase my subject, be it food or a DIY project. I think the softness that can be created in the background elevates not only the subject but also the environment around the object. For food subjects it truly allows me to showcase a portion of the food which in some cases can look busy and messy without a clear focal point.
Here is an image with a sharp focus throughout and the greatest depth of field with and F-stop of 16 and shutter speed of 2.0. The light source is on the right and the subject can be clearly seen front to back with the same degree of sharpness due to the higher F-stop. I selected the very front of the strawberries as the focal point.
The exposure of the same subject and focal point is manipulated by a change in camera settings. The light source and positioning are the same but focus begins to fall off past the strawberries and the softness beyond allows the eye to be drawn into the most focused part of the image when the aperture or F-stop is changed. Dialing down the F-stop to 4.5 begins to blur the background to allow greater focus on the strawberries in front as a focal point. I like the way the light illuminates the subject with a subtle glow and makes the subject and its environment so desirable.
Next, I stretched the capacity of the 50mm lens to an even wider aperture, setting the F-stop lower at 1.4 to create the shallowest depth of field. Again, the same perspective and light situation but the background now has a more “blown out” quality and the brightness and color intensity of the subject really pops. The foreground of the wire basket is much softer looking and the details of the strawberries are most defined. To me the image has become more painterly looking with softness and highlights and strong but select focal perspective.
THE BOKEH EFFECT
Bokeh is the use of a shallow depth of field that allows the background to take on a magical “out of focus” look ~ it’s a purposeful technique that creates ultra soft dream like backgrounds and in our examples create spherical light shapes. I used a 50 mm lens set at a 1.4 F-stop to gain focus in the foreground of the image while the colored lights hung behind have an “out of focus” glow.
For each snowflake bokeh image below, I also employed the use of a wall mirror to add light on the front of the image, but a small and well directed flashlight could also be used to illuminate the focal point. In these two snowflake examples the light source was from the left.
The mini lights were hung at least three feet behind the foreground subject and we shot several exposures to get the desired effect, this is a 1/60 shutter speed. The background colors are changed by altering the temperature and saturation with photo editing software (Photoshop in this case).
An easy Bokeh effect for the novice who just wants to capture the light circles and not a centrally focused still life is to select the 1.4 F-stop and place the camera on a manual focus setting. Find the shutter speed (1/60 for this image) which gives you the desired effect and then shoot all kinds of holiday lights. This is the Christmas tree in the center square of my town.
A colorful bokeh image like this one below could be turned into an invitation or label for a wine bottle. You could also manipulate the color of the entire image by opening in a photo program and adjusting the hue and saturation.
Use this next image to create a fun gift tag for a gift of your homemade French macaroons or to identify your offerings at a cookie swap.
In this image we have lit the snowman from the front with a mirror. We were actually able to use the warm light from the mini Christmas lights to reflect back on the snowman giving him a more vintage, holiday appeal.
I hope these tips from my process help you to achieve the desired effects that you are looking to capture this holiday season. As I have said, “practice makes perfect” in the field of photography and likewise, there really are no “mistakes” if you are able to achieve the look you are looking for.
For more of my work check out my blog and be sure to pick up a copy of my magazine HOLIDAY WITH MATTHEW MEAD ~ order by December 12, 2011 for delivery before Christmas.


* * *

Thank you so much Matthew for sharing your experience and insight with us today, I’m so inspired by your ability to create real magic with your camera!
Don’t miss even more of Matthew’s talents inside the pages of Holiday Magazine.
On sale now, buy it here!
.


Great tips! I definitely need to figure out the blurry background technique!
Wow, that is priceless advice. Thank you so much for sharing your tips with us this morning and then bringing us more from the amazing Matthew Mead!! This is the best Christmas present, ever.
~Sarah
Those are great tips! I’ve been playing around with my camera more and really experimenting. I appreciate the explanations and new settings to try. I have that lens too and it is my favourite!
LOVE these series! i really needed this! thank you for sharing such useful info!!
Great tips! I use the same for all my food photography – Rebel with 50mm lens.
I had a log of fun with Christmas light bokeh in my last macaron post :-)
http://www.yummymummykitchen.com/2011/11/sparkling-cranberry-brie-bites.html
GREAT tips! Thanks for posting this! I just got my first DSLR so this was really helpful!
Wonderful tips! Thank you so much for sharing these details. Can’t wait to try them out myself. :)
Thank you so much for the tips now and this morning! I was just telling another blogger the other day, I wish someone would just tell me the #’s to use with my camera. I have a nikon 5100 so I know it’s different but I’ll give these a try :) Thx!
Thanks for the tips, I am going to test some of them out. Totally made my day!:)
Awesome, awesome, AWESOME!! I’m bookmarking this for future reference. Thanks so much! Looking forward to putting these tips to good use! I love my 50mm lens, but I think I’m going to love it even more. ;-)
Great post! I never would have thought I’d go back to manual on my camera. But I do realize that is the answer to beautiful pictures now! Just gotta ask santa for a 50mm lens!
Wow! Stunning photography! Both of these posts have been very informative. I have a new camera on my wish list and will be referring here for help! Thanks for sharing all of your tips with us! Just picked up the magazine today!
Thank you so much for being willing to share such valuable information!!!
Merry Christmas to all!! :)
~*Jessica
Such a great post! Thank you Kate for sharing this wonderful wealth of information with us- and thank you Matthew for your priceless tips! And I hope to see more collaboration from the two of you-you make a great team!
Thank you for this great post! I am going out to get a new camera as soon as I can. You mention both Canon and a Nikon. I’ll be moving up from a digital point and shoot – any suggestions as to which I should get?
GREAT tips! I can’t wait to try these out. I never thought about taking a picture of blurry lights to use a label. LOVE IT! Thank you SO much!
I love Matthew Mead, and his images are spectacular. I can’t wait to try my hand at bokeh now. Thanks!
Awesome tutorial! Thanks Matthew!
I use a 50mm 1.4 for most everything. Thanks for the info on lighting tools. That’s what i really need to understand better.
@Jessica @ fourgenerationsoneroof, the D5100 can do all that. I bet you could even set it to Aperture priority, open it up to 1.4 or even 1.8 and with the right backgrounds and lighting you could have some beautiful bokeh.
Thanks Matt, very useful tips! Can you list down your top 5 photography equipment you normally use for a session?
Great info. Thanks for sharing. I guess the tip about the light fills under a subject explain why my husband says the best shots he’s ever taken of the kids were outside after a light snow! Who knew.
So helpful Matthew…you have an artist’s eye in addition to the technical know how.
Wow!! Thanks for the tip! In fact, i just got that very same lens last night! Will absolutely try all the tips now!! Thanks a million!!
This is a great article! Thanks :)