I’m so very happy to be sharing this powder room makeover with you today! I had a vision of a fresh blue and white coastal inspired space from the beginning and I’m so delighted with the final result!

I had a lovely powder room for five years, some might argue it wasn’t in need of a makeover at all, and I wouldn’t disagree, except when you live in a space and see it for so many years as the same old thing, it’s instinctual for those of us who do this for a living to want to refresh with a new look.
Sometimes I start from scratch, and sometimes I look at the pieces that exist and work with them. This makeover was a little of both. I loved the mirror so much since it fit the wall so well, also the light fixture and bamboo window treatment. No need to change them! What I was tired of was the pedestal sink simply because it offered no storage for toilet paper, soap, etc. I got by for years storing it in a cabinet outside of the bathroom but then decided I wanted a small cabinet in here, one with storage and one that had more surface space as well.
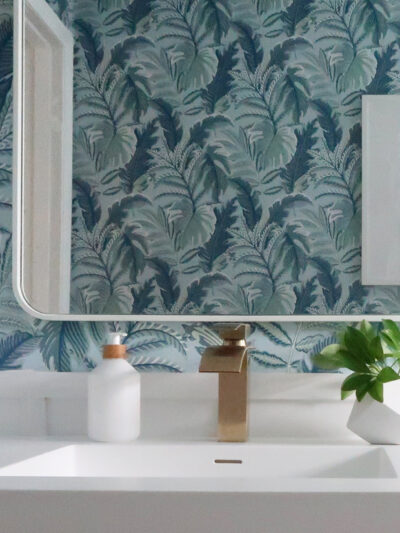
This is the image of my bathroom from a few years ago when it was photographed for Refresh Magazine, a special interest publication of Better Homes & Gardens. I always loved the dark paint above in contrast with the white beadboard wallpaper below. For this makeover, I kept the same mirror, glass wall shelf, light fixture, and window shade. To give the space a new look, I replaced the pedestal with a cabinet vanity with a marble top, and swapped the chrome fixtures for a matte brass finish. I also changed the beadboard wallpaper to a DIY shiplap wall treatment, and replaced the dark paint with a beautiful blue waves wallpaper.
Old:

New:
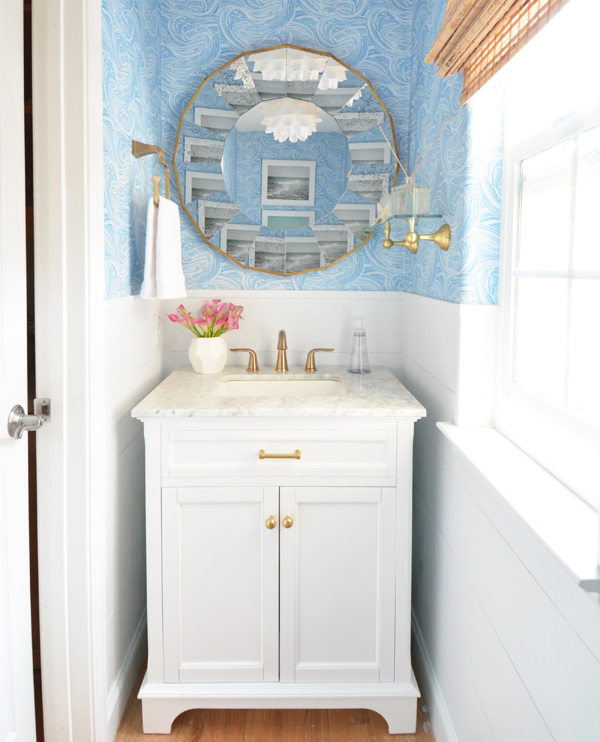
The blue waves wallpaper is from DesignYourWall, it inspired the makeover and I partnered with them on this project to give this small powder room its refreshed look.


On the toilet side, you can see the continuation of the DIY shiplap and the wallpaper as it wraps around the space. Above I hung two coastal prints that used to hang in my guest room years ago.

Installing prepasted wallpaper like this is not as difficult as you might think! It really comes down to preparation and following instructions. From the start consider two things.
1.) Circumference. When you wrap an entire room with wallpaper, in one of the corners the patterns will meet at a seam and not match up simply because the circumference of the room isn’t the exact same in inches as the width of multiple strips of wallpaper. You have to decide where you want that to happen. In this tiny powder room, I decided I wanted it to happen in the little strip of wall above the door where no one would really look. I did a little patch job there instead of choosing a corner where the patterns wouldn’t meet. If you’re covering a niche or less than three walls then you don’t have to worry, but if you’re wrapping four walls, it’s a decision you have to make.
2.) Wall Condition. The walls in this powder room (original to the home before the remodel of 2008) have an orange peel texture. Not my favorite, but at least in this space it’s not too bad, and the texture is very light. If you have heavy orange peel or knock down texture, before you wallpaper you’ll have to either retexture the walls or use a wall liner like this for the paper to lay flat. You decide.
Like I said, this project is all about preparation of the walls, gathering the proper tools, and following the instructions. These are the ones that come with the prepasted paper I installed. Easy to put up and if you read the note at the bottom you’ll see, so easy to remove if and when you ever want or need to.

First, measure and cut:

Turn paper pattern side down on a towel and activate the paste with a spray bottle. Follow instructions for “booking” the paper.

Matching the seams up is the most challenging part, it just takes patience. Flatten and smooth each strip as you go along. One little tip regarding the edges, I noticed sometimes they peel up a little bit in corners so I used a tiny dab of Elmer’s craft glue to hold them down, it worked perfectly.

The DIY installation took a few hours but it wasn’t too difficult! The result was this beautiful space!

I still love the ceiling fixture, so it stayed. The new faucet and towel hook are by Delta, it’s their champagne bronze finish which looks more like matte brass to me.


I was lucky to find the bathroom vanity on sale at Lowes. I purchased it for $399 at a bathroom sales event a few weeks ago, it was half of its usual price. The cabinet gives me the storage I wanted and a beautiful marble surface. I didn’t install the marble backsplash, I like it better without but if I notice too much water splashing over time, I can add it later.
I repurposed the glass shelf and toilet paper holder, I simply spray painted them with my favorite faux brass spray paint.


So much style packed into only 21 square feet, I love it!
Sources: blue waves wallpaper / vanity / faucet / towel hook / mirror / ceiling light
*This project brought to you in partnership with DesignYourWall. Visit their online store for hundreds of selections to start your own wall makeovers! All opinions are my own.
.

Lovely, just lovely! Powder rooms are the best rooms to have some fun! Love how bright and happy your powder room is! We just did ours in the black Nina Campbell “Swan Lake” wall covering. It’s so dramatic and I just love it! TOtal opposite of yours but both so fun!
Sounds amazing!!! Yes I agree, you can have a lot of fun in little spaces like these :)
Love love love this!
thank you Anita!
Such a fresh makeover! I love how bright it is. The original was nice, but these new photos definitely feel more fresh. Sometimes we just need a little update in our lives, whether that means changing a few photos on the wall or a bigger renovation like this.
Agreed! Full top to bottom makeovers are not always necessary :)
It’s beautiful, Kate! I like your choices, especially the faucet. I would have chosen a chrome or polished nickel – the “safe” choices – but I love this look. Following you and your style keeps me out of a rut!
My daughter just bought a new home built in 2002 and I am trying to get her to let me redo her powder room. She is opposed to wallpaper. The peel and stick ones are so expensive. Is this more like the wallpaper we used to hang but it removes easier?
Kim
It’s true the peel and stick are pricier. This prepasted one was only $38 a roll as opposed to $40 for a 2 x 4′ sheet. It’s more cost effective and yes, it’s remarkably easy to peel off when done, none of that paper residue underneath that you may recall from the wallpapers from decades ago that are misery to remove. The products have come such a long way!
Kate, I love this makeover! You must feel so happy when you walk in and see that fresh look. We are currently redoing one our bathrooms, and I’m looking for hardware similar to that on your vanity. Did you spray paint that as well, or if not, can you share your source? Thank you. Love the work you do!
Hi Lisa, yes this was spray paint as well. I’m adding a matte brass look knobs and pulls to the kitchen on the flip house, they are the “honey bronze” finish by Top Knobs called Kingsbridge and they’re so beautiful, here’s a link: https://www.topknobs.com/tk852hb-kingsbridge-knob-2-3-8-inch.html (they also have pulls too).
Thanks so much, Kate. Those look perfect!! I agree, so beautiful.
Wow, your bathroom was beautiful but now with that change is gorgeous, love the blue waves wallpaper, great look! Good job.
Very nice Kate! I have to say I liked the ‘before’ version as well. They both look great. You definitely have a knack for great decor. For such a small space, it’s really done very well.
I have a bathroom you can come decorate any time, LOL! :-)
Blessings,
Elizabeth
Wow gorgeous refresh~
I really wish the links in your emails would work though.
Oh, my gosh, that’s gorgeous. LOVE!
Kate,
Catching up with you, finally. Who doesn’t like blue and especially in a powder room. I read years ago, somewhere, that powder rooms are great places for a surprise. The rooms can be a delight to step into when the business at hand is not always so delightful. Thanks for sharing.
Such a pretty makeover, Kate! LOVE!!!
Beautiful transformation, Kate! The wallpaper makes such a statement, but pricey for a 2’x4′ roll ? I would love to see how you installed your shiplap. Maybe you can share that soon.
There’s a link to the DIY shiplap in the post!
Kate
I love the rework, especially how you change the tone from chrome to using matte brass finish, and the champagne bronze faucet of course. Always love Delta for their design and technology. The new one actually looks a lot more refreshing than the old pic.
Room updates are a good idea, even if they aren’t completely necessary. These powder room updates really open up the space and make the room look peaceful and serene. The blue tones seem to suit the room much better.
Love this so much! I tried the link to the wallpaper and it says the page is not available, nor can I find this wallpaper on their website. Can you tell me the “official” name and perhaps I can find it? Thanks!!!