My friend is redoing her little girl’s room and she really loves the coastal look in her home, so when she mentioned she was redecorating, naturally I volunteered my help.
One of her requests in her girl’s room design was to makeover the pine dresser that one of her in-laws painted for her daughter years ago. It was a kind gesture with a *ahem* questionable result. This is what the dresser looked like before I got my hands on it.
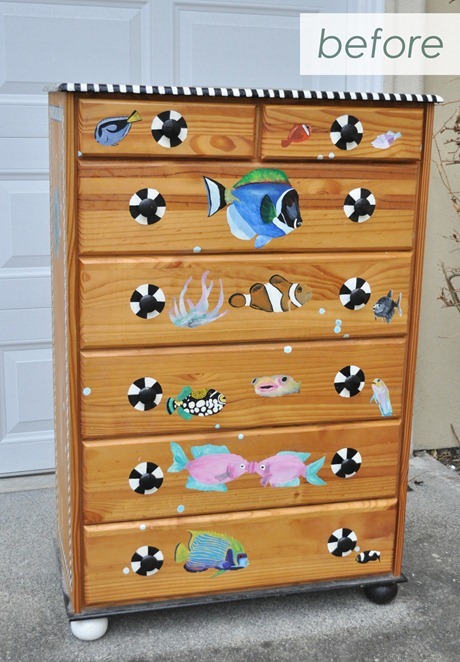
Clearly someone got a little carried away with the ‘Under the Sea’ theme and then threw in some black and white action just to keep us all mesmerized. It’s not that I have a thing against tropical fish. They’re cute on canvas or in a fish tank or floating in front of my snorkel mask while I’m vacationing in Hawaii. I’m just not a fan of them on a pine dresser. (Which one’s your favorite by the way?)
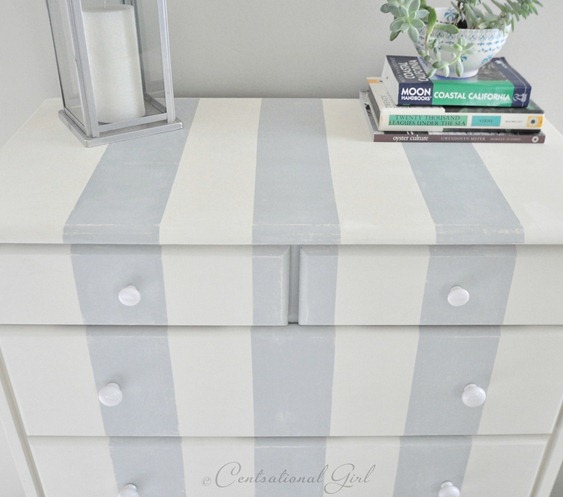
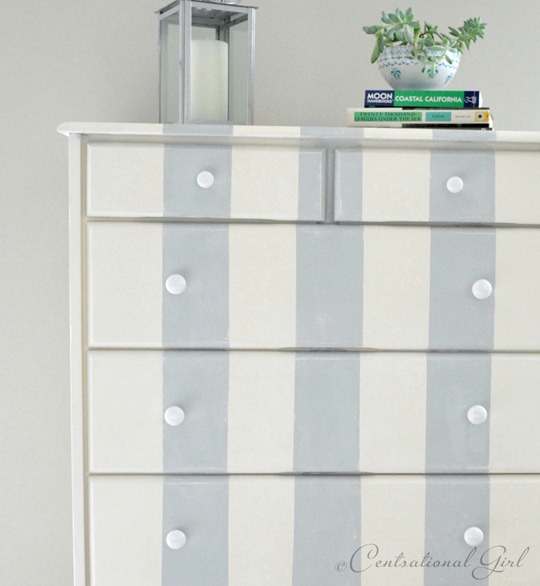
We decided to keep with the coastal theme but I transformed the dresser from a nautical no no to a more subdued Nantucket nicety with thick gray stripes running down the front.
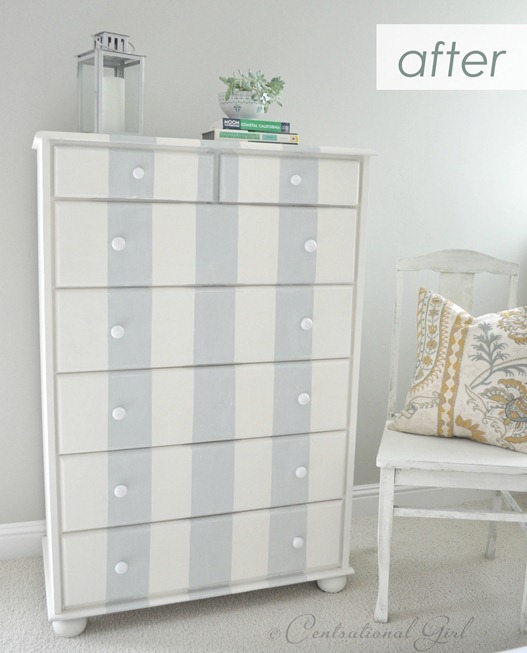
Super cute for a little girl’s room!
Here’s the step by step.
AS chalk paint is one of my three favorites to paint furniture with, especially when I’m going for a weathered or distressed look, so I mixed up some Old White, Paris Grey, and a little Duck Egg Blue to arrive at a bluish grayish shade for the stripes.

But before the stripes, I started by sanding the dresser smooth and then priming the dresser with Zinsser Cover Stain. Usually, AS chalk paint does not require priming but I absolutely could not risk those fish seeping through – using the primer bought me that peace of mind.
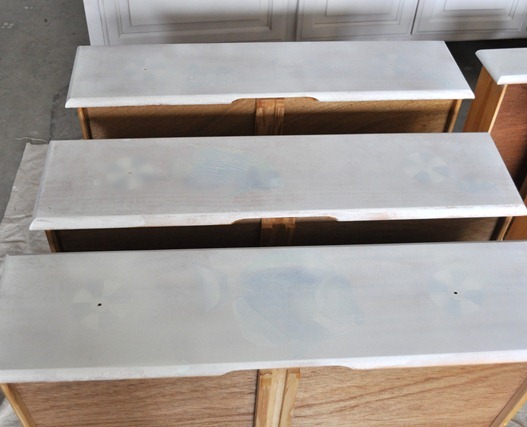
Next I painted the dresser in AS chalk paint in Old White, then once it was dry, measured and marked my stripes with painter’s tape. When painting stripes on a dresser, make sure your first coat is not just dry to the touch but completely dry (sometimes it’s a full day, sometimes as long as two) since you don’t want the painter’s tape pulling up the base paint when you remove it.

Here’s the key to a perfect stripe I’ve learned over the years, first paint over the tape with your base color to seal it and allow it to dry.
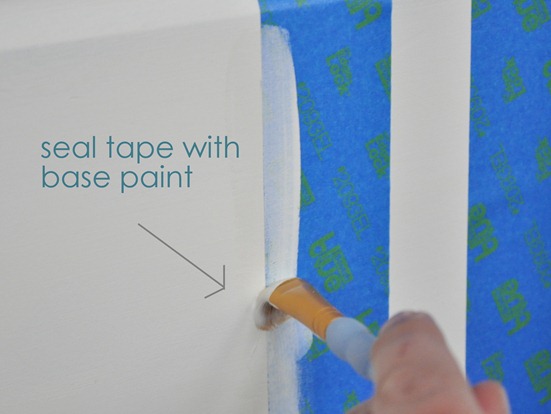
Apply your stripe colored paint on top of the sealed painter’s tape …
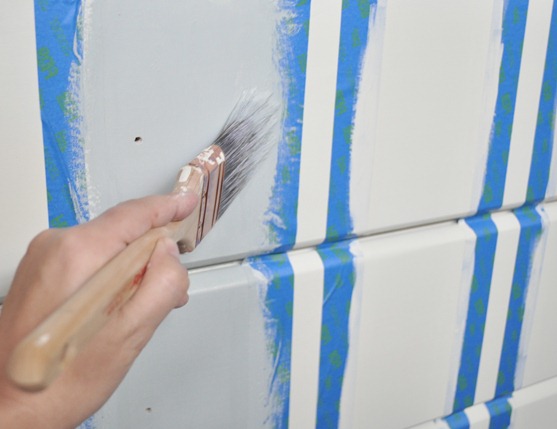
… then peel the tape away slowly and at an angle when the paint is still wet.
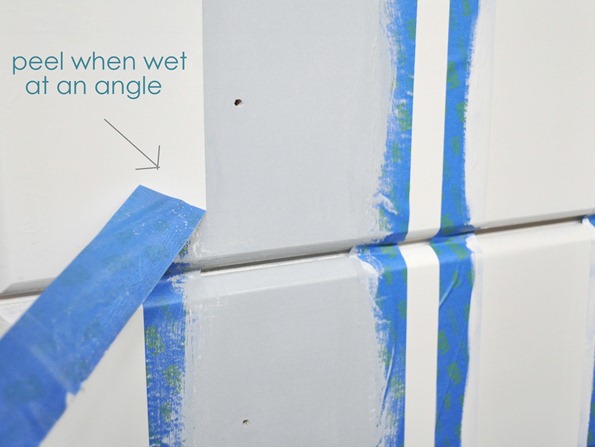
I only used one coat of paint for the stripe, but you may find you need two. In that case, peel the tape when the second coat is still wet.
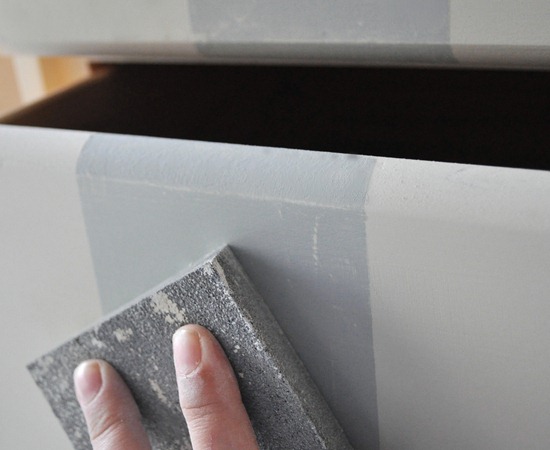
Once the stripes were dry, I distressed them a little to give the dresser a slightly weathered look, then waxed it with clear wax.
The stripes run all the way from the top straight down to the bottom and give the piece a cool coastal vibe. New knobs are simple white ceramic ones in two sizes from a local hardware store.
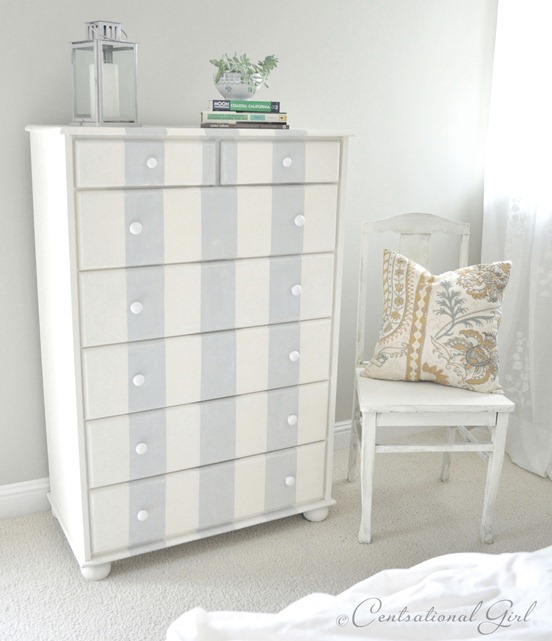
I can’t wait to give it back to the family this weekend!
.


Very pretty!!
Kim
Oh, I love this! Painting stripes terrifies me, but I love this look!
Love it, Kate. It looks amazing… And much more classy than fish. :)
Okay, the before was hideous and is such a good example how you can really make an improvement! Have you tried any of the homemade Chalk paint recipes and color conversions? I love AS chalk paint, but its so expensive!
this is a great tip. I’ve heard to paint the tape with clear paint to seal it, but this is much easier cuz who ever has clear paint on hand, or if you do, can find it?
Everyone should have a friend like you! It’s stunning!
The dresser looks so cute. I love your tips for pulling the tape off to ensure a clean removal.
“nautical no no to Nantucket nicety”… love it! And seriously, why did someone not tell me that painter’s tape trick before now?! So much time, energy, and money wasted! I’m feeling the urge to paint some stripes now!
The whole makeover makes me want to say “Ahhhhhh” It is like sweet relief!
This breaks my heart! The before was wonderful for a child, but I do of course see how she would grow out of it.
so cute, great job!!!!!
Looks absolutely perfect Kate!!Love the color palette you used!!
Please come and join my new Fashion Giveaway from Fresh Produce!
xoxo
Karena
Art by Karena
absolutely my favorite are the kissing fish. Haha. Jk. It looks awesome finished!
Love this look! I want to try this in blue and tan for my teenage son.
I love that you called it a “nautical no no”! :) Such a great transformation, great job as always, Kate! xo
It looks fab now. Love the tip about painting the tape with the top coat first. Will def have to try that – if I ever get away from the eight month old clinging to my leg and manage to make-over another piece of furniture in my life :-)
The “before” dresser is something my in-laws would do for me, and then get offened when I don’t jump for joy and the shear beauty of it. Nice job Kate.
It’s gorgeous! Thinking about doing the same thing to a pair of twin headboards we have – you’ve just cemented the decision!
Those strips are divine and as always your photography is stunning! We’d love you to link up to our new Repurpose-Remodel-Reveal Transformation party starting tomorrow morning, it’d make our day!
The after is so absolutely pinnably gorgeous (smile)
Bernadette
I really really love this. Subtle by tres chic. where do you buy your chalkboard paint? I looked today at Home Depot…but they only sell black. I think I saw one that said you could add tint…but I’m not sure. I don’t think my Lowe’s carries it either. I’d love to use this paint…but I can only find black. Again…legend…..ary.
This is inspirational! I want to add some coastal and this would be perfect!
I love the dresser, but what is the pretty wall color?
I love the way it turned out…LOVE!
I think my favorite is the mashey faced one in the middle…with pink lipstick!
Yes, your soft stripes are a THOUSAND times better than the soccer fish :) but my eye keeps going to the knobs off center of the stripes. I think I would have either, repositioned the top drawer knobs and lined the stripe up so they were centered, or treated the top drawers differently and lined the stripes to make the remaining knobs centered — its a gigantic improvement over the old, though — (and I use Caromal Colours Reclaim paint — I like it much better than AS)
I love it! Turned out great. I just bought a piece painted by ASCP and the wax finish looks splotchy. Any thoughts?
I sooo love it…amazing change…You are so very talented and creative..you are definitely the “Centsational” girl…
AWESOME!!! :)
Hi,
The dresser looks great. What an improvement, love the stripes. Thanks for the tips.
Can’t believe it is the same dresser, and such an easy fix! I am sure its new family will love it!
Goodness, it’s BEAUTIFUL!!! Lovely, lovely, lovely! Thanks for the tips on painting stripes, so have to try painting some, somewhere. Happy Friday!
Hey Kate,
Wonderful job on the dresser! Love the soft distressing.
I just returned from New Orleans and two days with Annie Sloan herself..you are going to LOVE her presentation on colors that she will give in San Fransisco. I read that you will attending her Workshop there…you are in for a real treat…you will fall in love with Annie. She is the real deal for sure!
Janet xox
The Empty Nest
Thanks so much Janet, yes I’m looking forward to the SF presentation on Monday!
Kate
It looks fabulous! Great tutorial, too. Thanks for the tips about the chalkboard paint and also sealing the edges of the tape with the base coat.
Jane
My daughter has the same type of dresser- I am sooo doing this! Thank you for including the paint colors and brand.
Perfect for a grown-up girl:) Loving that you went for a soft grey, looks so pretty.
much better than the fish:)! great transformation. love that the stripes run up to the top.
I absolutely adore this look. It’s inspiration for what to do with my white furniture from when I was a little girl.
Out of curiosity, where is the pillow on the chair from? I love it! Thanks!
Hi Marcie, that pillow cover I found last year at Pottery Barn on sale – I believe it was their summer collection. Pretty right? :)
I love the dresser what a huge difference. Much more elegant. Thanks for sharing.
What a transformation! This is absolutely gorgeous. I would love to try stripes, but how do you make sure your stripes are straight all the way down? How do you position the tape to get everything straight?
Hi Tara, I should have mentioned that! I use a good ol’ fashioned level to make sure the painter’s tape runs perfectly straight from top to bottom.
Kate
What a great way to add character to an otherwise nondescript dresser. Really like it a lot.
Oh my, that is just perfect, so soft looking. Oh and the kissing fish are tops with me !!
So cute, thanks for sharing. You gave me a great idea for my own dresser that I’m hoping to re-do!
Thanks for sharing that great tip! I have yet to try stripes because tape and I do not get along.
Looks great
Can we be friends? Then you can offer your fabulous hand at painting some of my ugly furniture pieces?! :) Great job!
WHAT a transformation!!! It looks beautiful now!!!
I love the stripes and I am so glad the fish on the dresser wasn’t your creation. It was the picture that showed up in my blog reader and I couldn’t help but think…”well as long as she likes it”. The nautical strips look so much better.
She is one lucky little girl! This may be my favorite redo of yours.
Very pretty!
So pretty! Love how the stripes turned out. So much better than the fish :) I’m also loving the pillow.
Looks so much better. I learned that trick of painting over the tape to get a nice crisp line a while ago and it works so well. Happy weekend!
Very calming and pretty. Way to go.
Wow. A gazillion times better with a fresh coat of paint. And stripes. Love the colour of grey you mixed up. Very, very pretty. :)
It’s gorgeous! I wish I’d read your tutorial on stripes 10 years ago. I learned the hard way that dry to the touch is not cured. I painted stripes on my daughter’s bedroom walls only to have the base color come off with the tape! I’ve never tried painting a little of the base coat over the tape, but I will in the future. I always just went over the bleed through areas with an artist brush later. Wish you had been blogging 11 years ago! Love your blog and have recommended it to every DIY friend and decorator I know.
Gorgeous!
Where did you find that pillow???
Love it!
Hi Holly, that pillow I found on sale at Pottery Barn last summer!
Kate
I love the dresser, but what color is on the wall? I love it. would like to know!!!
Fabulous! Love the colors on the dresser!
I love this dresser! Looks amazing.
Love the chest! Great tutorial!! I have been wanting to try the chalk paints for some time now, you have me motivated!
Wow! You are amazing! I never would have thought that dresser could look so good! LOVE IT! I’m so ready to find something to paint with that chalk paint!
Just gorgeous, Kate! Beautiful next to that chair and pillow. Your staging is always perfection. I am now craving the beach and sunshine. I know we need the rain but I want sun….am so ready for it. I am hoping to go to the ASC workshop on Monday. Crossing my fingers! Have a Happy St. Patrick’s Day!
this turned out absolutely perfect.
great job!
Amazing transformation. Perfect.
I wonder how the in-law would feel if they read this about their *ahem* fish that they obviously spent time and love painting?
Hello Anonymous, it was years and years ago that the fish were painted so hopefully she doesn’t mind, but ultimately it was my friend’s decision to repaint it, so with her permission, we gave it a new look.
Kate
I like what you did!! I would have primed it also. Need that security blanket!
Amazing transformation!
OMG Kate..That fish thing looks so hideous..you just amaze me with the transformations that you do with paint..I will be checking back through your posts for lots of advise when I start re-doing some of my furniture when it gets a little warmer..
Oh my gosh, the before? Yikes! Even the legs where done in the black and white mesmerized theme. Still wondering what that had to do with fish…. Love, love the striped finish, sooooo much better. Great tutorial once again.
What? You no likey the kissy fishies? The dresser turned out way better that I could ever imagine. I think I am going to go feed my fish on Happy Aquarium now.
I Love the dresser, but what color/brand is used on the walls? Such a pretty gray!!!
Wow…great transformation. Making me think one of the dressers sitting in my garage needs stripes…mmm. My question. I have never applied a clear wax after painting. What is the purpose? protecting the finish, sheen? What kind do you use…so I know what to look for. Thank you.
Hi Jill, the purpose of the clear wax is to solidify the paint and also protect it. It has a matte sheen which is really nice. I’ve used several brands, Briwax, Annie Sloan, Minwax and SC Johnson, all work well.
Kate
I absolutely love that dresser. I found Chalk Paint at The Melon Patch in Ontario and have ordered it online. I can’t wait to try it. I have a beautiful Armoire in a Robin Egg Blue but I’m going to paint over it with Arles. Have you ever used that colour before? I can’t wait for the paint to arrive.
I’m also going to try your stripe design on an old dresser. I love your website. It inspires me to be creative.
The before is just delightful! A good 15yrs ago when sponge painting was in style, my Mom painted my little brothers’ room with a sponged “sea” on the lower half, a tropical fish border halfway up, and then green and blue polka dot “bubbles” to the ceiling. At the time it was neat, and 4&5 yr old boys thought they’d died and gone to a magical under the sea heaven but, like this dresser, it has long since out lived its glory days and been transformed to better suit 2012. Love your finished product!
Ha! When I first saw the fish dresser, I thought, “oh, she’s turned to the under the sea theme” and then realized it was the before shot. Much better after you played with it! I just saw that you’ll be speaking at SNAP, I will too! Excited to meet you;)
Wow! Beautiful transformation!
Hi – I absolutely love the transformation. I have to agree that the “before” was horrible, but to defend the “artist” on one point, I think the black and white circles might be life rings? That’s no defense of the aesthetic, but I think it does technically fit the theme…
That gray striped desk is amazing! Thanks for the tutorial.
Gorgeous! How long does it take you to paint a dresser?
Hi Mary, here’s the breakdown:
Sanding 20 minutes
Priming 30 minutes
Painting 45 minutes per coat
Waxing – 30 minutes
Hope this helps!
Kate
Perfection! I really appreciate the tip on sealing the ape using the base paint color, when doing the stripes! Learning from the master!
Beautiful. Did you (or do you ever) paint the sides/insides of the drawers or leave them as is?
Hi Susan, with raw natural wood I typically leave them unpainted, I like the contrast when the drawers are pulled open plus too much paint can prevent drawers from sliding in and out smoothly.
Kate
LOVE the color combo and the chalk paint. GREAT JOB!