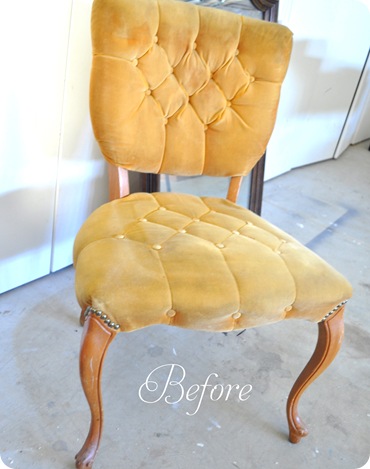
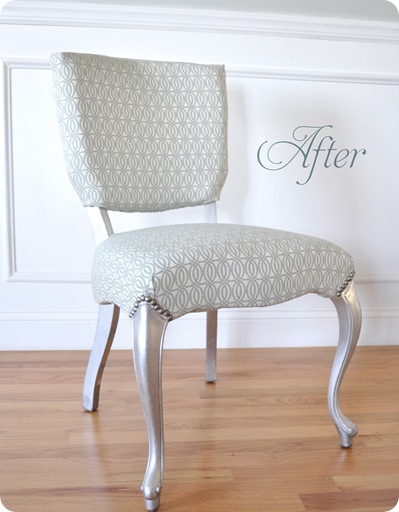
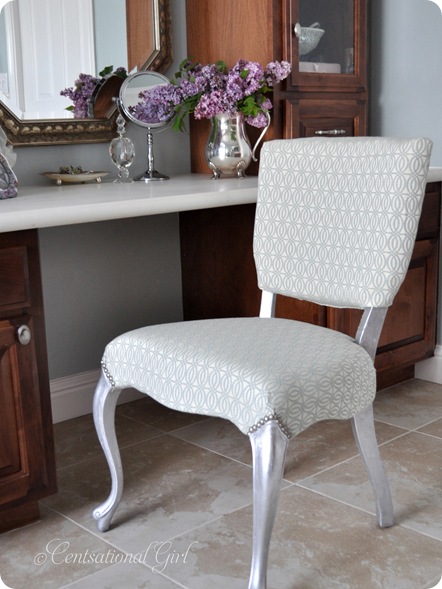
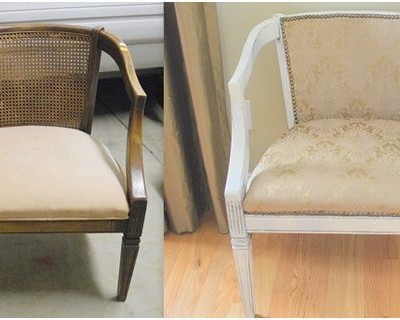
I finally finished up a chair makeover I’ve been meaning to get to for awhile. I found this one at a thrift store last year and I bought it specifically for the vanity in my bathroom. I loved the curve of the legs and the size was perfect, but the fabric? No thank you. It was dingy and stinky so the entire chair definitely needed to be reupholstered. For this piece, I had some fun adding a glamorous feel with a silver leaf finish on the legs, plus I replaced the foam and fabric with a modern geometric.
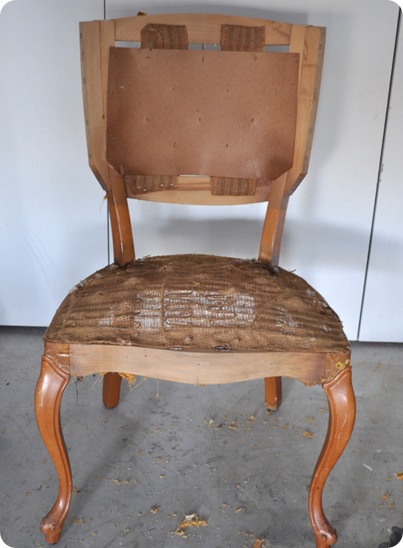
Here’s what it looked like last week.
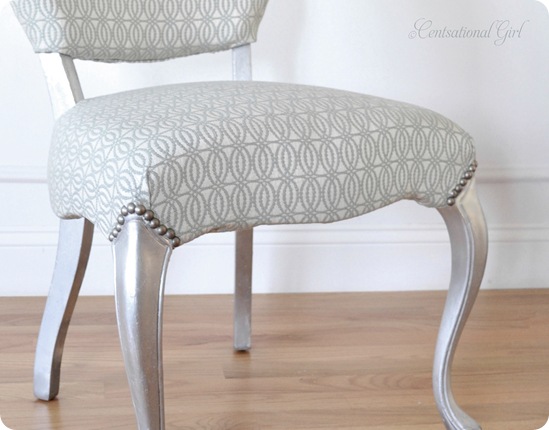
And now.
I went back and forth deciding whether to add some tufting with fabric covered buttons, but decided with the glitzy silver leaf and the swirling detail on this Annie Selke Pearls Slate fabric, to skip the tufting this time.
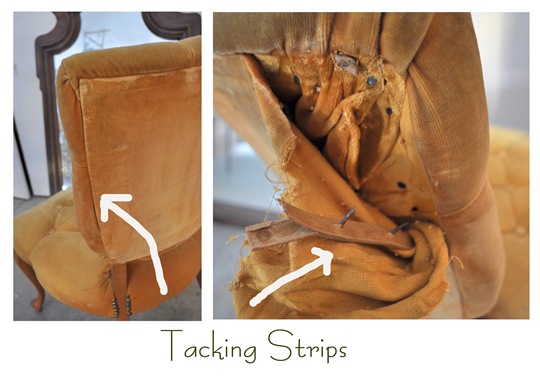
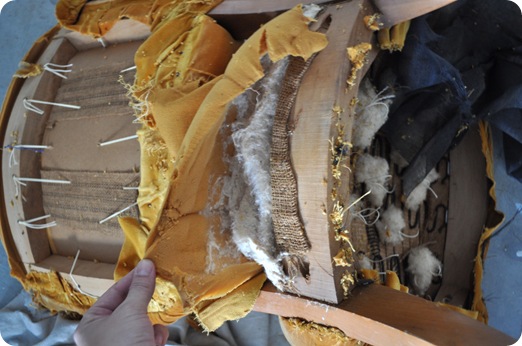
I find the best way to understand how to reupholster a chair is to analyze the original upholstery job. This particular chair was a hint more complicated because of the necessity of tacking strips along the back of the chair.
For those who don’t know what they are, tacking strips are a tool used by professionals to create a clean edge with fabric where there is a visible seam. You can find them in fabric stores or order them online too.
Stripping an old upholstered piece is time consuming and an icky job. There are always a zillion tacks and staples to pull, and you’ll often find the foam and old batting underneath is disintegrated. Ewww.
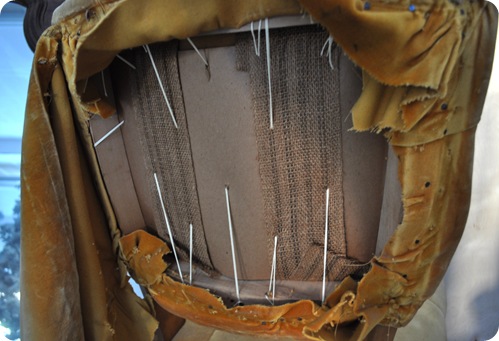
It took me an hour to get it down to this frame. The springs were in great shape so I left them intact, then gave the visible parts of the frame and the legs a coat of spray gray primer, which is a great base if you’re planning to silver leaf a piece.
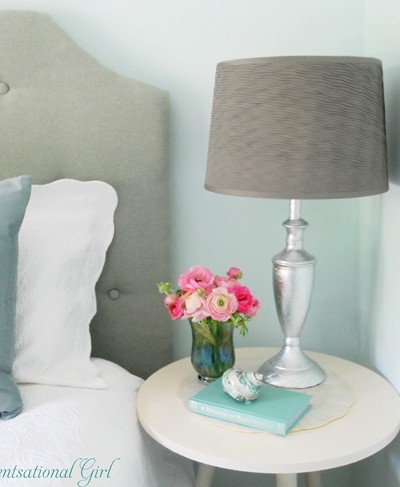
You get a subtle crinkly texture with silver leaf, but it is a pain in the patootie to apply. I followed the same method as with this silver leaf lamp. However, with the chair, I couldn’t get the silver leaf to settle in the ridges very well, plus it was shinier than I really wanted, so I used some ‘Silver Leaf’ Rub ‘n Buff over the top to tone down the reflection a bit and fill in the ridges.
Then I protected it with my new favorite: wipe on water based Varathane Polyurethane in ‘Satin’. I found it at OSH and it’s so easy to use. Wipe a small amount on a rag, then wipe the protectant on your piece, easy peasy. 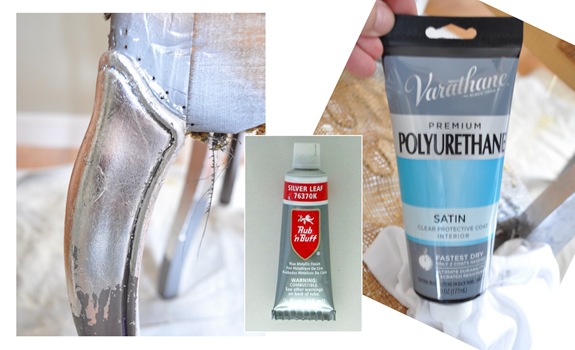
The combo of the three led to this finish.
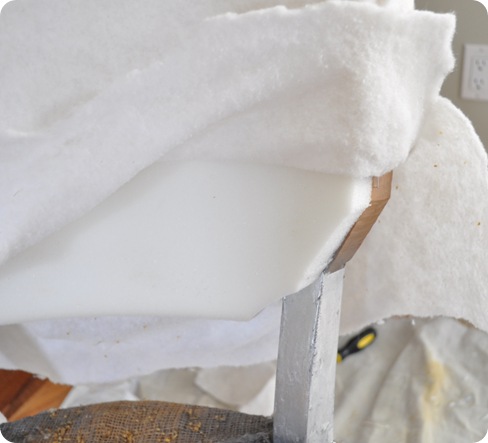
Gray primer + silver spray paint could achieve a similar look, but the‘Silver Leaf’ Rub ‘n Buff creates a muted, hand rubbed sheen that’s so pretty. Once the legs and frame were covered in the silver, I reupholstered the chair with new foam and batting.
As an alternative, I could have sewn a slipcover for the top, then tacked it underneath, but I thought this chair was a great opportunity to practice some more with tacking strips. If I was going to tuft the chair with fabric covered buttons like this headboard, it would be right at this stage (creating a hole in that batting of course).
You can see in the ‘Before’ how the original tufting occurred by pulling the buttons with twine and securing them to the wood frame before sealing the back of the chair with tack strips.
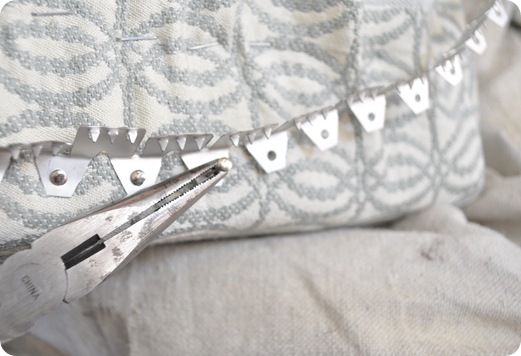
To close up the back of the chair, I chose flexible metal tacking strips, also called flexible curve ease, with metal teeth. I found this metal tacking strip at Beacon Fabrics for about $1.50 a yard.
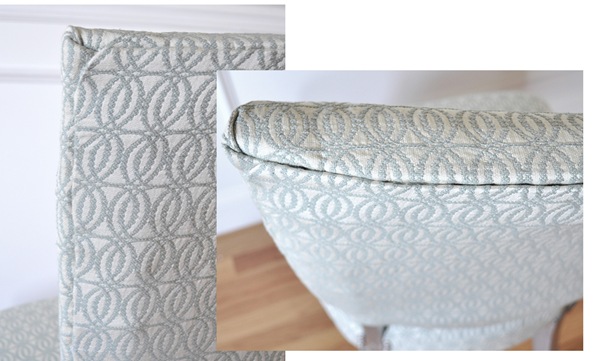
With needle nose pliers and a hammer, you attach the strip with 3/4 inch nails (or upholstery tacks). Then you wedge your fabric inside the metal teeth, then fold the teeth over for a clean seam, hammering it closed with a mallet.
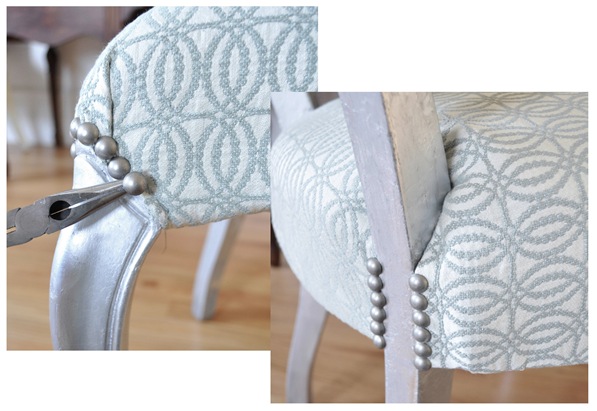
Finally, I had to hide the stapled edges around the legs. When hiding stapled edges, you basically have three choices. 1) Sew your own double welt cord, 2) Hide the staples with gimp, or 3) Cover them with nailhead trim.
In this case, I chose pewter nailhead trim to complement the silver leaf finish. To apply nailhead trim, hold them individually in place with needle nose pliers, then use a mallet (not a hammer) to gently pound them into the chair.
This thrift store chair now sits in my master bathroom. Of course this type of gilding isn’t for everyone, but I do like how it adds a touch of Old Hollywood glamour.
.
.


So stunning!
That is just amazing!
Thank you for the tutorial, it was really easy to follow the steps!
Wow, this looks great. I love the sass the nailhead trim adds. It plays perfectly with the legs and fabric.
It looks so beautiful! I agree with skipping the tufting.. not necessary:)
How absolutely brilliant! I really wish I had your talents.
Oh my goodness, that is beautiful!! You make upholstery not so scary! Thanks, Debbie
Wow! This looks so do-able. Thanks for the how-to.
I could’ve used those tacking strips on my office chair. Ha! I know now. Thx!
SO gorgeous! I love it!
Wow, amazing transformation. You certainly took that chair from drab to fab :)
I think you can add re-upholsterer to your resume at this point. Job well done! I really like the pattern on the fabric you used. I wonder if maybe the tufting would have blended in and/or been too much? The silver leaf looks gooooood. :)
ahhh! That’s stunning!
Hey Kate,
Gorgeous restyle!!
Well done girl…..complete transformation from old and tired to sleek and sexy.
Janet xox
a.maz.ing!
I absolutely love what you did with this. Much glamor indeed!
Congrats Kate!! What a beautiful transformation – looks so stylish!! I have a question: How do you determine the sizes of your pieces to cut for the back and seat? Do you just lay a big piece of fabric say, on the seat, then eyeball how much is required to wrap around the sides then just cut??? I was wondering how you make sure your pieces are not too small.
Can’t wait to see more of your DIY projects!!
Gorgeous! I love the nailhead trim around the legs, it gives it such a fresh look. Where did you get that fabric? It almost looks quilted. Its just beautiful! :-)
soooo very pretty! i love it. and i’m going to have to try that new wipe on verathane. i’m always looking for new sealer options..i feel like it’s an on-going task to find the right thing! let me know how it holds up! ps i’m doing your trellis wall look yet again for another client this week :)
no way in a million years could I make something look as flawless as this! It’s absolutely beautiful and looks SO professional!
This looks amazing!! I really want to learn how to reupholster! But I’m so intimidated.
I am so glad you did this project now!! I have a chair, href=”http://www.littlebrickranch.com/2011/02/this-beast-is-bust.html”>the Beast, that has been sitting half dismantled in our living room!! I can’t wait to finish her up now!! :)
Beautiful chair! Thanks for the tutorial.
Wow so pretty!! I love the fabric you chose!
You make it look really easy although you’ve probably been doing this for years! I’d love to sit in this chair at my vanity. Congrats.
Wondering what kind of staple gun you use. Manual, electric, pneumatic? I’m just starting to dismantle 2 upholstered pcs and want to be prepared when I actually start with the new fabric.
Thanks!
Beautiful, love Beacon Fabrics! This inspires me to get to a chair I posted about redoing a year ago, AFTER I get my bench done! Enjoy your new chair! Janell
This is just GORGEOUS! Thanks for sharing! I love the fabric choice. I didn’t know you should put nail head trim in with a mallet! I put some in on my dining chairs and they kept bending. Does the hammer make them bend?
What’s not to love. Gorgeous fabric, gorgeous finish. Love the tutorial as well.
You did a great job! The chair looks Awesome! Looks new too!
Oh MY, that is gorgeous! You did fabulous work – all around! I love it. It’s inspiring me to get on my own re-upholstery job here. Been kinda intimidated on that, but this tut helps~!
LOVE IT!
Stunning!!! Thank you so much for more detail on upholstery. I haven’t found much about it on line. A local class was on the wrong night. Thanks!!!!
Wow what a gorgeous transformation! Looks fantastic!
WOW WOW WOW!!! You really make me want to try this. That is quite amazing. You have to be proud of yourself! Wow!
Wow, this is beautiful, Kate! You make this look so easy. I’ve never used tacking strips (or even knew they existed), but now I totally want to find a project just to practice. Wonderful job; a gorgeous transformation. Well done!
That is so beautiful. I want to build a master bath just to have a chair like that. :)
It looks absolutely amazing! Thanks for the step by step….
Wow, now I’m motivated to find an old chair and try reupholstery. You made it look easy…and the end result is fabulous!
lovely, lovely. very inspiring indeed.
i’m in the middle of a reupholstery project similar to this one on my blog….i’m a newbie so i was going to skip the tufting as well. you encouraged me to use the tacking strip now so i may have a go at it…i’ve been struggling with that aspect in my brain. THANKS!!
Kate – I don’t know how you do it all! You truly are censational. The chair looks great!!
Oh my goodness, the chair rocks!!! You are so patient to tackle something like this! Way to go, it looks fabulous!
Awesome! Seriously, this post is so helpful and it’s making me feel like wrestling some chairs to the ground and reupholstering them. Thanks for the pointers (never would have guessed about those tacking strips).
AMAZING! I love the silver leaf and the fabric choice could not be more perfect. Great tips, too!
Wow! That is one gorgeous after! Beautiful transformation! I love the fabric you used, and the silver leafing is perfect. Thanks for sharing.
Oh girl you have really out done yourself!! I am always amazed to see your before & after pics. You definitely have great design sense. Thank you for sharing.
Love that fabric!!! Thanks for the show and tell on this one. I wondered how to do the back of a piece like that and this will help so much with a sofa project I want to do!
Oh wow! So gorgeous!
Gorgeous and oh so chic!! Great job, friend.
xo
shaunna
It looks amazing! Tack strips look so intimidating but your’s looks beautiful.
gorgeous. job well done. Thank you for all the description and pics too. enjoy your lovely chair.
It’s gorgeous and perfect as a stand alone chair for your vanity – perfect understated elegance!
I don’t think I’m ready for that level of project, but WOW that is a gorgeous chair!
Thank you for the breakdown on this and the info on tacking strips too. I so want to learn how to reupholster, but it’s harder than you’d think to find good info out there on the subject! So thanks!
OH Kate –
Before I found you I was afraid to paint furniture. I conquered that and learned to embrace spray paint as well! After this tutorial….I am not afraid to attempt reupholstery. Thank you so much for your wonderful pictures, step by steps, and the ability to help overcome my beginner DIY fears!!!
What a wonderful transformation. It looks so gorgeous ‘after’. You did such a great job, it looks like it’s professionally done. Thanks for sharing your tutorial.
Jessie
Gorgeous and beautiful. I’m new to following this blog and I see you’ve done a few pieces. I was wondering if you were self taught on reupholstering or did you learn for a class etc. ?
Love it!! Great job, so classy!
This looks great!! I wanted to share with you that I refinished a table a little while back and I used your dry brush painting technique. Thank you thank you for that awesome DIY! I made a little post about it in my blog and did a link back to you. Thanks again!
Wow! You are getting to be pro at Upholstery, that is hard to do! Beautiful chair now that you’ve added your touch!
Wow! That is just fantastic. It is so beautiful now :)
Wholey Glam! Love this!
The finished chair is beautiful. Thank you for such a clear tutorial.
– Joy
I love it! You did a great job. I wish I had it in my master bedroom.
Hey Betsy, for this project I used a manual heavy gauge staple gun because it was only one piece. A series of chairs or a larger sofa would justify a pneumatic!
Wow Lindsay, so nice to hear that dry brushing worked out! Off to see your handiwork!
Ahhh Kate! I have been dying to re-upholster a horrific chair, and you continue to inspire. My boyfriend even knows you by name lol. Another fantastic job. Thanks for the great tutorials as well.
Love it!! Love the colors. Good job!
Such professional results and you made it look so easy!
You also answered a question I’ve been wondering about…paint legs and wooden parts first and risk the paintjob getting banged up by the upholstery process, or paint wooden parts last and risk getting paint on the new fabric? Thanks!
I love it! I wouldn’t have gone for silver leaf on the legs, but I definately would have changed their colour. I’ve had so many chairs that needed a new blash of life, and now I can see how to use tacking strips. Thank you.
Kate – sighhh – it’s absolutely stunning. I’m so impressed that you taught yourself how to do this!!!!
xo
Cat@BudgetBlonde
What a transformation…Such a classy chair now!
Wow. It really does look gorgeous! Thank you so much for telling about that tacking strip stuff. I’ve done a little bit of reupholstering but didn’t know about that yet. Whoohoo! My life just got a little better. :D
The chair is beautiful, and I’m totally intimidated by the reupholstering process – not because you didn’t provide a great tutorial (because you always do), but rather because I have extremely limited patience! :)
it appears you may be veering away from the “GSC” :) great work!!
It is perfect in its simple elegance! Great job! I have yet to try silver leafing, but you make it look easy.
Kacey
Gorgeous! Thank you for the picture of needle-nosed pliers holding the nailhead in place. I’ve only tried applying nailhead once before and this tip will make next time go So much smoother!
Oh she is a beauty!!! Thanks for showing us how you completed the back, always wondered!
XO
Kristin
PS I love cheese too, pair it with some vino and ahhhhh :)
So pretty! It has a really classic elegance.
Great job on the chair. I just did a similar silver finish on some chairs, but they’ll be a guest post on another blog so I can’t reveal them quite yet. I’ve yet to try the tack strip, but I think that’s coming on one of my next projects. It looks beautiful!
WOW! That looks GREAT!
Great chair. I have thinking o leafing one of my furniture re-dos but was discouraged by the hubby. Now I might go for it.
Thank you for showing us how to do this – I have a chair with a very similar style that I’ve been wanting to re-do. The silver hand-rubbed legs look divine!
Looks great, Kate! Love the nail head trim.
Gorgeous, gorgeous, GORGEOUS!!! These are excellent directions.
I would love it if you would give a cost breakdown for projects like this. Something like:
Thrift store chair $12.00
Paint $8.00
Fabric $20.00
Nailheads $10.00
Total: $50.00
Again I am amazed at your abilities..i only wish you lived next door so you could help me!!!!
This is absolutely outstanding! Thank you so much for sharing this lovely project. I apologize in advance for my dumb question, but did you finish the underside of the seat cushion? I have no idea how to do that. Thanks again and take care!
I wish I have the patience to do something like that. I am scared to destroy the chair, HA! Great job once again!
I love that chair. I must have it!!!!
Way too hard for me, but absolutely love it!
Happiness does not come from reason but of imagination.
Greetings.
Absolutely lovely!
You’re right, this chair had such a nice shape but ugly fabric. I am so encouraged by how you see the possibilities in run down furnishings. I’m working on changing the way I see things.
amazing!
Wow! The finished chair looks amazing! Great job and thanks for sharing the details.
Wow! That is so gorgeous and impressive!! not sure I am brave enough to tackle a chair redo yet…;)
Love it! Looks like a perfect vanity chair. Thanks, Kate!
Wow! What a professional finish!
My goodness…it is just gorgeous! Nicely done.
STUNNING :)
You did a fabulous job! I love the finishes you chose for this chair. I think they complement it nicely. And thanks for the share of the flexible metal tack strips — I’ll have to try those out!
It turned out beautifully! I like how you decided to leave off the tufting with that fabric too.
Wow – your chair looks amazing! I have a similiar one that’s in desperate need of a facelift, but rigid springs make the seat really uncomfortable. Did you have the same problem? I’m wondering if foam and batting would do the trick or if my chair needs more serious help.
You’re making me think that maybe I could upholster a chair I have in my living room myself… I have the fabric, but I’m not sure I want to attempt the back myself… Might be worth tearing it apart to see how they have it put together… hmmmm..
Amazing job! so pretty – enjoy it!
I think your chair is gorgeous, Kate. Very glamorous! You did a beautiful job and that is stunning fabric. I just finished my first ever chair! I am many steps behind you in and have lots to learn to produce a beautiful chair like your chair but I had fun and think mine turned out OK for my first one. You are an inspiration with all that you do.
Wow! It’s beautiful. I’m so impressed, Kate!
I love the silver leaf legs and nail head trim. Silver and nail heads are two of my favorite things. I also love tufting but I think your new look is gorgeous.
Amazing, Kate! I love the color, the nail head trim and the shape. So great when you can refinish something and make it look beautiful!
Wow- look at those beautiful legs! This came out so great! You always make it look so easy!
It’s beautiful!!
Looks divine! The added bling of the silver leaf makes it a show stopper! Beauty!!
Looks fantastic. You did a great job once again.
Another beautiful piece, Kate. You made this look easy but I’m sure it was far from it. Do you know if it’s possible to paint over the silver leaf if in a few years you want to change it up? Also, did you use foam and batting purchased used specifically for upholstery? Or did you use quilt batting and less dense foam from a fabric store?
You are amazing!!!!!! I wish I had your talent!
Gorgeous, gorgeous chair!!!!!
Are you the best of What – I just adore you and your blog. You do everything. I think when your kids get a lil older you should do this full time and sell em. I’d buy it. You are the best
Wow! Thanks so much for sharing that phenomenal inspiration!
Oh my gosh! This project turned out beautifully! I love your fabric choice and the silver leafed legs just pulled it all together! As usual another brilliant job! Thanks so much for sharing.
HA!… I have been using Rub n’ buff for years… it is getting so hard to find around here!.. Love what it did for your chair… beautiful!
Maddie- The D.A.
Yikes .. the chair guts looks intimidating yet u made the proceess seem do-able. Not sure if I could had done it without crying I don’t wanna work on this anymore :) Thanks for sharing ur process!
Great job on the chair, Kate…it really turned out beautifully!
WOW… this looks incredible!! thats seriously a fabulous chair!
love the fabric… such a great pattern! you did an amazing job!! love it!!
Beautiful.
beautiful job!!! I love the lines of the chair, very pretty
Beautiful job! I’m a new fan of your site and talent. What is the color gray on your wall in the vanity with this chair? Thanks!
WOW!! LOVE the finish you rubbed on! Much more detailed than just spray painting – to mix & layer the finishes! Wonderful before & after transformation! You ROCK Kate!!
:D Lynda
Wow! The transformation of this chair is amazing! I have been reading your blog since you appeared on the Nate Berkus show and I am amazed daily at things you do. You are blessed! Great job.
I am DYING! that chair is gorg!
Beyond gorgeous!
Kate, this is one sexy chair! I do a fair amount of reupholstery and it’s a bear, isn’t it? The self satisfaction from it is great, though. This is a beautiful job. Love seeing what you do!
Awesome, awesome, awesome! Thanks for showing how the tufting would go. I have a chair that I want to re-do, but I had no idea how to do that back. I guess I’ll be learning how to use tack strips!
Oh I forgot to leave the link to the dry brush painted console table my husband refinished…Thank you again for the FABULOUS tutorial!! Every one who walks in loves it!
http://www.delightedmomma.com/2011/03/few-things.html
This chair is GORGEOUS! You inspire me!
Love your DIY! Will you please let me know the brand/model of your staple gun? I am going to buy one and do some upholstering. There are so many varieties. I don’t which one I shall buy.
Thanks!
WOW! what an AWESOME tutorial. u r a serious CRAFT NINJA. this was truly inspiring. i’ve always wanted to redo furniture but never thought i could. thanks a million. your chair looks GORGEOUS! congrats. and keep crafting.
GORGEOUS!!! Just gorgeous before (well not the before) & after!! Love the colors you used, it’s so fresh looking! Bravo!
Wow! Not only did you make a clean back seam, but you perfectly matched the pattern on both sides of the seam. Surely that is serious bonus points!
love love love ur work…u always get me inspired…im not silver leafing a dresser while im wrting this comment:))) i have a question when i put the nail head the space between them looks always weird ..how can you achieve this clean look? thx
What a beautiful transformation, i love old hollywood glamour and i love this chair. It makes me wanna go find a chair right away to take on this project.
Hi, Kate – Where did you learn to upholster? I’ve looked for a long time for classes, but there are none offered where I live. Can you recommend a book or video, or did you just go at it and learn by trial and error? I scored a fabulous teak mid-century chair at Goodwill for (swoon!) $5.99, but according to a local shop, it needs $160 of reupholstering. I’m thinking of tackling it myself (eBay was a great source for period-appropriate fabric!). Thanks – as others have said, your blog is so inspiring!
LOVE the chair!!
I want to silver leaf or matallic paint 6 dining room chairs. Not very confident! Thanks for the recommendations.
WOW! thank you ! I have always want to know how this is done. i have 2 chairs of my own that i have inherited that desperately need an overhaul. Now i feel inspired to try. So grateful you took the time to show us.
kate
hi! i just found your blog through Pinterest & i love all your ideas! i can handle the furniture painting, but this chair project looks like a lot of work. it turned out great, very pretty chair, love the fabric you chose! can’t wait to see more furniture redos! thanks for the tips!! :)
Hi–Thanks to my addiction to Pinterest I have discovered your lovely blog with a TON of eye candy!! You have such awesome skill & I just LOVE all of your transformations (& creations!)! I would love to have just an ounce of your talent!! :) Blessings from your newest follower!!
I’m usually more of a gold fan, but I really like this. Great job! It is beautiful at your vanity. I’ve been trying to get up the courage to try to reupholster our dining chairs and your post is definitely motivation/inspiration.
Hi Kate. May I ask what your opinion is regarding silver leaf on bigger pieces of furniture? I am searching for a bomb-type chest for my bedroom. I love the shiny/silver guilderdlook, but was wondering if ‘guilding’ would be difficult and expensive on such a large piece. How do you recommend achieving the look you have on these chair legs on a much bigger piece?
Thanks, Elva
Thank you for this! I have 6 antique chairs that were my grandmother’s from the 1940’s that I want to reupholster. You made it look so easy. I hope I can do as nice a job as you!
What a neat job!!
New follower here.
Hi Kate, i am an old hand at DIY but being in SA and still having my daytime job, i have not got around to surfing the net too much., love your work.
can i ask a question? what is silver leaf, is it readily available.
i painted a side table with Aluminium paint, the type we used to paint downpipes with years ago. it looks perfect, but gives off. you have to varnish it.??
do you think we will find all the products you used in SA.?
thanks
Absolutely gorgeous !!