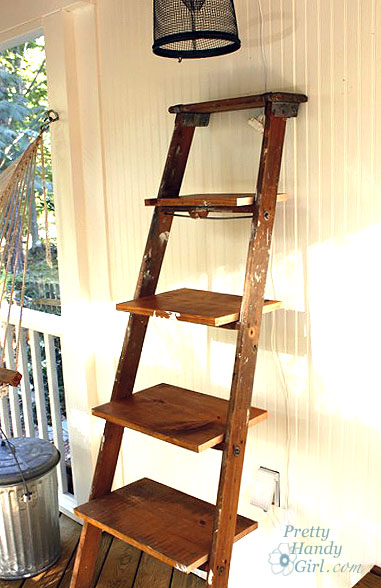
“I know you’ve seen them at Pottery Barn, those adorable book shelves that look like ladders, but they are $299 a unit!When I saw this ladder at the Habitat ReStore for $15 I knew it had the potential to fulfill my ladder shelf dreams.I hauled the old ladder home and transformed it into shelves perfect for my home!
How to Build Ladder Shelves:
Start by measuring the width of each step (and subtract 1/8″ to account for the slant of the ladder.)
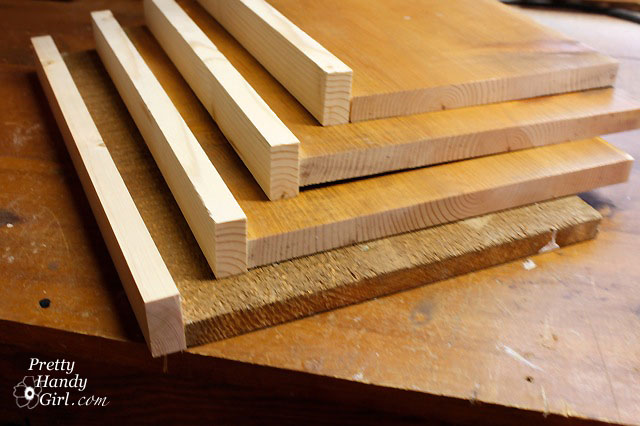
Use 1″x10″ pine boards (or any depth you choose.) Cut them down to size on a miter saw or ask the lumber store to cut them for you.
Dry fit the boards to make sure they fit your ladder.
Next, cut some 1″ x 2″ strips the same width as each shelf. These are for the backs of your shelves. If necessary stain your shelves or paint them to match your ladder
To attach the strips to the back of the shelves, use some Gorilla Glue…
…and then screw or nail the 1″x2″ pieces securely to the shelves.
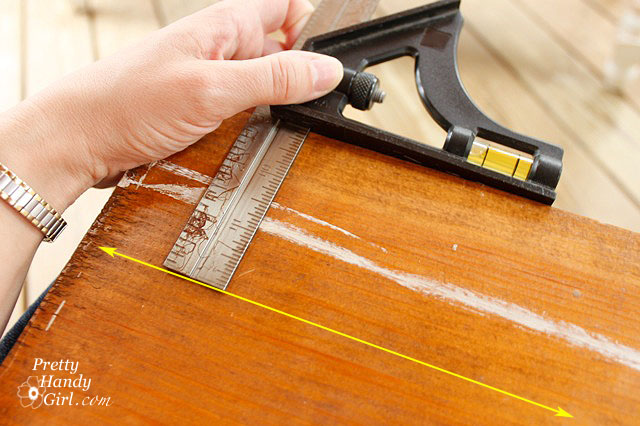
Choose the depth you want your shelves to extend beyond your ladder. Then using a carpenter square or ruler, mark a line on all the shelves. I chose a 3″ overlapping depth.
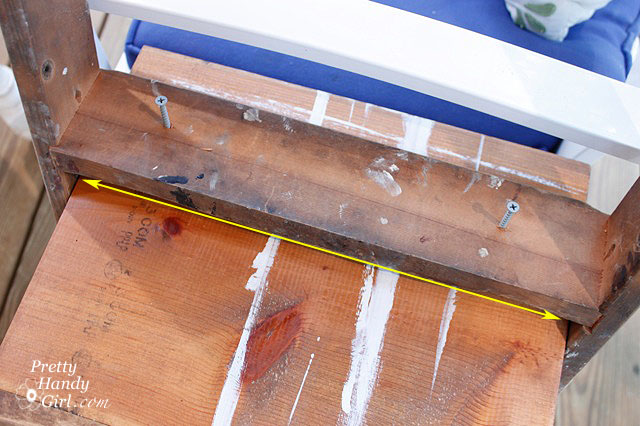
Use a drill to pre-drill three holes per ladder rung.
Turn your ladder upside down and set the screws inside the holes
Line up your pencil lines on the shelf to your ladder step.
Using one hand to support the shelf (or better yet get a helper to hold it), drive the screws into the bottom of each shelf.
Repeat the process for all the shelves. Then flip the ladder back over and admire!
$15 for the ladder and no cost for the materials I had on hand. Much better than $299! And the best part is mine has a rustic charm.
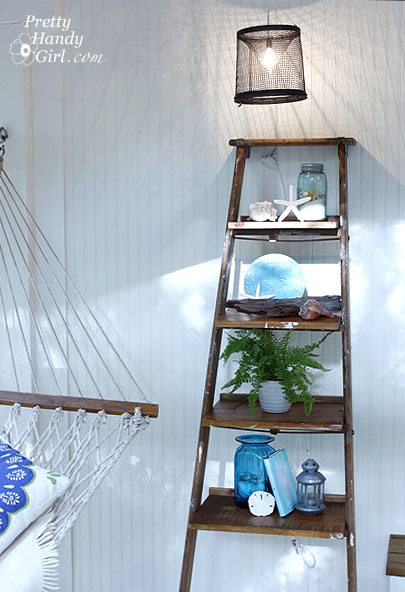
It looks great on my beach inspired screen porch!The minnow trap hanging pendant lights up my treasures on the shelves.Thank you for inviting me over to your blog today, Kate. I look forward to meeting some of your readers! For those of you that don’t know me, I’m Brittany, also known as Pretty Handy Girl.
My blog is my way of helping others to tackle their own projects. I share tutorials, tips and secrets for making your next DIY project easier. Some projects are advanced, but many are for beginners. Stop on by sometime!”
Guest Post: How to Build Ladder Shelves
By Kate Riley • November 27, 2010
.
Today, I have a great tutorial for you from Brittany at Pretty Handy Girl. Brittany wanted the look of the Studio Wall Shelves from Pottery Barn, but didn’t want to spend $299 to achieve it, so she fashioned her own out of a ladder found at Habitat for Humanity Restore.
Brittany is a girl after my own heart, not afraid to wield power tools and use her ingenuity to create exactly what she wants! Please welcome Brittany as she tells how she built her very own ladder shelf unit. Take it away Brittany!
__________________________


__________________________
Thank you Brittany for your informative tutorial! I love ladder shelves because they are a great use of vertical space, in the bathroom, living area, pantry or simply for display, don’t you think? Anyone else out there motivated to build yourself a ladder shelf with Brittany’s instructions?
.


Very cool. And I have to say I like yours better than PB’s!
Thank you for the great idea .. :) can’t wait to transfer my own ladder..
I love it! Is it pretty stable or did you have to attach it to the wall?
I’ve wanted one of these ladders forever. I’d paint mine shabby white, forget the shelves and put it in my bedroom decorated with dried flowers and vintage linens. Thanks for the post, now I have a starting point to search for a ladder :)
Love this idea. I really like the rustic look
They have ones very similar to the PB ones at JCPenny for $79!
JCPenny ladder shelves
Thank you for your compliments on my ladder shelves. To answer Sheila G’s question, I didn’t attach mine to the wall because it is stable enough. But, if you have little ones that might try to pull it down, you can use two “L” brackets to secure it to your wall (be sure to find studs to screw into first.)
Brittany
http://www.prettyhandygirl.com
I knew I saved that old ladder for a reason!
Perfect tutorial……….. I can see these painted black maybe even laquer!
xoxo
Karena
Art by Karena
I actually love this version way more than the inspiration piece. Very cool! I’m bookmarking this post for when I come across the perfect vintage ladder.
I think your ladder is much better, and I love the rustic charm as well. Thanks for the tutorial.
It was so fun seeing my friend Brittany on your blog! I just met her this weekend and we had a blast together. This is a great project and excellent tutorial.
What a brilliant tutorial! I am so bookmarking your blog – what an amazing resource!!
Thank you for a great post and all the inspiration!
x Charlotta
This was awesome! I’ve been on a long time search for an affordable/used ladder but no luck so far. I do have one question. I’m currently building a shelving unit for my bedroom (will hopefully post soon – weee!) but the guy at Home Depot said it’s not recommended to screw wood together and that nailing is preferred because screws can split the wood, and it’s the pressure of the nails that actually keep a tight fit. I noticed Brittany used screws and was wondering if I could take a risk and use screws too because hammering nails in is extremely awkward and taking forever!! Thanks!
My father gave me a electric drill like that but I’ve been scared to use it. You guys inspire me to get with it!! Great DIY!!!
Sweet! Thanks very much. I managed to get an antique round rung ladder from a gent closing out at a Flee market. Perfect for hanging my quilts on.
FOR ABOVE: You go girl! I told my Dad….”I have power tools and I’m not afraid to use them!” He was thrilled I knew how. As you all know…tools are for boys. Not anymore.
Well, that’s pretty darn cool, pretty handy girl! Well done! :)
Sofia,
Thank you for your questions. I won’t get started on the big Orange (I’m a Blue girl myself) but…that is the craziest thing I’ve ever heard. It is true that the screws can split the wood, but that is why you should always pre-drill your holes. And if you think about it, a screw has the extra spiral that extends beyond the shaft of the fastener, giving more resistance and keeping it from pulling out of the wood. Where as a nail doesn’t have much resistance. If I am going to use nails, I almost always will use glue also as an added fastener. I hope that helps.
Brittany
http://www.prettyhandygirl.com
Hi,
I’m a carpenter and just wanted to point out some tips to readers. I would recommend NOT using Gorilla Glue for this project. Not that it doesn’t work (it obviously works), but I would use carpenter’s glue (wood glue) instead. 2 reasons:
1. Gorilla Glue expands when it dries… and if you use too much, its going to be HELL to sand later. Wood glue sands very easily on the other hand. If you do have some monkey glue hanging around (pun intended) and you want to use it, be careful not to use too much. If you accidentally gloop a bunch on, use a wet cloth to wipe the excess off.
2. Your using a nail gun, so you don’t need the strength of monkey glue. Inexpensive wood glue works fine here.
Regards,
Gabriel
you’re*
By the way, I forgot to mention, I love the finished product and this is a great tutorial!
Regards,
Gabriel
Aha! I have been eyeing an old wooden ladder we have in the shed as well as lamenting a lack of shelves, and not wanting to spend $$$$ for the PB ones, this is the perfect solution. Thank you!
I LOVE this shelf! I’m totally honored you think I’d build this because I think it’s BETTER than what I could pull off. :) Incredibly creative! Thanks for linking this up to the Copy Me Challenge, Brittany! Or Kate.. or both! hee!
Donna
http://funkyjunkinteriors.blogspot.com/
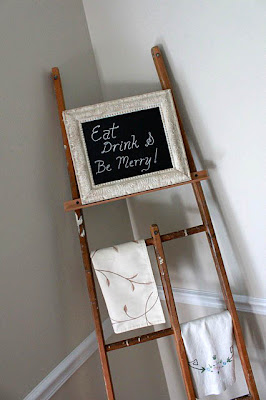
Awesome! I am wondering what you did with the other half of the ladder with the round rungs? It would look great in a bathroom used as a towel rack.
This is fantastic and I like the way it turned out – I linked it to my ladders post too, well done!