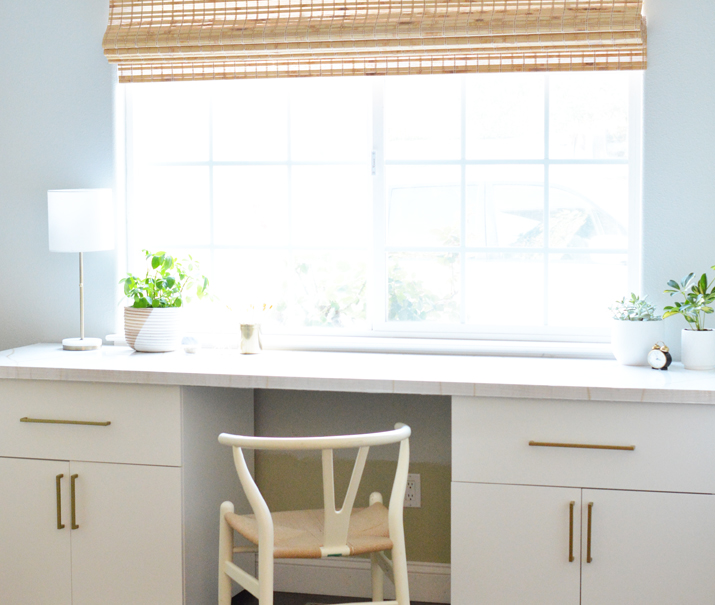
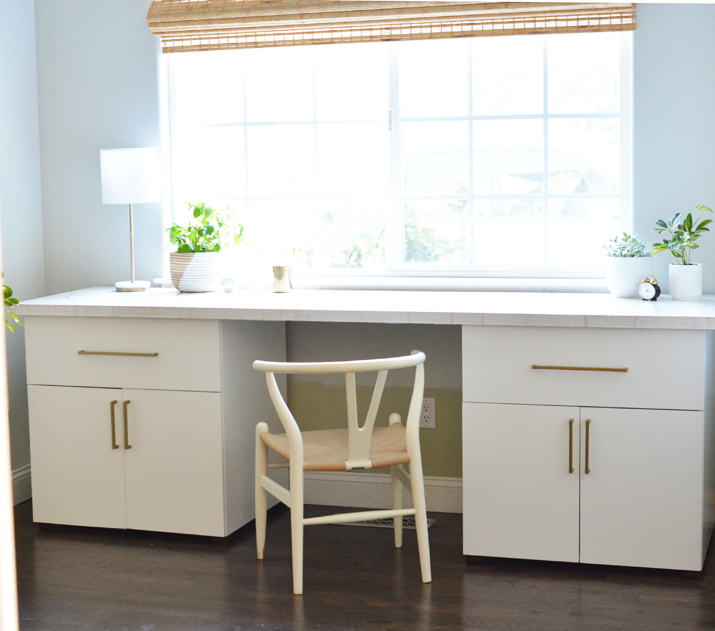
I finally finished that back to school DIY desk project I’ve been working on for a month. I needed a window desk to set up a computer and study space for my teens – my idea was to build a DIY desk using cabinet bases for storage and a custom resin top to provide a long smooth surface.
I featured a bunch of DIY desk project ideas a few weeks ago, and one of my favorite looks is similar, using cabinet bases and a dark wood top, but I wanted a white glossy desktop with a smooth surface so I used resin to create it.
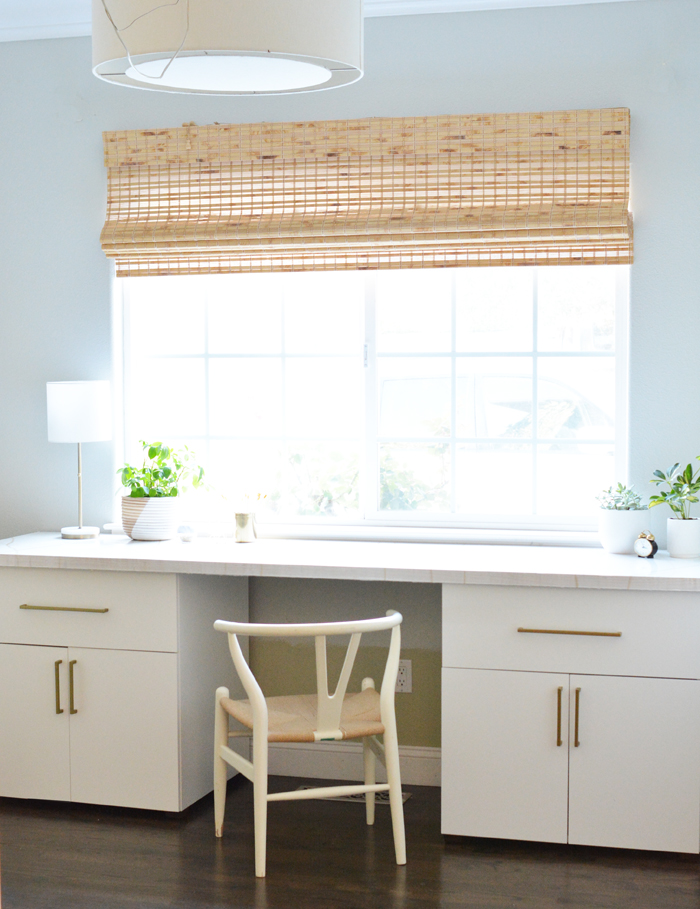
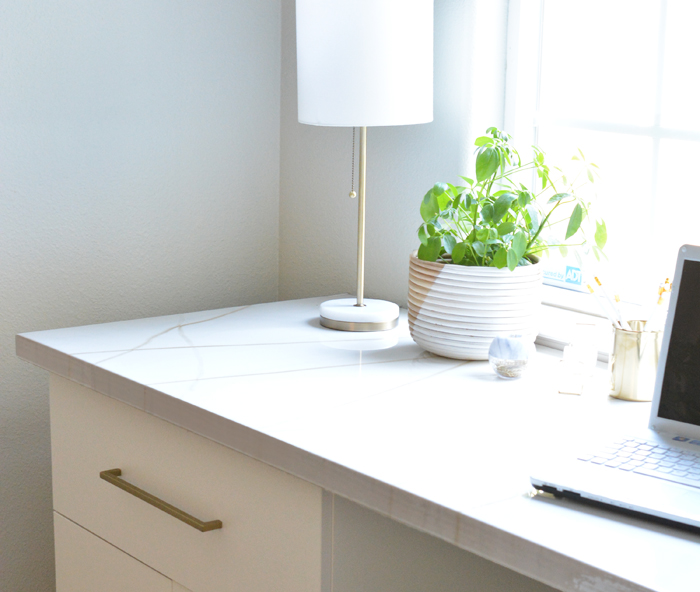
I made this desktop by building the foundation with plywood then pouring a custom white glossy top with epoxy resin, and also added a few abstract gold resin stripes to the surface – I love it so much! I share how I did it below.
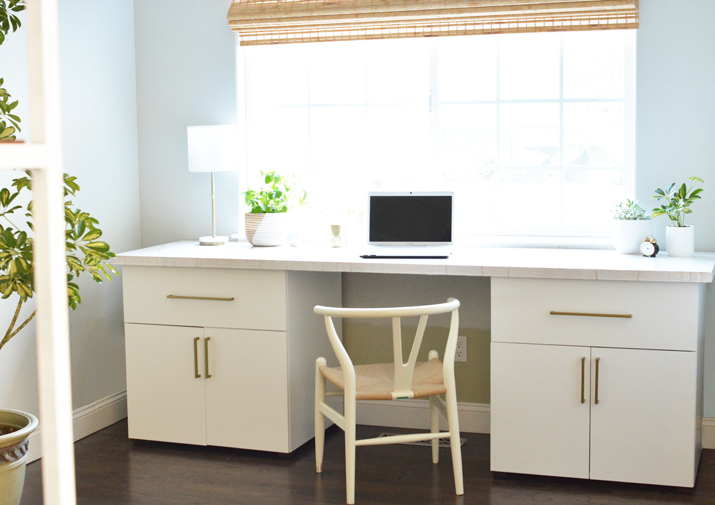
Years ago, this room was used as the kids’ study and it held their games and toys while they were in elementary school, but now that they’re in junior high and high school the need is for a teen study center and lounge with this new computer desk.
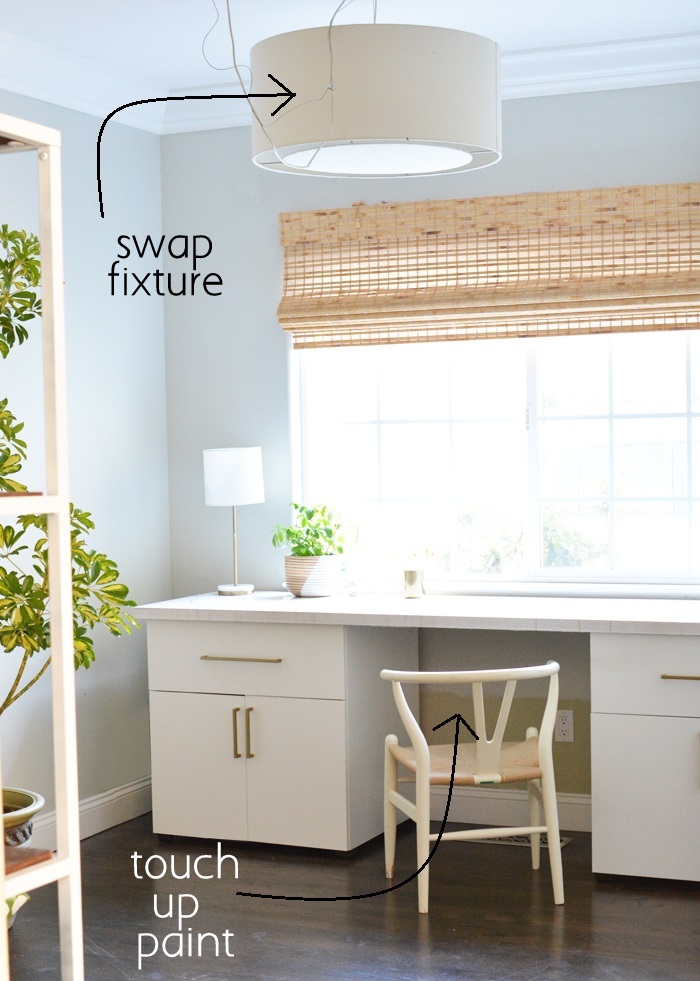
I have a lot more upgrades coming to this room like new light fixtures and furnishings, and I still need to touch up the paint! You can see behind the desk where the DIY window seat used to be in the study – I never finished painting the walls since it was always covered up under there. :)
Here’s how I made the resin top window desk…
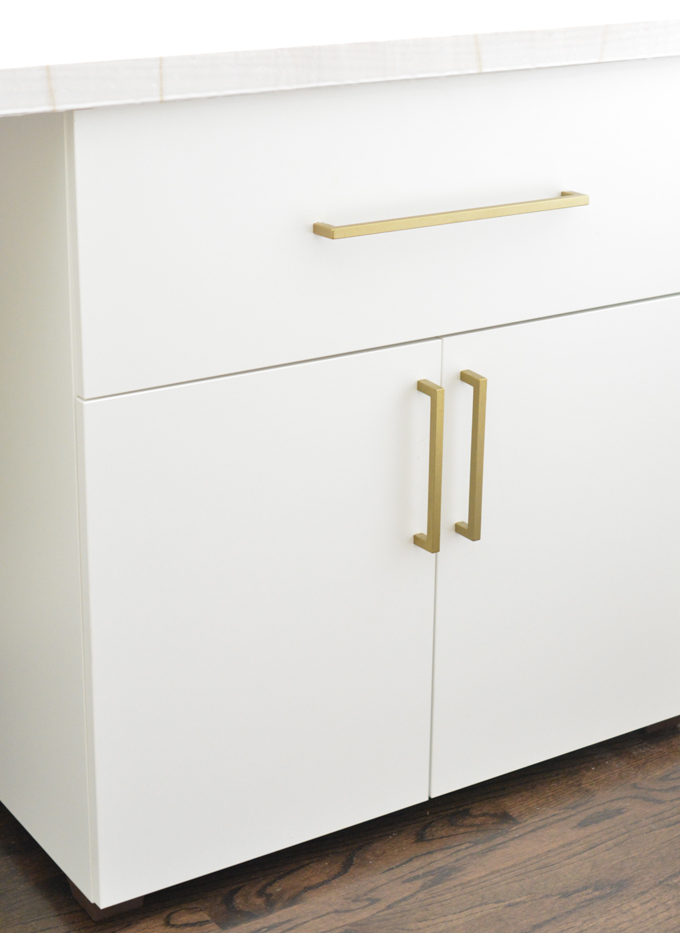
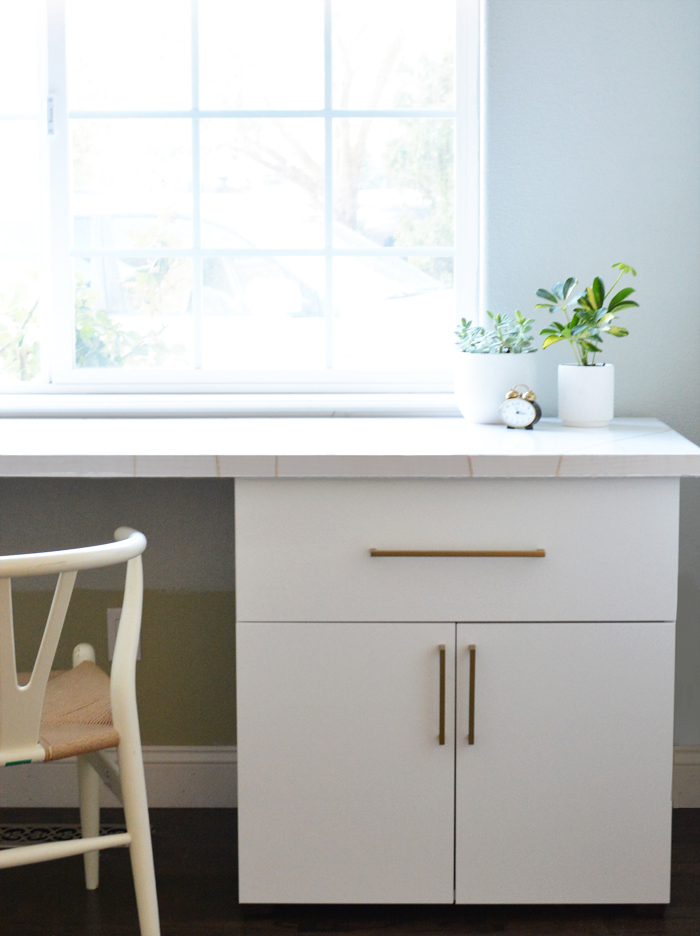
I purchased these IKEA Sektion cabinet bases with the modern Haggeby white doors and drawers, then added these 11” brass pulls to the drawers and these 6” brass pulls to the door fronts.
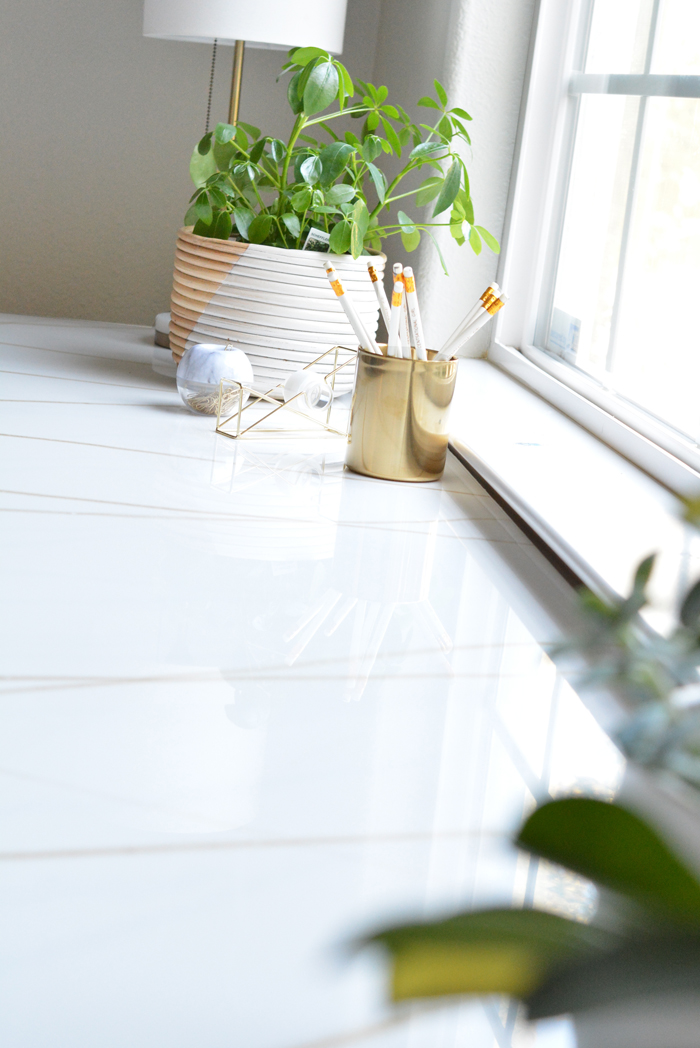
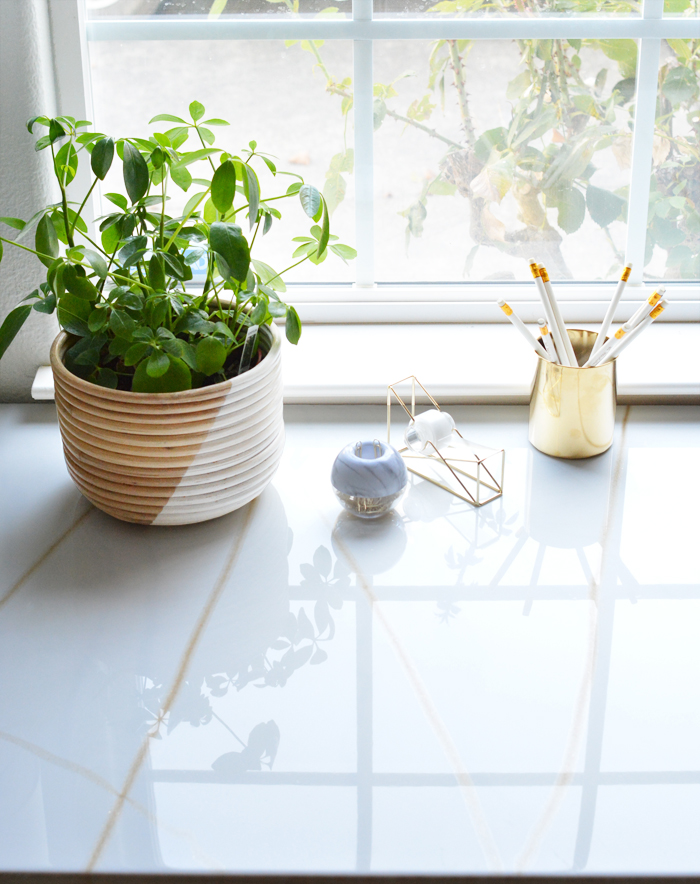
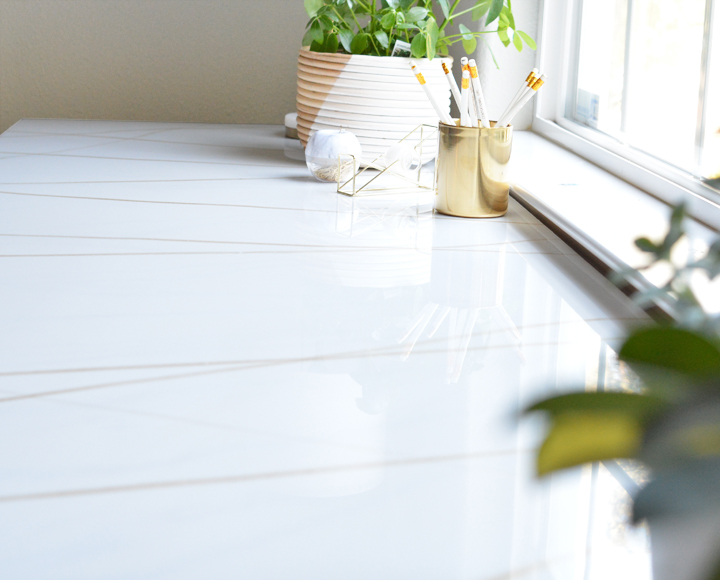
The resin top was the part of this project that took more work but the surface turned out so beautiful – it’s white and glossy and smooth and has skinny abstract gold lines running through it.
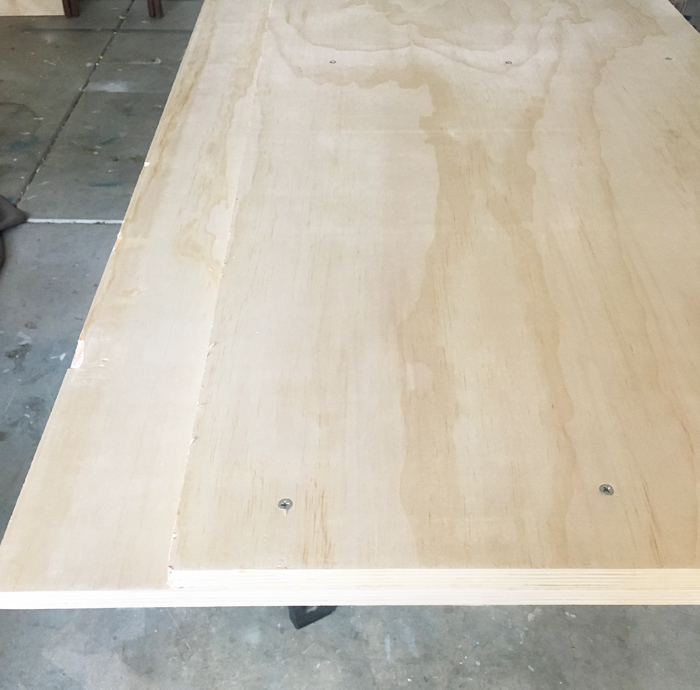
To make the desktop I formed the foundation with a 4’ x 8’ sheet of smooth finish plywood purchase at Lowes. The cabinet bases are 24” deep but I wanted the desktop to be 26” to hang out over the edge of the cabinet base.
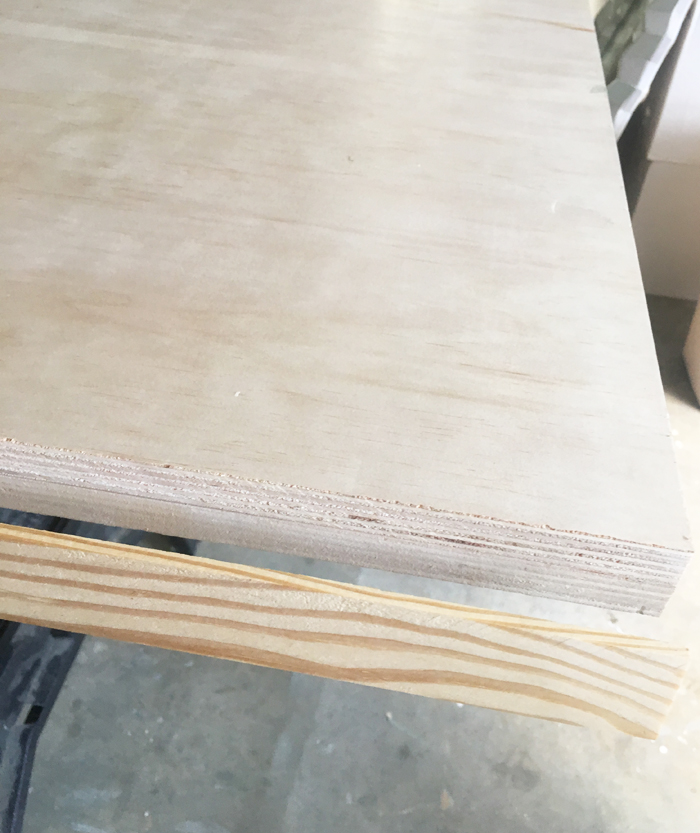
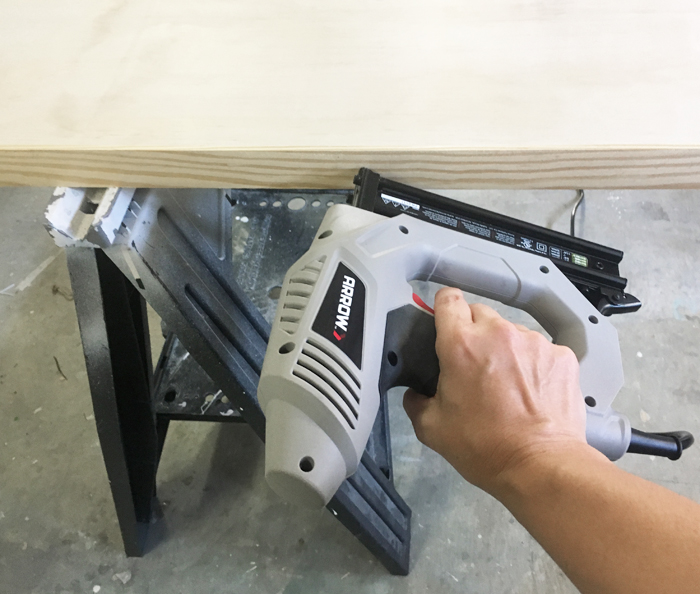
I didn’t want to buy two sheets of plywood so I cheated. I had the plywood ripped in the cutting department to one piece that was 26” x 8’ and the secondary piece is 22” x 8’. Matt helped screw them together with wood screws on the bottom and flipped it over. Then I attached a piece of lattice around the three sides with a brad nailer to hide the 4” gap and finish off the edges.
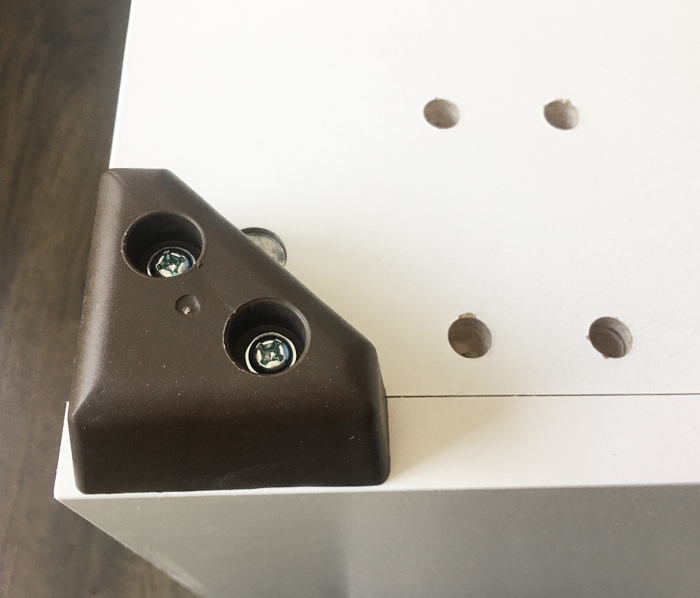
The dark brown furniture triangle feet are fastened to the bottom of the cabinets, I found them on Amazon. I needed something that would lift the cabinet bases off the floor but also keep the bases low enough so the desktop would fit under the windowsill. These are perfect since their dark brown shade blends in with my hardwood floors.
The next step was pouring the epoxy resin desktop. I poured it indoors in place which was essential – to create a perfectly smooth top you don’t want to risk any debris or insects getting in your resin top while it dries, it takes 24 hours to cure to the touch and 72 hours to fully cure, so it’s best to pour the epoxy resin indoors.
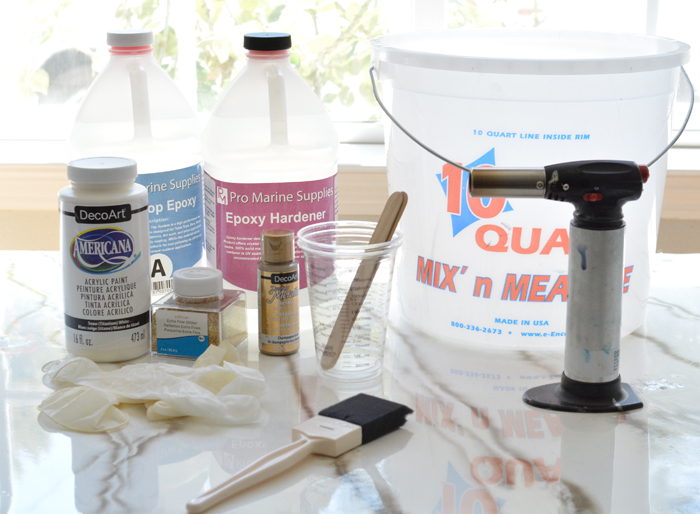
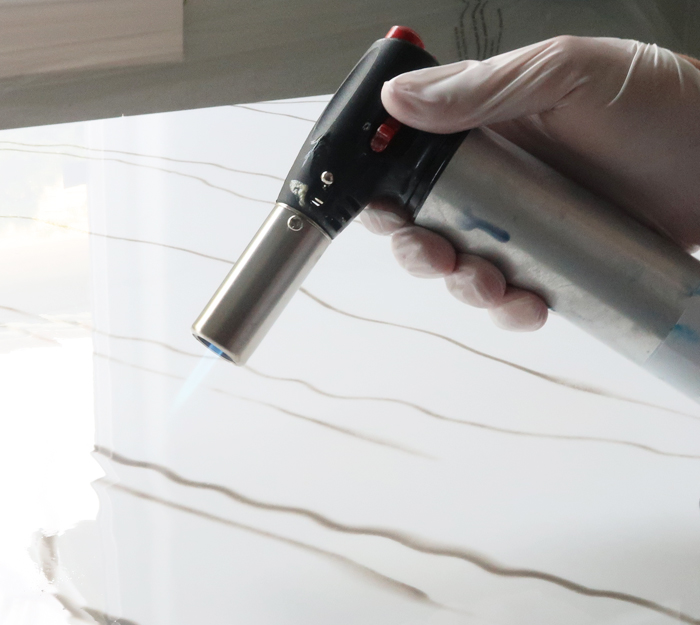
These were my basic supplies, this Countertop Epoxy, two buckets, my culinary butane torch, latex gloves, paint stir sticks, 16 oz. acrylic paint in white and 2 oz. metallic gold, small wood stir sticks, a sponge brush, and lots of plastic tarping!
The online instructions provide all the details, the epoxy resin needs to be mixed a specific way and poured at a certain temperature but it wasn’t too complicated. (If you’re nervous about working with resin for the first time, I’d recommend a smaller scale project to practice with it, like I did with this ocean inspired resin art.)
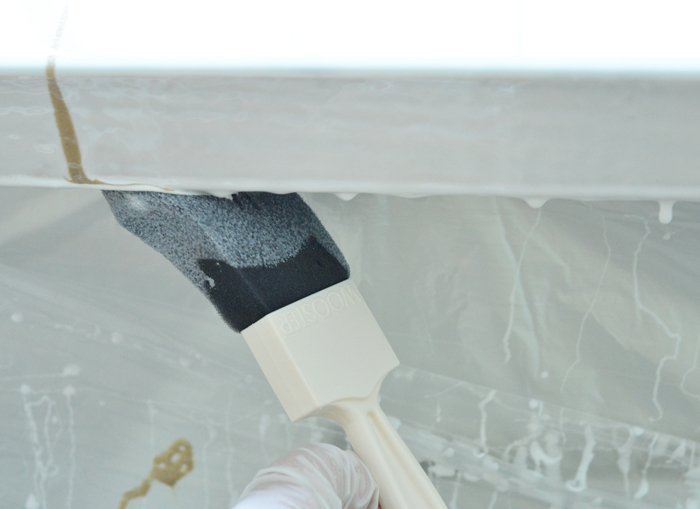
Once I mixed the resin I added the white acrylic paint with 95% of the mixture and kept the remaining resin mixture for creating the stripes.

I wrapped the cabinets and the surrounding space with a ton of plastic tarping then mixed the resin as instructed. Once mixed, the resin is like thick paint so pour it slow and even. I used the sponge brush to spread it out evenly and to wipe the drips as the resin ran over the sides of the desktop.

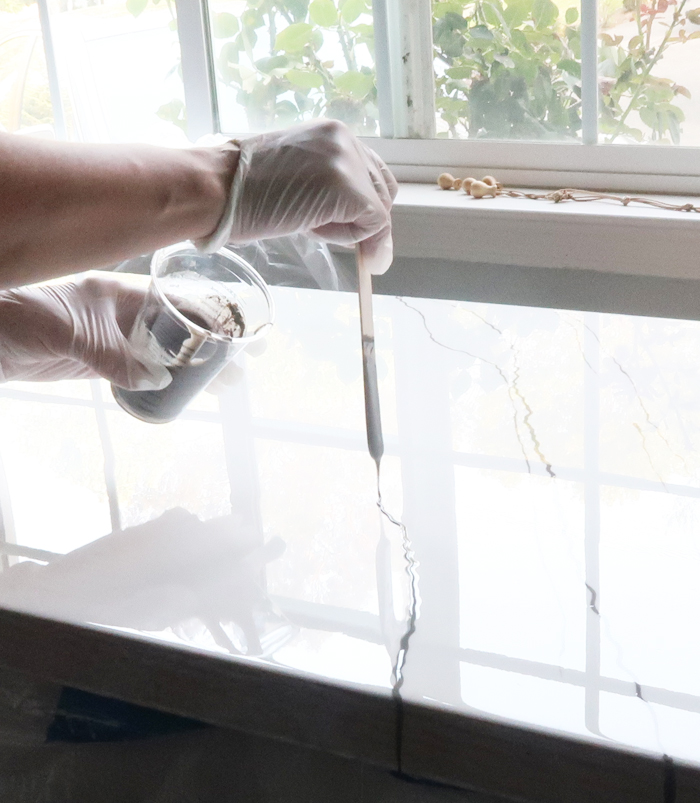
There is a technique I used for creating the stripes, I mixed a tablespoon of acrylic paint with a few ounces of resin and used a wood stir stick to drip it over the white resin base when it was still wet. This is an example of creating the marbleized look which I did on the first pour with taupe acrylic paint mixed with clear resin.
The resin will drip over the sides and you have to keep coming back every 5 minutes over the course of an hour to smooth the drips. You also need to keep a little bit of resin reserved for the edges because as it drips off it will expose the wood edge so just like frosting the sides of a cake, you need to keep applying resin to the sides every 10 minutes for about an hour until it starts to solidify and stay in place.
The butane torch is necessary to get out any of the tiny bubbles that will come to the surface. You can see even the more marbleized design I created with the taupe colored resin on my first pour in this photo.
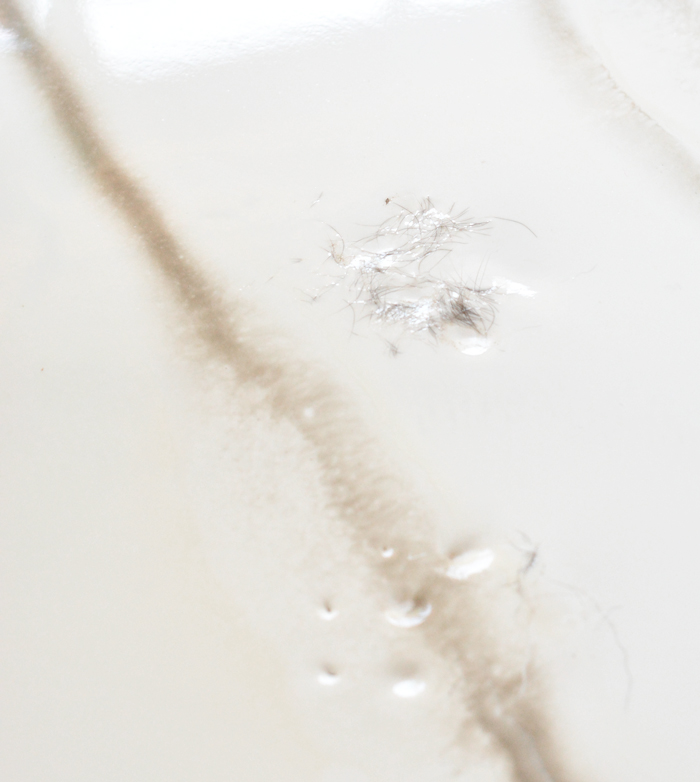
Unfortunately, I had to pour this desktop twice due to a pet disaster! The first time I poured it on a Saturday afternoon, I created a more marbleized look with streaks of taupe paint like you see above, and it worked and it looked pretty good but then dun… dun… dun…. I went out to a show and came back to discover my cat had jumped on top of the resin desktop and got her pawprints and fur all over it. OMG! I forgot about the damn cat!!! This is what I found when I got home….all over the surface.
So I had to order a new batch of resin and completely redo the top. This time I went with a simpler design and different color for the stripes, I chose gold with a tiny bit of glitter mixed in for sparkle. Instead of a marbelized curves I used straighter gold lines to create an abstract pattern, and I like this look a little better.
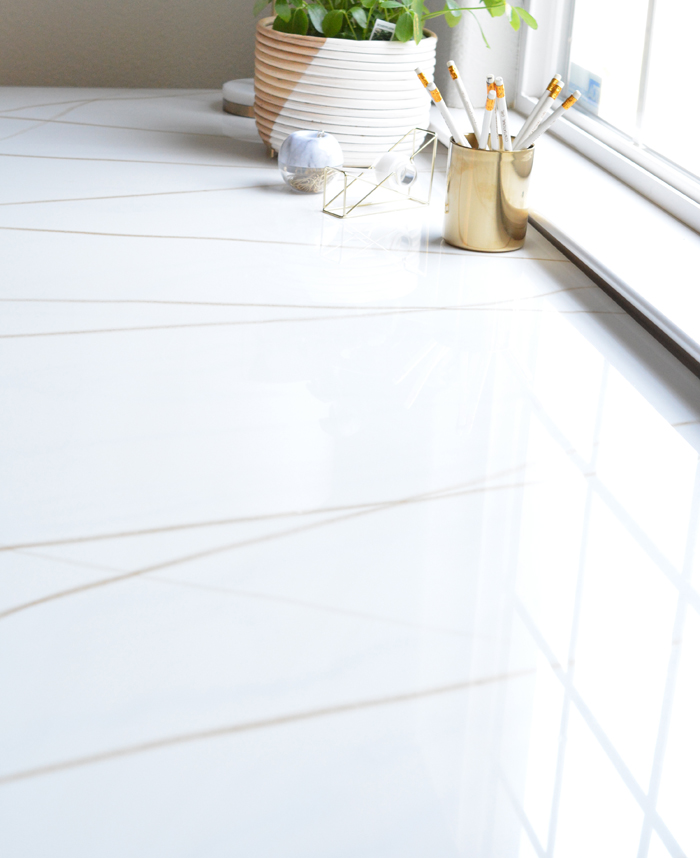
The hardened resin is glossy and smooth and so beautiful under the light of the window, I’m really pleased with how it turned out!
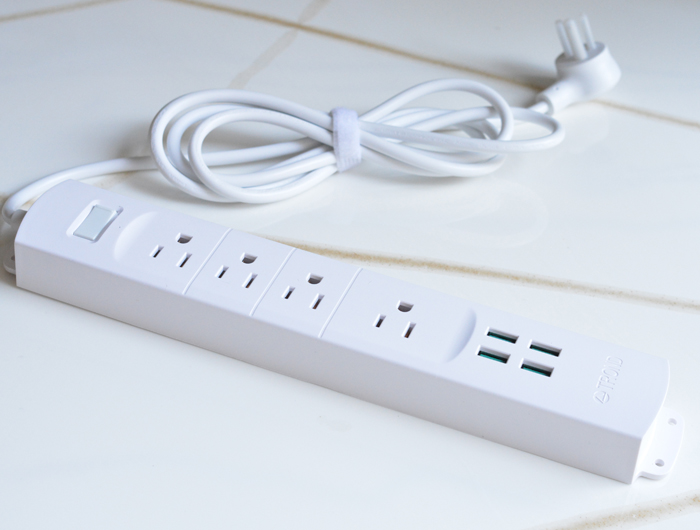
The new computer arrives next week, and I bought this mountable surge protector with USB charger to attach to the left side of the desk to plug in all the cords, plus the kids can charge their school iPads while they do their homework.
My next project is to build a media center with bookshelves for storage the adjacent wall, stay tuned for that project coming soon. :)


Thoughts on if this would work for a dining table? I have a dark wood table I’d love to change to a white glossy top
Yes I think it would. The epoxy resin I used is designed for countertops and tabletops. Look on the website for the amount you need per square foot and consider buying a little bit extra, better to have more than you need. Especially true for the edges of the table since the resin drips and you need to keep coming back and applying resin to the sides as it solidifies over the first hour or two.
I’m so scared to use that resin. How did you fix it? If a disaster like yours can be fixed maybe it’s not so scary.
I just poured a new coat over the top, the new coat filled in the indentations left by my cat!
Wow, that’s awesome! I thought it would be a huge disaster fix.
This is so creative and unique! Love the smooth, glossy finish and the addition of glitter! Beautiful!
Thanks Debbie, I love it too! It’s hard to capture the beauty of it in that spot since it’s under the window and there is a glare on the glossy surface but in person it’s really beautiful.
Do you have a source for the bamboo shade? Thanks!!
Levolor from Lowe’s :)
It’s gorgeous!
I had to reread the paragraph about screwing the two pieces together. Technically you could have just used the one piece of plywood, yes? The top would have been half the thickness so it was a good way to use up the rest of the wood while getting a heftier desktop.
Does your kitty know it used up one of it’s nine lives? ?
This is a project I’m seriously going to try! Thanks for the great tips!
Let me know how it goes Jodi!
Wow! This is such an awesome project. Desktops can be challenging. I have several desks in my house with glass resting on top of wood to provide a smooth writing surface but it’s annoying me how moisture can sneak under there and ruin the wood finish. This is better! ❤️ Beautifully done!!
Thank you Kathleen!
This is really beautiful. I’m so impressed.
I love this! Exactly what I’m looking to replicate except I need a double for a really long wall. What’s the total height? I’ve been hesitant to use cabinets because the desk seems like it would be too high. Is it a comfortable height for your kids? And did you attach the cabinets to the wall or are they free standing? Thanks!
Don’t buy a kitchen cabinet height, buy a 30″ cabient, that’s what I did. The total height is 32″ which is 2″ taller than regular desk height so it’s not too high, it fits my teens, but I am going to add an adjustable desk chair just in case.
Beautiful! How did you get your lines so straight the second time?!
Very carefully! I used very thin drips of paint and steadily applied them slowly in an even consistency from front to back.
This is so fabulous! The CAT!!! Oh my goodness! But, I like the abstract lines better so maybe it was all for the best? ? Will you report back how this wears? Id live to know how it holds up to heavy uses and kids sliding books all over it. We homeschool and we have torn up so many table tops. I think this could be a great treatment for an ikea tulip-style table.
How durable is the epoxy in real life? Will it withstand drippy glasses left on it, and ballpoint pens writing on thin paper? Does it fade in the sunlight? How do you clean it? Would love a re-visit after the desktop has been in use for several months.It sure looks lovely in your photos!
Great idea Ann to test a few substances. It’s too early to tell regarding sunlight or discoloration, but it’s very hard almost like thick plastic so condensation on glasses won’t effect it. I haven’t tried any pen tips on it (don’t want to damage it!) but now you make me want to test it. I’ll report back in a few months.
Love Love Love it Great job, and thanks for sharing
Thanks Tracey.
All I can say is that I’m really impressed. The paint colour and everything else are all conducive to learning. Nice work!
Thanks Ollie.
I’m wondering if it would work to paint the wooden bottom with a design you like and then pour clear resin over the top. Instead of adding the design to the resin itself. What do you think?
Yes you can do that Connie! You can pour clear resin over just about any surface especially wood with a painted design to give it a high gloss finish.
Just curious if you could share the color of paint on the wall- thanks!
That’s Oyster Bay by Glidden, it photographs a little more blue than it is, I had to take pictures after the sun had almost set to reduce the glare.
Dear Kate,
Isn’t this material VERY VERY toxic? Not toxic 10 years from now like cancer but toxic the same day. You could fry the inside of your nose and give yourself a permanent resin headache. You don’t mention using a respirator this time. Or opening the windows.
I worry…just saying.
Take care of yourself.
and it is beautiful
I don’t believe it’s toxic Fay unless you ingested it of course. The website states it’s non-toxic but I believe they’re referring to epoxy in its fully cured state.
Find more information here: https://www.countertopepoxy.com/
Bahahaha! Cats are such a**holes. It turned out gorgeous, Kate!!
Kate, I am trying to save this to Pinterest but I got the message ” Sorry! We blocked this link because it may lead to spam.”
I have done several epoxy pours, but never even thought about putting paint in it. I think it looks great. I will have to try that with different colors.
My favorite project I did with an epoxy top was a shuffleboard table surface. Still using it years later.