I’m not sure it’s readily apparent around here but I have big thing for faux bois. Truth be told I didn’t really know the fancy term for wood lookalike decorative objects until a couple years ago when faux bois starting showing up here and there and all around the design-osphere. I had to recall my long ago lessons from high school French to decipher faux bois meant ‘false wood’.
I’m pretty much obsessed with any decorative object that looks like bark, especially if it’s white, so I thought to myself why not make some faux bois vases for the holidays. For this project, I worked with two products I’ve combined in the past: glass and silicone. Remember these dessert stands? I still have them. I learned with that project that silicone and glass bond really tightly together. For Like Ever. In Hollywood terms, like Paul and Joanne and unlike Kim and Chris.
I used the same combination of products to create these fun ceramic look vases, but this time I used the silicone to create the bark like look. They turned out pretty cool.

To recreate a similar version, you’ll need four things: a glass cylinder vase, DAP household silicone sealant, frosted spray paint; and white spray paint or primer. 
To begin, make sure your glass is free from any debris then free form your bark like design with the silicone. Use a cotton swab to clean up or correct any areas you want to redo. If you’re hesitant to make it up as you go, search for ‘faux bois’ images and you’ll come up with various sources of inspiration. The more imperfect your design, the more natural your “bark” will look in the end, so go for it. Imperfect is what you want.
Some asked why silicone and not hot glue for this project? A tube of silicone with a tip is easier to control, but more importantly, it adheres more permanently to glass. Hot glue will come off glass if pulled at or if it gets wet, but silicone will not. 
Free form your design around the entire vase with the silicone, then allow it to cure for a full 24 hours. That’s the hard part, the waiting, but you must wait for that silicone to fully solidify.
After 24 hours, your vase is ready to be painted. Turn it upside down on a tarp and coat with 2 coats of quick dry frosted spray paint*. Once it’s dry, apply 2-3 light coats of white spray primer or paint. Keep your spray application light to avoid drips and allow to fully dry between coats.

*I’ve tried primer directly on glass before and with some (like Zinsser primer) it works okay, but I’ve found through experiments that a coat of frosted glass spray paint (which is designed specifically for glass) works best as your first layer for greater durability. After a coat of frosted glass spray paint you can choose any spray paint on top of that (brown or white). I chose primer instead of white spray paint only because it has a flat finish, but you could use satin or gloss spray paint and it should work just fine.
That’s all it takes to turn a basic glass cylinder into a faux bois ceramic look vase.

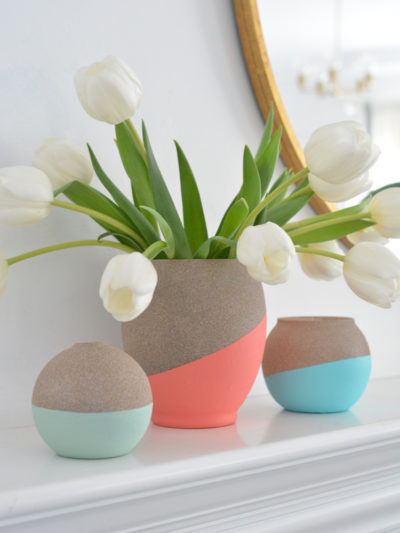
These bark like vases look great with any kind of blooms, from your spring tulips to your summer wildflowers, to branches or evergreens in winter.


Lovely for a mantel or centerpiece in any season!
A couple of extra giveaways are coming up this week, plus a few of my ideas for great gifts, be back soon !
.
,,,

This is an awesome idea – love the outcome! :-)
You have the best ideas! I would never have thought of doing this, and it looks great.
these are awesome!!!! i need to make some- so me!
I love the look of this! And I had never heard that term. Learn something new every day…
~Stop Me if You’ve Heard This One
Lovely!! You have some of the best original tutorials. :) Your mantel looks fantastic.
I am crazy about this idea!! I love the look of bark (almost) anything!!!
I love these! What a great idea!
Debbie
Well, these are lovely. LOVE.
xoxo
shaunna
umm..you are amazing…thank you so much for the inspiration.I am so doing this…NOW..I cant wait!!!
I also have a thing for faux bois. Thanks for the diy, it will breath new life to some old vases that where bound for the thrift store. But do it free hand!… I’m not as confident and talented as you, so I plan to “cheat” : I’ll place the faux bois inspiration image you suggested inside the vase to guide me. I hope they’ll turn out as nice as yours.
LOVE this! So simple, but so versatile with such an impact, it’s now on my DIY list!
Cathy
These looks awesome and I even like them without the paint!
Interesting idea – but why use silicone? Wouldn’t hot glue have worked just as well with much less waiting time?
HI Laree, great question, yes hot glue will work okay, but it can be pulled off of glass, especially if it gets wet, whereas silicone will stay put!
Kate
Cute and easy with big impact. I already have a few of the materials lying around.
Wow! Such a clever idea! You always have such great ideas to share Kate!
Love the faux bois vases, Kate! So pretty and for very little money and effort. :)
Great idea, and perfect for winter!
Love it! This is going on my Christmas gift ideas list. Thanks for the idea!
Love this!!! I wonder what they would look like with a brown gel stain rubbed over them or blackish brown to give them a birch bark or aspen look? Maybe a different pattern for that!!! Or a hot pink gel stain, etc for a ultra modern look.
Very cool! Do you have a trick for getting the silicone out in a nice smooth line? I have a really hard time squeezing it out of the tube, usually ends up coming out in globs.
Hey Sheila, I just used constant pressure to keep it in a smooth line, but you can use Q-tips to clean up any globs or strangeness that occurs, it wipes away easity!
Kate
All of the woodwork in our living room and lower/upper hall has been faux bois’d. Although it’s actually the colour of wood (it’s attempting to be quarter sawn oak, actually). Oooh the things that were all the rage in Victorian times…
Kate! These are awesome! I’ll have to try this one myself! I really like the Christmas display with them. Thanks for the frosted glass tip!
Really looks great. This could create a faux bois holiday revolution. Ornaments, candles, wrapping paper. You’re centsational! Jo @ Let’s Face the Music
Wow! Very crafty.
Cute and simple! Thanks for sharing =)
You are a genius. I love these and can’t wait to try this myself. Thanks for sharing.
They look great!
Frosted spray as a glass primer is a wonderful idea. Thank you so much for sharing that and the adhesive to make designs with. I’m thinking these two bits of knowledge, could be used in so many ways.
OMG those are gorgeous!!! Great project! Thanks for sharing. :)
Very pretty. They actually look kinda cool before spray painting too.
I absolutely love these vases! They are so cute and perfect for Christmas decor…
I love this so much. I am headed out today to get my glass vases.
I love these and think I can actually do this. Love the white. I think you can do anything well.
a brilliant diy!!!
Love this! I’m obsessed with anything faux bois so I of course love these!
Fantastic!! I’m totally doing this as I was just looking at glass vases I have last night thinking “These are so boring.” Love this!
Truly nifty…but what I like best are the possibilities…any design could turn a glass jat with a lid into a one-of-a kind piece of “pottery” – how neat is that? Thanks ever so much for your inspiration today (and all the other days, too!).
Oooh this is such a neat idea! Thanks so much for sharing! :)
P.S. consider this pinned!
http://pinterest.com/pin/141581982005070857/
Thanks for sharing this awesome idea. You are brilliant!…And thanks, also, for explaining what “faux bois” means. Maybe it’s a French term I’ll remember!:)
Awesome, easy, done and done!
I even love the look unpainted!
I also loved that unpainted look! I was thinking (scary, I know) that if you put the silicone on and frost the glass, then pull the silicone off, that it would look great too — like an inverse of your unpainted look — for us Midwesterners who don’t have a lot of white in our houses!
SUCH a great idea, Kate! LOVE IT! :-D
Already started mine! Great idea and thanks for sharing!
OH MY you have got to be kidding me….I just read this post 2x and was like “did she just make these with glue & spray !”? BRILLIANT girl!
What a great project! I’m going digging in the garage tomorrow. I have all of the stuff just need to find it (we moved after 19 years in our old house) so, haven’t found everything yet. I have to get to it. Blessings
Love this idea! I don’t know how in the world you come up with this stuff.
Love it!! I really love the texture it creates!
Shannon
I love these they are so pretty!!! Great Job
These are fabulous! I am featuring them at somedaycrafts.blogspot.com
This is awesome!!!
OMG! AWESOME project. This is a must do! Love them with the glittered deer!
Great seasonal craft. Absolutely Centsational again! Well done Kate!
YES YES YES! Love it. I am impressed with your faux bois skills. I wanted to do some art freehand and got frustrated trying to figure out a pattern that looked natural. Your vases look like something straight from West Elm.
xoxo,
Jen
I love this DIY! It’s so simple and yet has so much impact. Thanks for the continuous inspiration.
This is one of those, “Why didn’t I think of that?” moments. So perfect, and easy to alter for different times of the year! Love, love, love! Thanks for the inspiration!
So darling. What an easy and gorgeous transformation. Thanks for sharing.
Fabulous and absolutely beautiful! Very creative. Kudos!
Instead of free handing the bark you could just print out a bark print picture, stick it in the glass vase and trace over it with the silicone.
Wow! Would have never thought to do this. Is there a LOVE button? :)
They look great! I sort of dig faux bois.